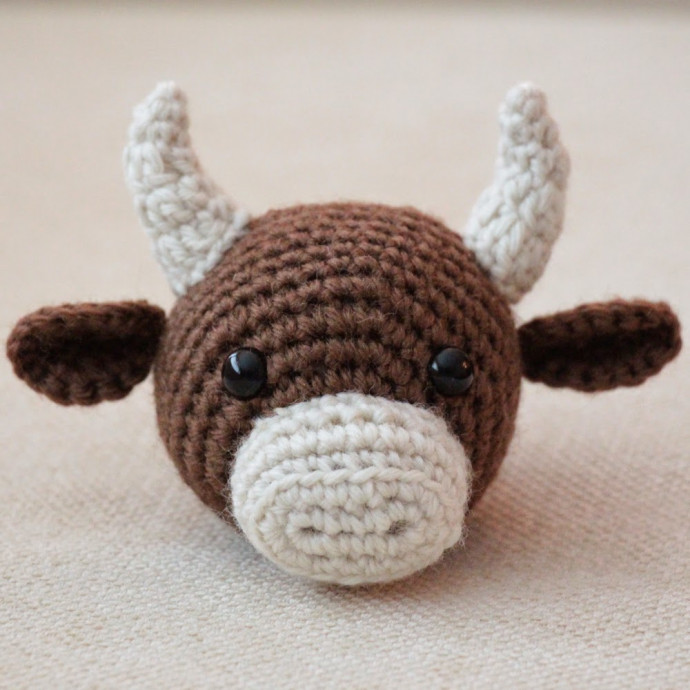
How to Crochet a Cute OX Toy

Crocheting a beautiful OX toy is not only a fun and creative project but also a fantastic way to give a personal touch to your crafts. You can play around with different yarn colors to make your OX toy unique and eye-catching, adding a touch of whimsy to your collection. With just a few basic crochet stitches, you can bring this adorable creature to life, perfect for cuddling or displaying in your home. Whether you're a crochet enthusiast or a beginner looking for a new hobby, creating a beautiful OX toy is sure to bring you joy and satisfaction. Let your imagination run wild and enjoy the process of crafting something special with your own hands!
You Will Need:
- brown yarn
- cream/beige yarn in worsted weight
- stuffing (polyfill or wool)
- safety eyes
- crochet hook (I love using the size A to get a tight fabric but any hook up to size G will work. You will just get a much bigger animal!)
- tapestry needle
Key:
- Ch = chain
- INC = 2 sc into one stitch
- #INC = do # increases in a row
- DEC = invisible decrease turns the next 2 sts into one st
- # or sc# = separate sc stitches (no increasing or decreasing)
- hdc = half double crochet (yarn over, insert hook, pull up a stitch, yarn over and pull thru all stitches on hook)
- dc = double crochet (yarn over, insert hook, pull up a stitch, yarn over, pull thru two stitches on hook, yarn over, pull thru remaining stitches)
Begin Here:
Work in continuous rounds. Don't join rounds for this section.
Rounds Instructions:
R1: With brown yarn, do a magic circle with 6 stitches into the loop.
R2: INC around. (12)
R3: (1, INC) around (18)
R4: 1, INC, 2, INC, 3, INC, 2, INC, 3, INC, 2 (23)
R5: INC, 4, INC, 3, INC, 4, INC, 3, INC, 4 (28)
R6: 3, INC, 6, INC, 6, INC, 6, INC, 3 (32)
R7: 5, INC, 9, INC, 9, INC, 6 (35)
R8: 3, INC, 10, INC, 11, INC, 8 (38)
R9: 12, INC, 25 (39)
R10: INC, 38 (40)
R11: sc around inserting eyes between R6/7 six sts apart
R12: 38, DEC (39)
R13: 25, DEC, 12 (38)
R14: 8, DEC, 11, DEC, 10, DEC, 3 (35)
R15: 6, DEC, 9, DEC, 9, DEC, 5 (32)
R16: 3, DEC, 6, DEC, 6, DEC, 6, DEC, 3 (fill with stuffing leaving some room at the top) (28)
R17: 4, DEC, 3, DEC, 4, DEC, 3, DEC, 4, DEC (23)
R18: 2, DEC, 3, DEC, 2, DEC, 3, DEC, 2, DEC, 1 (18)
R19: (DEC, 1) repeat around (12)
R20: (DEC, 1) repeat around. Fasten off. Weave loose end through each stitch in the opening. Fill completely with stuffing. Pull tightly to close. Sew in your ends.
Muzzle (Using Cream Coloured Yarn):
You will be joining the rounds for the muzzle.
Ch 5. 3sc in 2nd ch from hook, sc2 across the chain, 5 sc in the last chain.
Turn work and work back across with sc2 and INC in the last chain. Sl st to first sc. (14)
Ch 1, INC in same stitch as hook, INC in next st, sc 4, INC in next st, 3 sc in next st, INC in next st, sc4, INC in last stitch. Join to first sc. (22)
Ch 1, sc in back loops around. Join with a sl st.
Ch 1, sc around. Join with a sl st. Finish off. Leave tail for sewing. Notice how your work has two little holes that look like nostrils? Place some scrap brown yarn inside the muzzle so the “nostrils” are dark (see picture below). Place some stuffing inside to hold the yarn and then place onto the head centered between the eyes and over initial rounds of the head. Stitch into place using a whipstitch and right before closing off, stuff completely. Finish off.

