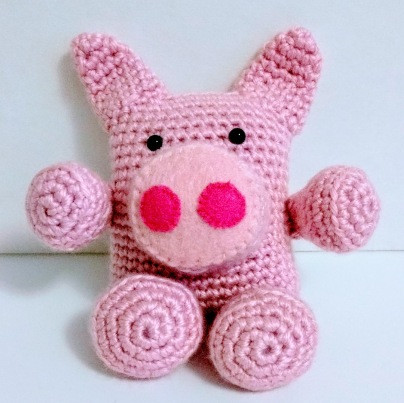
Create Your Adorable Crochet Boxy Pig: A Fun and Engaging Project

The Crochet Boxy Pig is an adorable and fun project to work on for any crochet enthusiast. With its cute and compact design, this little piggy is sure to bring joy to both the maker and anyone who sees it. The boxy shape gives it a modern twist, making it a unique addition to your collection of crocheted creations.
Whether you're a beginner looking for a charming project or an experienced crocheter wanting a quick and enjoyable piece to crochet, the Crochet Boxy Pig is a delightful choice that will surely put a smile on your face. So grab your yarn and hook, and let's create a lovable little pig friend together!Stitches Used
Stitches used (American terminology used)
If you are unfamiliar with any of these stitches, I recommend searching for and watching one of the numerous instructional YouTube videos available.
- MR = magic ring
- ch = chain stitch
- sc = single crochet
- inc = increase
- dec = decrease
- Sl = slip stitch
Materials Needed
- Worsted weight yarn in pink
- Pink felt (different shade than the yarn)
- F crochet hook
- B crochet hook
- Pink thread
- Either pink embroidery floss and yarn needle or craft glue
- 2 – 6mm black safety eyes
- Scissors
Head/Body
Working from the bottom of the head/body up using pink yarn.
ch 17. This is your foundation chain.
R1: sc in 2nd chain from hook and in the next 15 ch stitches, 2 sc in the last ch.
Turn. You will continue with 14 sc along the backside of your foundation chain and 2 sc in the next ch. (35)
You now have a long oval. From here you will crochet in the round.
R2 – 21: sc 35 (35)
Sl to finish off. Leave a long tail for later for sewing the top shut (at least 12 in.).
Place the eyes between rows 16 and 17 centered on what will be the front leaving 5 sc between them.
Stuff the head/body and sew top closed.
Snout
R1: MR 6 (6)
R2: inc x 6 (12)
R3: [1 sc, inc] x 6 (18)
R4: [2 sc, inc] x 6 (24)
R5: [3 sc, inc] x 6 (30)
R6: [3 sc, dec] x 6 working in back loops only (24)
R7-8: 24 sc (24)
Sl to finish off. Leave a long tail for attaching to head/body. Position snout below the eyes. Sew it in place stuffing as you go.
From one shade of pink felt, cut a circle the same diameter as your crocheted and stuffed snout. Then cut two smaller circles from the other shade of pink felt to be the nostrils. Using pink embroidery floss, stitch the nostrils onto the larger circle of felt, then stitch the circle in place covering the front of the snout (see images).
Ears (Make 2)
R1: MR 4 (4)
R2: [1 sc, inc] x 2 (6)
R3: [1 sc, inc] x 3 (9)
R4: 9 sc (9)
R5: [2 sc, inc] x 3 (12)
R6: 12 sc (12)
R7: [3 sc, inc] x 3 (15)
R8: 15 sc (15)
Sl to finish off. Leave a long tail for attaching to head/body.
Sew over the top corners of the head/body.
Legs (Make 2)
R1: MR 6 (6)
R2: inc x 6 (12)
R3: [1 sc, inc] x 6 (18)
R4: [2 sc, inc] x 6 (24)
R5: 24 sc working in back loops only (24)
R6: [2 sc, dec] x 6 (18)
R7: [1 sc, dec] x 6 (12)
R8-9: 12 sc (12)
Stuff
R10: dec x 6 (6)
R11: dec x 2 (4)
Sl to finish off
Cut yarn leaving a tail to sew the end closed and to attach to the head/body.
Sew end closed creating a flat straight edge. Sew this straight edge horizontally to R1 of the front side of the head/body.
Arms (Make 2)
R1: MR 6 (6)
R2: inc x 6 (12)
R3: [1 sc, inc] x 6 (18)
R4: 18 sc working in back loops only (18)
R5: 18 sc (18)
R6: [1 sc, dec] x 6 (12)
R7: 12 sc (12)
R8: [1 sc, dec] x 4 (8)
Stuff
R9-10: 8 sc (8)
Sl to finish off
Cut yarn leaving a tail to sew the end closed and to attach to the head/body.
Sew end closed creating a flat straight edge. Sew this straight edge horizontally. Then attach to side of the head/body.
Tail
Using pink embroidery floss and a B hook
ch 16, starting in 2nd ch from hook sc 14, sl in the last ch leaving a tail to sew to back of body using embroidery or small yarn needle. The tail should be curly.
