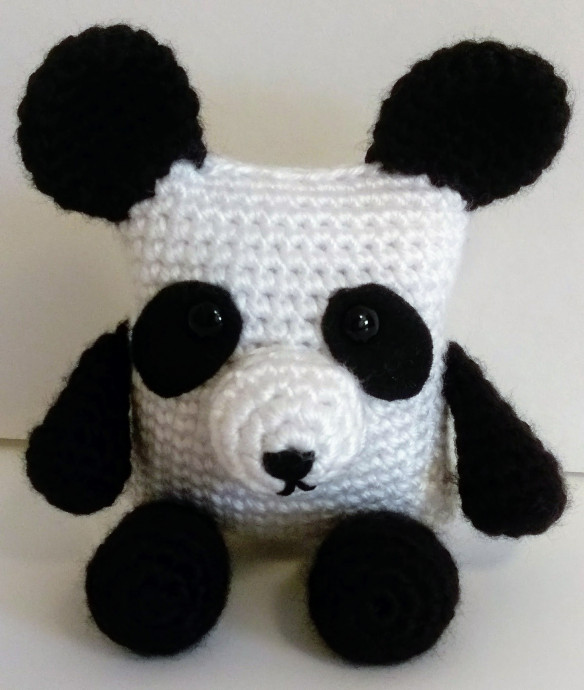
Create Your Own Adorable Crochet Boxy Panda - A Step-by-Step Guide for All Skill Levels

The Crochet Boxy Panda is an adorable and charming amigurumi project that brings a smile to anyone's face! With its cute design and boxy shape, this little panda is perfect for both beginners and experienced crocheters looking for a fun and quick project. The black and white yarn used for the panda's body adds a classic touch, while the details like its round eyes and fluffy ears give it a playful personality.
Crocheting this Boxy Panda allows you to unleash your creativity and make a cute companion that can brighten up any room or be a thoughtful handmade gift for a loved one. Get ready to cuddle up with this lovable crochet creation and enjoy the relaxing and rewarding process of bringing this sweet panda to life stitch by stitch!Stitches Used
If you are unfamiliar with any of these stitches:
- MR = magic ring
- ch = chain stitch
- sc = single crochet
- inc = increase
- dec = decrease
- Sl = slip stitch
Materials Needed
- Worsted weight yarn in white and black
- Black felt
- F crochet hook
- Black embroidery floss and yarn needle or craft glue
- RND 1: 2 – 9mm or 10mm black safety eyes
- Scissors
Head/Body
Working from the bottom of the head up using white yarn:
ch 17. This is your foundation chain.
R1: sc in 2nd chain from hook and in the next 15 ch stitches, 2 sc in the last ch. Turn. You will continue with 14 sc along the backside of your foundation chain and 2 sc in the last ch. (34)
You now have a long oval. From here you will crochet in the round.
R2 – 21: sc 34 (34)
Sl to finish off. Leave a long tail for later to sewing top shut (at least 12 in.). Place the eyes and stuff the head/body when instructed below.
Cut out 2 ovals from the black felt (see template) and cut a tiny slit in each one through which to insert the safety eyes. With the eyes through the felt ovals insert them between R14 & R15 (remember to count up from the bottom) leaving 5 spaces between them and centering them on what will be the front of your panda. Either use the embroidery floss and yarn needle or use craft glue to affix the black felt ovals to the face.
Muzzle
Using white yarn:
R1: MR 6 (6)
R2: inc x 6 (12)
R3: [1 sc, inc] x 6 (18)
R4: 18 sc (18)
R5: [1 sc, dec] x 6 (12)
Sl to finish off. Leave a long tail for attaching to the head/body.
Before attaching, use black embroidery floss to stitch the nose and mouth onto the muzzle.
Sew muzzle to face stuffing as you go.
Then stuff the head/body and sew top closed.
Ears (Make 2)
Using black yarn:
R1: MR 6 (6 sc)
R2: inc x 6 (12 sc)
R3: [inc, 1 sc] x 6 (18 sc)
R4-6: sc around (I felt my ears were a little too long after I sewed them on, so you may want to only do 2 rows of sc instead of 3) (18 sc)
R7: [1 sc, sc2tog] repeat around (12 sc)
R8: 12 sc (12)
Sl to finish off. Leave a long tail for attaching to the head/body.
Do not sew the opening closed. Open up the bottom of each ear enough to place each over the top corners of the head/body (see pictures for positioning) and sew in place.
Legs (Make 2)
Using black yarn:
R1: MR 6 (6)
R2: inc x 6 (12)
R3: [1 sc, inc] x 6 (18)
R4: 18 sc working in back loops only (18)
R5: [1 sc, dec] x 6 (12)
R6-11: 12 sc (12)
Stuff
R12: dec x 6 (6)
R13: dec x 2 (4)
Sl to finish off
Cut yarn leaving a tail to sew the end closed and to attach to the head/body.
Sew end closed creating a flat straight edge. Sew this straight edge horizontally to R1 of the front side of the head/body.
Arms (Make 2)
Using black yarn:
R1: MR 6 (6)
R2: [1 sc, inc] x 6 (12)
R3: 12 sc (12)
R4: 12 sc in back loops only (12)
R5: 12 sc (12)
R6: [1 sc, dec] x 4 (8)
R7-8: 8 sc (8)
Stuff
R9-10: 8 sc (8)
Sl to finish off
Cut yarn leaving a tail to sew the end closed and to attach to the head/body.
Sew end closed creating a flat straight edge. Sew this straight edge horizontally to R1 of each side of the head/body.
Tail
Using black yarn:
R1: MR 4 (4)
R2: inc x 4 (8)
R3: [1 sc, inc] x 4 (12)
R4: 12 sc (12)
R5: [1 sc, dec] x 4 (8)
Sl to finish off leaving enough yarn to sew to head/body.
Stuff lightly and attach.
