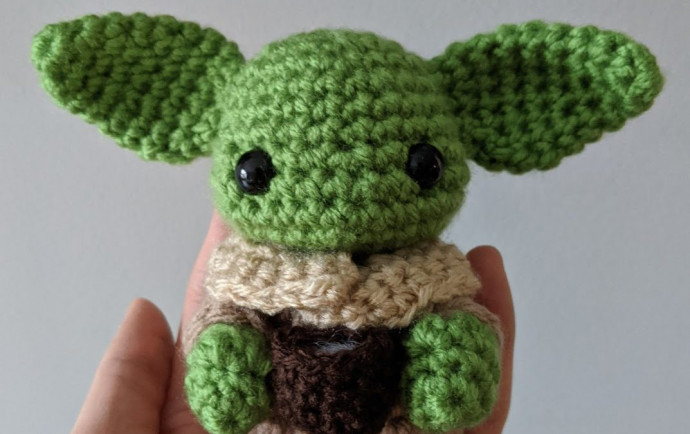
Crochet Baby Yoda Amigurumi

Crocheting a Baby Yoda Amigurumi can be such a delightful and heartwarming project! The adorable green creature's iconic big ears and wise eyes make for a charming addition to any nursery or a wonderful handmade gift. Whether you're an experienced crocheter or a beginner looking for a fun challenge, creating your very own Baby Yoda Amigurumi can bring a sense of joy and accomplishment. With each stitch, you'll be one step closer to making a cuddly companion that captures the essence of this beloved Star Wars character. Get ready to immerse yourself in a world of creativity and cuteness as you embark on this magical crocheting journey!
MATERIALS
Yarns – green (G), brown (B), light brown (L), dark brown (D)
white felt
white glue
polyester fibrefill
10.0 mm safety eyes
size 8 (5.0 mm) crochet hook
ABBREVIATIONS
ch = chain
st = stitch
sc = single crochet
sl st = slip stitch
inc = single crochet 2 into the same stitch
dec = decrease over next two stitches (single crochet 2 stitches together or use invisible decrease)
[bean st] = insert hook into st, yarn over and draw a loop through, yarn over, insert hook into st and draw a loop through, yarn over, draw yarn through 4 loops
HEAD
R1: With G, sc 6 in magic ring (6)
R2: inc in each st around (12)
R3: (sc 1, inc) six times (18)
R4: (sc 2, inc) six times (24)
R5-7: sc in each st around (24)
R8: (sc 3, inc) six times (30)
R9-10: sc in each st around (30)
R11: (sc 3, dec) six times (24)
R12: (sc 2, dec) six times (18)
R13: (sc 1, dec) six times (12)
Finish with a sl st. Cut a long tail for sewing. Insert safety eyes 8 rows from top of the head.
EAR (Make 2)
R1: With G, sc 6 in magic ring (6)
R2: (sc 1, inc) three times (9)
R3: sc in each st around (9)
R4: (sc 2, inc) three times (12)
R5: sc in each st around (12)
R6: sc 5, inc, inc, sc 5 (14)
R7: sc 5, dec, dec, sc 5 (12)
R8: sc 4, dec, dec, sc 4 (10)
Finish with a sl st. Leave long tail for sewing.
HEAD ASSEMBLY
Sew EARS to sides of HEAD.
FOOT (Make 2)
R1: With G, sc 6 in magic ring (6)
R2: (inc, inc, sc 1) two times (10)
R3: sc 2, (bean st, sc 1) three times, sc 2 (10)
R4: sc in each st around (10)
Finish with a sl st. Cut a short tail and weave in.
BODY
You will be joining the feet together and crocheting the body. Hold the feet together so that toes point forward.
R1: To join feet, with B, sc 10 on first foot, then sc 10 on the second foot (20)
R2: (sc 8, dec) two times (18)
R3: sc in each st around (18)
R4: (sc 7, dec) two times (16)
R5: sc in each st around (16)
R6: (sc 6, dec) two times (14)
R7: (sc 5, dec) two times (12)
Finish with a sl st. Cut a short tail and weave in.
ARM (Make 2)
R1: With G, sc 6 in magic ring (6)
R2: (inc, inc, sc 1) two times (10)
R3-4: sc in each st around (10)
R5: With B, (sc 3, dec) two times (8)
R6: sc in each st around (8)
R7: (sc 2, dec) two times (6)
Finish with a sl st. Leave long tail for sewing.
ROBE
With B, chain 9.
R1-5: Skip first ch, sc 8, ch 1 and turn
R6: Skip first ch, sc 4, ch 3, skip 3 st, sc 1, ch 1 and turn
R7-17: Skip first ch, sc 8, ch 1 and turn
R18: Skip first ch, sc 4, ch 3, skip 3 st, sc 1, ch 1 and turn
R19-22: Skip first ch, sc 8, ch 1 and turn
R23: Skip first ch, sc 8
Fasten off. Leave long tail for sewing.
For the collar, along the top edge of the robe,
R1: With L, sc 24, ch 1 and turn
R2: Skip first ch, inc, sc 22, inc, ch 1 and turn
R3: Skip first ch, sc 26
Fasten off. Cut a short tail and weave in.
CUP OF BROTH
R1: With D, sc 6 in magic ring (6)
R2: inc in each st around (12)
R3-5: sc in each st around (12)
Finish with a sl st. Cut a long tail for sewing.
ASSEMBLY
Sew HEAD to BODY.
Sew ARMS to BODY. (He’ll look a bit weird at first with the different coloured arms)
Insert ARMS through the openings in the ROBE.
Sew the sides of the ROBE together.
Use the tail of the CUP to sew to the hands so that he looks like he’s holding it.
