CrochetMenScarvesHatsGlovesSweatersCardigansSocksOther clothingWomenScarvesHatsGlovesShawls and cover upSweatersCardigansSocksSlippersBagsOther clothingChildrenScarvesHatsGlovesSweatersCardigansSocksSlippersOther clothingHomeBlankets and plaidsRugsHome decorationsPetsSchemesKnittingOther hand-madeChat
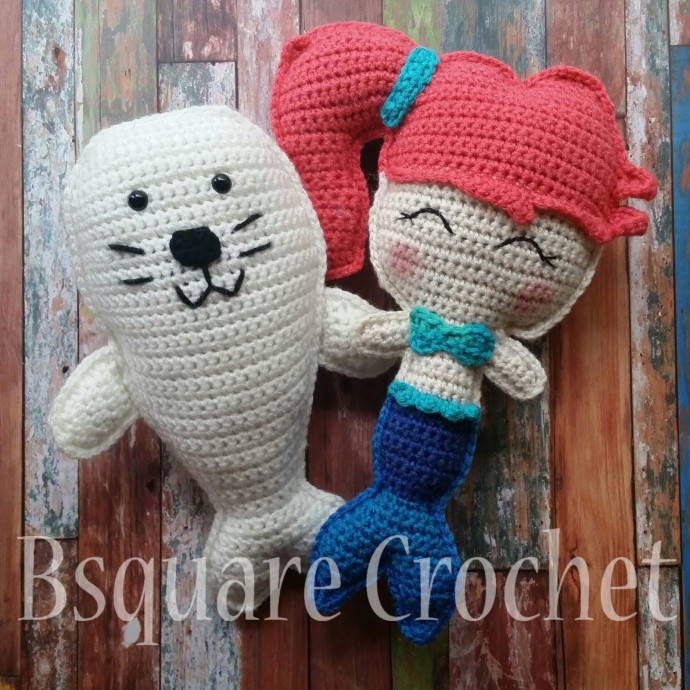
Crochet Seal Pillow Friend

The Crochet Seal Pillow Friend is more than just a cute cuddly companion; it's a whimsical addition to any space that brings a touch of coziness and charm. With its soft, plush texture and adorable seal design, this handmade treasure is perfect for snuggling up with during movie nights or adding a playful touch to your bedroom decor.
Whether you're looking for a unique gift for a loved one or simply want to treat yourself to something special, the Crochet Seal Pillow Friend is sure to bring joy and smiles wherever it goes. So go ahead, embrace the cuteness and comfort of this delightful seal friend - you won't be able to resist its undeniable charm!Materials:
I actually used a 4.5 mm hook for the mermaid and RHSS yarn (its what I had handy) so I imagine mine is a bit smaller than if you follow her recommended hook size.
Simon Seal
Before you begin:
SC- Single Crochet
INC. – Increase (2 single crochets in same stitch)
DEC – Decrease (1 single crochet over 2 stitches)
MC- Magic circle
Although it isn't written, chain 1 and turn at the end of each row.
Gage is not important in this pattern.
Materials.
- 4.5 mm hook
- Regular worsted weight yarn. (I used Red Heart Super Saver that I had laying around)
- Poly-fil
- Yarn needle for sewing
Make 2 Body panels
1. Chain 15, SC in second chain from hook and across (14)
2. Inc., SC 12, Inc. (16)
3. Inc., SC 14, Inc. (18)
4. Inc., SC 16, Inc. (20)
5. Inc., SC 18 Inc. (22)
6. SC across (22)
5. Inc., SC 18 Inc. (22)
6. SC across (22)
7. Inc., SC 20, Inc. (24)
8-11. SC across (24)
12. Inc., SC 22, Inc. (26)
13-18 SC across (26)
19. DEC, SC 22, DEC (24)
20- 23. SC across (24)
24. DEC, SC 20, DEC (22)
25. SC across (22)
26. DEC, SC 18, DEC (20)
27. SC across (20)
28. DEC, SC 16, DEC (18)
29. SC across (18)
30. DEC, SC 14, DEC (16)
31. SC across (16)
32. DEC, SC 12, DEC (14)
33. SC across (14)
34. DEC, SC 10, DEC (12)
35. SC across (12)
36. DEC, SC 8, DEC (10)
37. SC across (10)
38. DEC, SC 6, DEC (8)
39. SC across (8)
40. INC, SC 6, INC (10)
41. INC, SC 8, INC (12)
42. SC across (12)
43. INC, SC 10, INC (14)
44. INC, SC 12, INC (16)
32. DEC, SC 12, DEC (14)
33. SC across (14)
34. DEC, SC 10, DEC (12)
35. SC across (12)
36. DEC, SC 8, DEC (10)
37. SC across (10)
38. DEC, SC 6, DEC (8)
39. SC across (8)
40. INC, SC 6, INC (10)
41. INC, SC 8, INC (12)
42. SC across (12)
43. INC, SC 10, INC (14)
44. INC, SC 12, INC (16)
Beginning Tail Fin :
45. SC 8, turn chain one (8)
46. SC across (8)
47. DEC, SC 4, DEC (6)
48. DEC, SC 2, DEC (4)
49. DEC, DEC (2)
47. DEC, SC 4, DEC (6)
48. DEC, SC 2, DEC (4)
49. DEC, DEC (2)
50. SC 2
Tie off. Attach yarn on other side of tail and work rows 45- 50 in the remaining 8 stitches
Flippers:
MAKE 4 (two for each side )
1. Ch 7, work SC in second chain from hook and across (6)
2. SC across (6)
3. INC, SC 3, DEC (6)
4. SC across (6)
5. INC, SC 3, DEC (6)
6. SC across (6)
7. DEC, SC 2, DEC (4)
8. DEC , DEC (2)
Tie off.
Place two flippers pieces together and SC around, lightly stuffing before you finish off. Do the same for the second flipper, only making sure they point in the opposite direction (I wanted mine to look pointing downwards) . Do not worry about cutting off tail, you can stuff if inside the body later.
NOSE (in black yarn)
1. Chain 4, SC in second chain from hook and across (3)
1. Chain 4, SC in second chain from hook and across (3)
2. INC, SC, INC (5)
3. DEC, SC, DEC.
Leave a long tail for sewing onto body and embroidering mouth and whiskers.
Assembly:
Place Safety eyes between rows 8-9 with 5-6 stitches between them. Sew nose onto one body panel, just below eyes at about row 12. Using tail of black yarn, embroider a mouth and whiskers. Pin or tack flippers into place on each side at about row 22. To attach back panel, line up with front. Attach your working yarn a row or two above the flipper on the left side, and begin to SC the two body panels together. When you get to each flippers, you need to Slip Stitch through top panel, bottom of the flipper (where you pinned or tacked), and bottom panel. Resume SC around the two body panels. Repeat the same steps for the right flipper. When you have about an 1” left to go, stuff with poly-fil, then finish SC to where you began. Tie off and sew in ends.

hi came on this page to see the seal pattern. I'm so confused!!! I read it over about 4 or 5 times n wondered why does it start at row 32?? Where's the whole top half rows 1 thru 31?? I'm guess the body, can someone help me with this please. Wanted to try it for my 1 yr old granddaughter. Thanks 😊
Hello 😃
It’s been adjusted 🍀