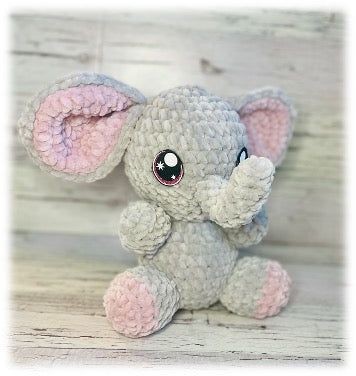
Crochet Beautiful Elephant

Crocheting a beautiful elephant can be a delightful and rewarding craft project. With your creativity and some colorful yarn, you can create a charming handmade elephant that will surely bring a smile to anyone's face. The process of crocheting allows you to add personalized touches, like different colors or patterns, making your elephant truly unique.
Whether you're an experienced crocheter or just starting out, this project is not only enjoyable but also a great way to relax and unwind. So gather your crochet hook, pick out your favorite yarn, and let your imagination run wild as you crochet a lovable elephant that will be cherished for years to come.Materials:
- Weight 6 yarn
- Size J/6.0mm
- Stuffing
- Safety Eyes or felt eyes and either a safety nose or some scrap cotton yarn to embroider one
- Yarn needle
- Stitch Marker
Abbreviations:
- mr = magic ring
- ch = chain
- sc = single crochet
- inc = increase (2 sc in next stitch)
- dec = invisible decrease (sc 2 stitches together)
- st = stitch
- FO = fasten off
This pattern uses weight 6 blanket yarn. Any yarn may be used, but your crochet hook size will be different. Use a hook 1-2 sizes smaller than your yarn calls for. This pattern is in US crochet terms.
This pattern is worked in continuous rounds and using a stitch marker to mark the first stitch is recommended.
*Safety eyes are NOT recommended for children who are three years old or younger.
Head & Body
These are worked as one piece, starting at the top of the head.
R1: 6SC in a magic ring
R2: 6 inc (12)
R3: (1SC, inc) x 6 (18)
R4: (2SC, inc) x 6 (24)
R5: (3SC, inc) x 6 (30)
R6: (4SC, inc) x 6 (36)
R7-10 (4 rows): 36SC
R11: (4SC, dec) x 6 (30)
Place safety eyes between rows 9-10 about 6 stitches apart.
R12: 30SC
R13: (3SC, dec) x 6 (24)
R14: (2SC, dec) x 6 (18)
R15: (1SC, dec) x 6 (12)
R16: 12SC
Stuff head firmly.
R17: 12 inc (24)
R18: (3SC, inc) x 6 (30)
R19-22 (4 rows): 30SC
R23: (3SC, dec) x 6 (24)
R24: 24SC
R25: (2SC, dec) x 6 (18)
R26: (1SC, dec) x 6 (12)
R27: 6 dec
Stuff firmly, FO, sew hole shut.
Trunk
R1: 4 SC in a magic ring
R2: 4SC BLO
R3: (1SC, inc) x 2 (6)
R4-10 (8 rows): 6SC
R11: 3SC, 2 inc, 3SC
Depending on your tension, you may want to subtract or add rows for the trunk. F/O. Place a pipe cleaner in trunk so that it can bend upwards. Lightly stuff around the pipe cleaner.
Arms – make two
R1: 6 SC in a magic ring
R2: 6 inc (12)
R3: 12SC BLO
R4: 12SC
R5: (2SC, dec) x 3 (9)
Stuff foot, FO, and leave a long tail for sewing.
Feet – make two
Begin in secondary colour:
R1: 8 SC in a magic ring
R2: 8 inc (16)
R3: 16SC BLO
Switch to primary colour:
R4-6 (3 rows): 16SC
R7: (2SC, dec) x 4 (12)
Stuff foot, FO, and leave a long tail for sewing.
Tail
R1: Ch 5. Starting in the second chain from the hook, 4SC down the chain.
Loop scrap worsted weight yarn in a coordinating colour through the last SC. Tie it tightly and fray it with a comb or dog brush
Ears – make two
In secondary colour:
R1: 6SC in a magic ring
R2: 6 inc (12)
R3: (1SC, inc) x 6 (18)
R4: (2SC, inc) x 6 (24)
R5: (3SC, inc) x 6 (30)
FO.
In primary colour:
R1: 6SC in a magic ring
R2: 6 inc (12)
R3: (1SC, inc) x 6 (18)
R4: (2SC, inc) x 6 (24)
R5: (3SC, inc) x 6 (30)
Take the ear piece in the secondary colour and line up the stitches with the second ear piece. You’re going to place a SC in both the first and second ear piece all the way around, increasing every 4th stitch (4SC, inc) x 6 (36).
FO and leave a long tail for sewing. Fold the ear in half and place a stitch so that it stays pinched.
Assembly
- I like to begin by sewing on the trunk to make it easier to ensure everything else is symmetrical. Sew the trunk between rows 9-11 on the head. Bend it upwards.
- Sew the ears on at about row 3 of the head.
- Sew the arms where the body meets the neck. Ensure they are symmetrical to the trunk.
- Sew the feet at about row 3 from the bottom of the body. Ensure they line up with the arms and that they are placed so that the Elephant can sit upright.
- Sew the tail in between the legs on Ellis’ back, about 3 rows up from the bottom
