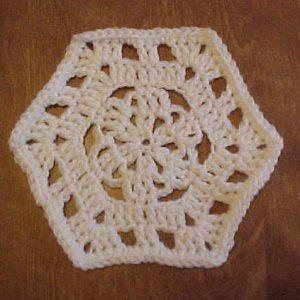
Crochet Snowflake Motif

Crochet snowflake motifs are a delightful way to add a touch of charm and whimsy to your winter decor. These intricate designs are not only beautiful but also versatile, allowing you to use them in various crafting projects like blankets, scarves, or even as ornaments for your Christmas tree. The detailed patterns and delicate stitches create a cozy and festive atmosphere wherever they are incorporated.
Whether you're a seasoned crocheter looking for a new creative challenge or a beginner eager to learn a new skill, making crochet snowflake motifs is a fun and rewarding activity that is sure to bring joy and warmth to your winter season. So grab your yarn and hook, and let's get crafting some magical snowflakes together!Materials Needed
Worsted weight yarn in any desired color. Red Heart Super Saver in white was used in the example
Size H/8 or 5mm aluminum crochet hook
Yarn needle for weaving in ends
Yarn Thickness: 4mm
Gauge: 4sc=1"
Finished Size: 6½" diam
Skill Level: Beginner
Instructions
RND 1: Ch6. Join w/slst to first ch to form ring. Ch2. Hdc in same st as slst. Ch3. *2hdc in next ch. Ch3. Rep from * around. Join w/slst to top of ch2.
RND 2: Ch3. Dc in next hdc. Ch3. Sc in next ch3 sp. Ch3. *Dc in each of the next 2 hdc. Ch3. Sc in next ch3 sp. Ch3. Rep from * around. Join w/slst to top of ch3.
RND 3: Ch1. Sc in next dc. Ch5. *Sc in each of the next 2 dc. Ch5. Rep from * around. Join w/slst to ch1.
RND 4: Ch3. Dc in next sc. Dc in each of the next 2 chs of the next ch5 sp. Dc, ch2, dc in next ch. Dc in each of the next 2 chs. *Dc in each of the next 2 sc. Dc in each of the next 2 chs of the next ch5 sp. Dc, ch2, dc in next ch. Dc in each of the next 2 chs. Rep from * around. Join w/slst to top of ch3.
RND 5: Ch3. Dc in next dc. Ch2. Sk next 2 dc. Dc in next dc. 2dc, ch2, 2dc in next ch2 sp. Dc in next dc. Ch2. Sk next 2 dc. *Dc in each of the next 2 dc. Ch2. Sk next 2 dc. Dc in next dc. 2dc, ch2, 2dc in next ch2 sp. Dc in next dc. Ch2. Sk next 2 dc. Rep from * around. Join w/slst to top of ch3.
RND 6: Ch1. sc in next dc. 2sc in next ch2 sp. Sc in each of the next 3 dc. Sc, ch2, sc in next ch2 sp. Sc in each of the next 3 dc. 2sc in next ch2 sp. *Sc in each of the next 2 dc. 2sc in next ch2 sp. Sc in each of the next 3 dc. Sc, ch2, sc in next ch2 sp. Sc in each of the next 3 dc. 2sc in next ch2 sp. Rep from * around. Join w/slst to ch1. Fasten off, weave ends into back of work.
If you want to change color on the last round. Fasten off at the end of rnd 5. Then on rnd 6, join new color at the same st as slst. Continue with rnd 6 as usual. This will create a real snowflake effect around the edges of the white part.
