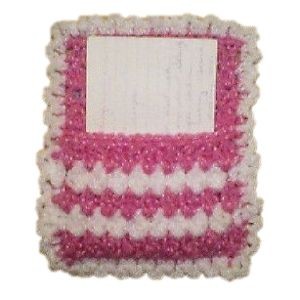
Crochet Refrigerator Pocket

How delightful is the idea of a Crochet Refrigerator Pocket! Not only does it add a touch of charm to your kitchen decor, but it's also incredibly practical. Imagine having a cute little pocket on the front of your fridge where you can store small items like shopping lists, pens, or even your favorite recipes. It's a fun and creative way to keep things organized in your kitchen while showcasing your crochet skills. Plus, it's a great conversation starter for guests who visit your home. A Crochet Refrigerator Pocket is both functional and adorable, making it a must-have for any crochet enthusiast looking to add a touch of whimsy to their kitchen.
Materials Needed:
Small amounts each Red Heart's Baby Sport Pompador yarn.
Pink &White
Size F aluminum Crochet Hook
Note Pad. About 3"x3" or 3"x5" Will work with Index Cards
Thin Yarn Needle
Yarn Thickness: 3mm
Gauge: 6sc=1"
Finished Size: = 4"x6"
Skill Level: Intermediate
Special Stitch Instructions
Spoon Stitch (spn)
Insert hook in place indicated. Pull up a lp. Yo pull through one lp on hook twice as if to ch. Rep from beg 2 more times. Yo pull through all 4 lps on hook.
Instructions
Front Instructions
ROW 1:With Pink: Ch20. Sc in 2nd ch from hook and in each ch across. (19sts.) Ch3, turn.
ROW 2: Sk first sc, spn in next sc. Ch1. *Sk next st. Spn in next st. Ch1. Rep from * across. Dc in last sc. Fasten off Pink.
ROW 3: Tie White yarn on to top of dc. Ch3. Dc in ch1 sp. *Spn in next ch1 sp. Ch1. Rep from * across. Dc in ch1 sp and in top of ch3. Fasten off White.
ROW 4: Tie pink yarn on to top of dc. *Spn in next ch1 sp. Ch1. Rep from * across. Dc in top of ch3. Fasten off Pink.
ROW 4: Rep ROW3.
ROW 5: Rep ROW 4 but do not fasten off. Instead, ch1, turn.
ROW 6: Sc in next st and work 2 sc in each ch 1 sp across and in the last 2 sts in row. Fasten off. Weave ends into back of work and set aside.
Back Instructions.
With Pink.
ROW 1: Rep as for row 1 on front. Ch3, turn.
ROW 2: Sk first sc, spn in next sc. Ch1. *Sk next st. Spn in next st. Ch1. Rep from * across. Dc in last sc. Ch3 turn.
ROW 3: Dc in ch1 sp. *Spn in next ch1 sp. Ch1. Rep from * across. Dc in ch1 sp and in top of ch3. Ch3, turn.
ROW 4: *Spn in next ch1 sp. Ch1. Rep from * across. Dc in top of ch3. Ch3, turn.
ROW 5-11: Rep ROWs 3&4 alternately. At the end of ROW 11, ch1 turn.
ROW 12: Sc in each of the first two sts. 2sc in each ch1 sp across. Sc in each of the last 2 sts. Fasten off and weave ends into back of work.
Assembly:
Position the back in front of you so the right side is facing up and the starting ch is on the bottom. Lay the front piece on top matching up the Starting ch with the starting ch on the back. Attach yarn to both thicknesses at the bottom left corner and work the following around the perimeter of the whole thing. Working the front to the back where they meet. Work a row of sc, ch3, sc all the way around. Work sc, ch3, sc in each corner.
