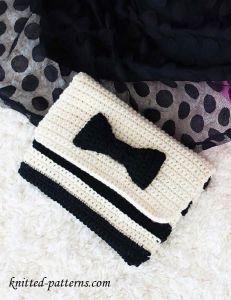
Crochet Striped Bow Clutch

The Crochet Striped Bow Clutch is an adorable accessory that adds a touch of charm to any outfit. This cute little purse features colorful stripes and a sweet bow detail, making it the perfect blend of trendy and feminine. Whether you're heading out for a casual day with friends or a special evening event, this clutch is sure to turn heads and add a pop of fun to your ensemble.
With its handmade crochet design and stylish appearance, this accessory is a must-have for anyone looking to add a playful touch to their wardrobe. So why not treat yourself to this delightful Crochet Striped Bow Clutch and show off your unique style with a touch of whimsy?FINISHED SIZE
CLUTCH
Width 22cm/8.75in
Height 6.5cm/6.5in
BOW
Width 5.5cm/2.75in
Length 11.5cm/4.5in
YOU WILL NEED
Debbie Bliss Rialto DK, 100% extra fine Merino wool (105m per 50g ball)
4x50g balls 397 Ecru (B)
2 x 50g balls Black (A)
1 x 5mm crochet hook or size to obtain gauge
2 x 13mm/0.5in nickel magnetic snaps
Fiber fill
Straight pins
Note: Yarn amounts given are based on average requirements and are approximate.
TENSION
15 sts and 19 rows to 10cm/4in over sc using size H/8 (5mm) hook.
PATTERN NOTE
When changing colours, draw new colour through last 2 loops on hook to complete last st, then turn.
STITCH GLOSSARY
sc2tog [Insert hook in next sc, yo and draw up a loop] twice, yo and draw through all 3 loops on hook.
BACK
With colour A, ch 35.
Row 1 (RS): Sc in 2nd ch from hook and in each ch across—34 sc. Turn.
Rows 2 and 3: Ch 1, sc in each sc across. Turn.
Row 4: Ch 1, sc in each sc across, changing to A. Turn.
Row 5: Ch 1, working through back loops only, sc in each sc across. Turn.
Rows 6 and 7: Ch 1, sc in each sc across. Turn.
Row 8: Ch 1, sc in each sc across, changing to B. Turn.
Row 9: Ch 1, working through back loops only, sc in each sc across. Turn.
Rows 10 and 11: Ch 1, sc in each sc across. Turn.
Row 12: Ch 1, sc in each sc across, changing to B. Turn.
Rows 13-28: Rep rows 5-12 twice more.
FLAP
Rows 29-51: Ch 1, sc in each sc across. Turn.
Fasten off, leaving a long tail for sewing.
FRONT
Work as for back to row 28; do not change to B on last row. Fasten off, leaving a long tail for sewing. BACK LINING With colour B, ch 35. Row 1 (RS): Sc in 2nd ch from hook and in each ch across—34 sc. Turn.
Rows 2-49: Ch 1, sc in each sc across. Turn.
Fasten off, leaving a long tail for sewing.
FRONT LINING
With colour B, ch 35.
Row 1 (RS): Sc in 2nd ch from hook and in each ch across—34 sc. Turn.
Rows 2-28: Ch 1, sc in each sc across. Turn.
Fasten off, leaving a long tail for sewing.
BOW
With colour A, ch 3.
Row 1 (RS): Sc in 2nd ch from hook and in each ch across—2 sc. Turn.
Rows 2 and 3: Ch 1, sc in each sc across. Turn.
Row 4: Ch 1, [2 sc in next sc] twice—4 sc. Turn.
Rows 5 and 6: Ch 1, sc in each sc across. Turn.
Row 7: Ch 1, 2 sc in first sc, sc in next 2 sc, 2 sc in last sc—6 sc. Turn.
Row 8: Ch 1, sc in each sc across. Turn.
Row 9: Ch 1, 2 sc in first sc, sc in next 4 sc, 2 sc in last sc—8 sc. Turn.
Rows 10-17: Ch 1, sc in each sc across. Turn.
Row 18: Ch 1, sc2tog, sc in next 4 sc, sc2tog—6 sc. Turn.
Row 19: Ch 1, sc in each sc across. Turn.
Row 20: Ch 1, sc2tog, sc in next 2 sc, sc2tog—4 sc. Turn.
Rows 21 and 22: Ch 1, sc in each sc across. Turn. Row 23: Ch 1, [sc2tog] twice—2 sc. Turn.
Rows 24 and 25: Ch 1, sc in each sc across. Turn.
Rep rows 2-25.
Fasten off, leaving a long tail for sewing.
CENTRE WRAP
With color A, ch 4.
Row 1 (RS): Sc in 2nd ch from hook and in each ch across—3 sc. Turn.
Rows 2-9: Ch 1, sc in each sc across. Turn.
Fasten off, leaving a long tail for sewing.
MAGNETIC SNAP BACKING (MAKE 4)
With colour B, ch 4.
Row 1 (RS): Sc in 2nd ch from hook and in each ch across—3 sc. Turn.
Rows 2 and 3: Ch 1, sc in each sc across. Turn.
Fasten off, leaving a long tail for sewing.
ASSEMBLY
1) To make the bow, sew the first row to the last row, forming a circle.
2) Centre the seam over the centre of the bow, then wrap the centre of the bow with the centre wrap.
3) Sew the first and last row of the centre wrap together, then bring the yarn up through the centre of the bow, then back down through the bottom to secure the wrap in place.
4) Sew the side edges of the bow together, stuffing very lightly with fiber fill. Weave in ends. Set aside.
5) Sew the bottom and side edges of the front to the back, matching the stripes. Turn the right side out.
6) Position the bow on the right side of the flap, so the bottom edge of the centre wrap of the bow is 4cm(l.5in)from bottom edge of flap and bow is centred side to side. Sew in place.
7) Sew the bottom and side edges of the front lining to the back lining. Leave wrong side out. Set aside.
8) Attach the magnetic snaps to the crochet backing as per the package instructions.
9) Position the bottom half of each snap on center B stripe on front, so edge of the backing is 4cm(1.5in) from the side edge of the front; pin in place. Sew backings in place using their tails. Weave in ends. Set the top halves of the snaps aside.
10) Insert the lining.
11) Sew the top edge of the clutch front to the top front edge of the lining, then sew the side and bottom edges of the clutch flap to the lining flap. Weave in ends.
12) Position the top half of each snap on the underside of the flap, so they line up with the bottom halves; pin the backings in place.
Snap closed and adjust their positions if necessary. Sew backings in place to the underside of the flap using their tails, taking care not to stitch into the topside (front) of the flap. Weave in ends.

