Crochet Mermaid Pattern: Step-by-Step Instructions for Crafting a Whimsical Doll

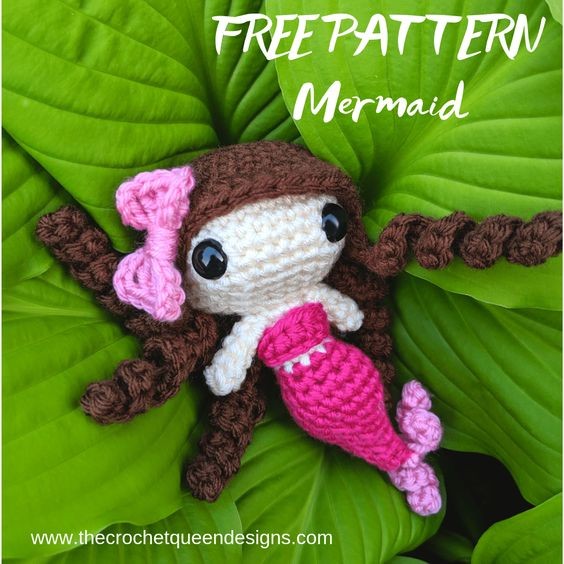
Crocheting a beautiful mermaid is a delightful and creative way to dive into a magical world of yarn and imagination. With your crochet hook as your wand, you can bring to life a whimsical sea creature that will enchant anyone who lays eyes on it. From the shimmering tail to the flowing hair, each stitch is a step closer to creating a mesmerizing mermaid that is sure to make waves with its charm. So grab your favorite yarn colors, unleash your inner artist, and let the mermaid magic unfold stitch by stitch in your hands, spreading joy and wonder wherever she goes. Happy crocheting, dear mermaid maker!
What You Need
- Yarn weight 4
- Skin Tone (Yarn Bee, Cream)
- Hair Color (I Love This Yarn, Brown)
- Main Color (Loops & Threads, Lippy)
- Secondary Color (Loops & Threads, Soft Rose)
10mm safety eyes
Crochet hook size 3.5mm
Yarn Needle
Scissors
Stuffing
Pattern
Head
In Skin Tone Yarn, Ch 2, sc 6 into second ch from hook
R1 – inc in each sc (12 sts)
R2 – *sc, inc* x6 (18 sts)
R3 – *sc 2, inc* x6 (24 sts)
R4 – *sc 3, inc* x6 (30 sts)
R5 – *sc 4, inc* x6 (36 sts)
R6-9 – sc in each sc (36 sts per row)
R10 – *sc 4, dec* x6 (30 sts)
R11 – *sc 3, dec* x6 (24 sts)
R12 – *sc 2, dec* x6 (18 sts)
Insert safety eyes between R7 and R8, about 7 stitches apart. NOTE: You will want the eyes on the opposite side of the head from where the rows start. This way the color changes are not on the front of the doll.
Begin stuffing head to medium firmness. Beware not to overstuff because this will elongate the head rather than leaving it in the nice oval shape.
R13 – *sc, dec* x6 (12 sts)
R14 – *sc 2, dec* x3 (9 sts)
Do not tie off. Continue to Body.
Body
Continuing with Skin Tone Yarn
R15-18 – Sc into each sc (9 sts per row)
Switch to Main Color Yarn
R19 – Sc in each sc (9 sts)
R20 – *sc 2, inc* x3 (12 sts)
R21 – *sc, inc* x6 (18 sts)
R22-24 – sc in each sc (18 sts per row)
R25 – *sc, dec* x6 (12 sts)
Stuff body to medium firmness. Once again, do not overstuff.
R26 – *sc 2, dec* x3 (9 sts)
R27 – *sc, dec* x3 (6 sts)
R28 – sc in each sc (6 sts)
R29 – dec x3 (3 sts)
Tie off and leave a small tail for sewing.
Tail Swirls
In Secondary Color, ch 2
In second ch from hook, ch 9. Starting in second ch from hook *inc, sc* x4
In same ch as the first swirl, ch 11. Starting in second ch from hook *inc, sc* x5, Tie off.
Using the tail from the end of the body, attach the swirls to the end of the tail. Sew ends from tail swirls up through the center of the tail to hide them.
Bralette
In Main Color, ch 14
R1 – In second ch from hook, sc, hdc, dc, dc, hdc, sc. Do not finish row, tie off.
To attach to body, wrap the bralette around the Skin Tone area of the body with the thicker portion in the front. Tie the ends together and tack to body.
Arms (make 2)
In Skin Tone Yarn, ch 2, sc 4 into second ch from hook
R1-3 – Sc in each sc
Tie off, leaving a tail for sewing.
Sew arms to either side of body, above the bralette.
Hair
With Hair color, ch 2, in second ch from hook sc 6
R1 – inc in each sc (12 sts)
R2 – *sc, inc* x6 (18 sts)
R3 – *sc 2, inc* x6 (24 sts)
R4 – *sc 3, inc* x6 (30 sts)
R5 – *sc 4, inc* x6 (36 sts)
R6-8 – sc in each sc (36 sts per row)
NOTE: R9 is creating the bangs.
R9 – hdc, 22 dc, hdc, 2 sc, hdc, 2 dc, 5 tc, dc, hdc (36 sts)
NOTE: R10 is creating the curls along the back of the hair.
R10 – *sc, ch 25, starting in second ch from hook (inc, sc) x10, inc, hdc, dc, dc* skip 2. Repeat 7 times. Do not complete row. Slip Stitch and tie off, leaving a long tail for sewing.
Using the end, sew the hair to the head, with the bangs slightly off center for the side sweep bangs look. When sewing the hair to the head follow along R8 so the curls are loose and the bangs aren’t sewn flat to the head.
Bow (Optional)
Using secondary color, ch 6
In first ch [tc x3, ch 5, sl st, ch 5, tc x3, ch 5, sl st] Tie off leaving a long tail.
Wrap the long tail 6-7 times around the center of the bow and tie to the beginning tail to secure.
Attach the bow anywhere in the hair; I sewed it to the front left side to offset her bangs.