Enhance Your Home Decor with the Cozy Crochet Cabled Throw Cushion Cover
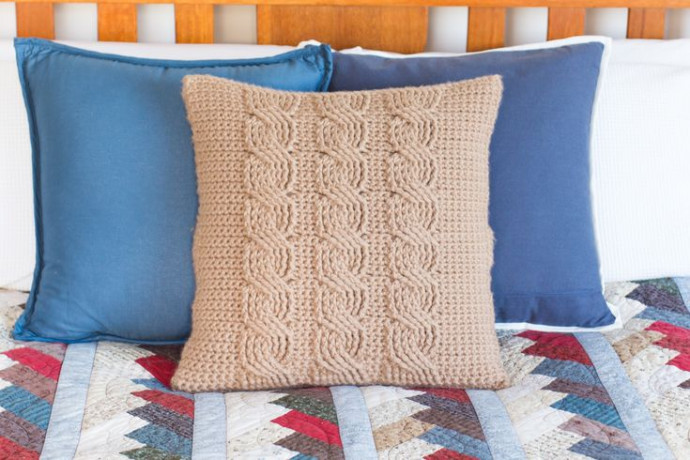
Looking to add a touch of coziness to your living space? The Crochet Cabled Throw Cushion Cover is the perfect solution! With its intricate cabled design and soft, textured feel, this cushion cover will instantly elevate the look of any room. Whether you're cuddled up with a book on the couch or simply looking to spruce up your home decor, this throw cushion cover is a must-have.
Materials
- 8mm (L) Crochet Hook
- 480yds Super Chunky Yarn – Phildar Rapido (44yds/50g)
- — “Beige/11″ (11 skeins)
- Tapestry Needle
- 3 Buttons (2”)
Finished Size
This cushion cover fits a standard throw cushion.
- Cushion Cover Height: 18” (46cm)
- Cushion Cover Width: 18” (46cm)
Gauge
12 stitches + 14 rows = 4″/10cm in single crochet
Stitches & Abbreviations
- st(s) – stitch(es)
- ch – chain stitch
- sl st – slip stitch
- sc – single crochet
- hdc – half double crochet
- camel hdc – camel half double crochet
- fpdc – front post double crochet
- fpdtr – front post double triple crochet
- cable st – cable stitch
Camel Half Double Crochet (camel hdc)
YO, insert hook in the next st, but not through the front OR back loop, but instead an extra loop that is behind the st. YO, pull up a loop (3 loops on hook). YO, and pull through 3 loops on hook.
Front Post Double Crochet (fpdc)
YO, insert hook under the post of next st. YO, draw up a loop (3 loops on hook). YO, draw through 2 loops on hook (2 loops on hook). YO, draw through 2 loops on hook.
Cable Stitch (cable st)
Skip 4 sts, fpdtr in next 4 sts. Going back to the 1st st, fpdtr in the 1st, 2nd, 3rd and 4th st. (The sections should be crossed over)
Skill Level
This is an “Intermediate” level crochet pattern (includes “How-To” photos). You must be familiar with basic crochet stitches and techniques. Directions are written so that they are easy to read and follow. All patterns are in English and written in standard US terms.
Pattern
Note: The back/front of this cushion cover is worked in the row, from side to side. This cover is worked in 3 parts (1 front part and 2 back parts), which are seamed together to create the final cover. It is imperative to check gauge and maintain an even tension throughout to ensure pieces fit together.
Front of Cover
Ch45 using super chunky yarn and 8mm hook.
- Row 1: 1 sc in 2nd ch from hook. 1 sc in next 43 sts. Turn your work. (44 sts)
- Row 2: Ch1, 1 sc in same st. 1 sc in next 43 sts. Turn your work.
- Row 3: Ch1, 1 sc in same st. 1 sc in next 7 sts. 1 fpdc in next 8 sts. 1 sc in next 2 sts. 1 fpdc in next 8 sts. 1 sc in next 2 sts. 1 fpdc in next 8 sts. 1 sc in next 8 sts. Turn your work.
- Row 4: Repeat row 2.
- Row 5: Ch1, 1 sc in same st. 1 sc in next 7 sts. 1 fpdc around fpdc from 2 rows below in next 8 sts. 1 sc in next 2 sts. 1 fpdc around fpdc from 2 rows below in next 8 sts. 1 sc in next 2 sts. 1 fpdc around fpdc from 2 rows below in next 8 sts. 1 sc in next 8 sts. Turn your work.
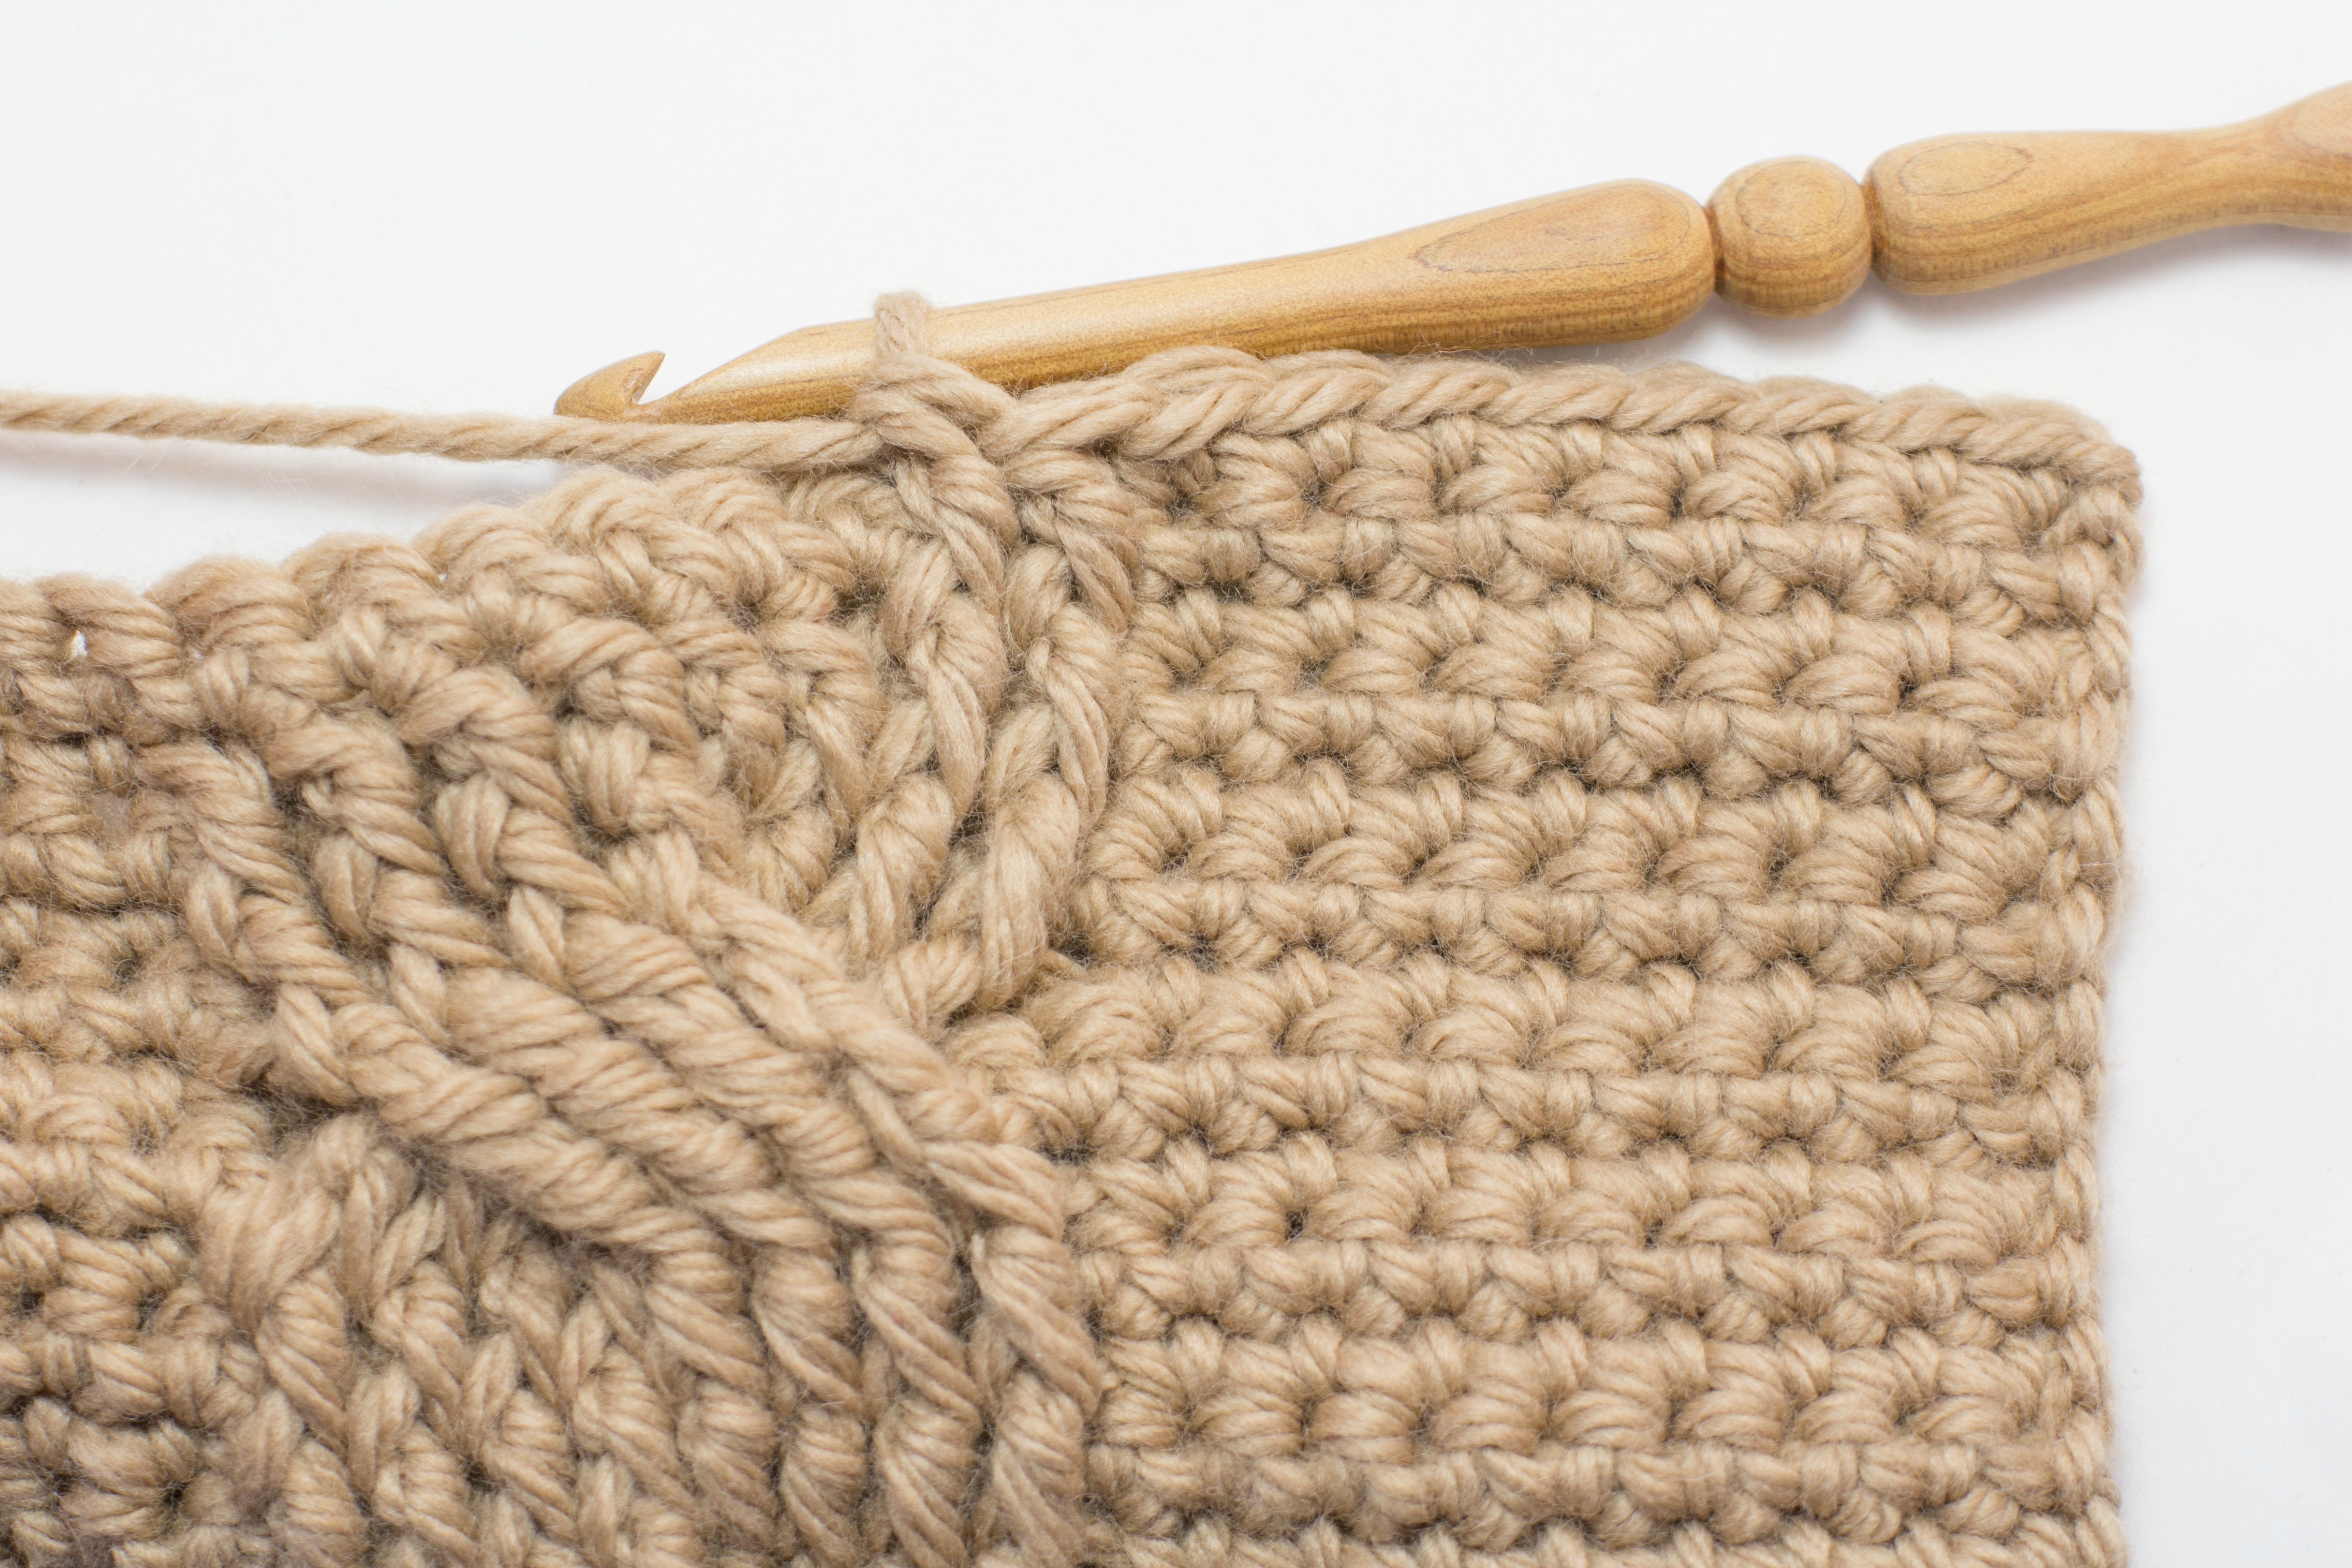
- Row 6: Repeat row 2.
- Row 7: Ch1, 1 sc in same st. 1 sc in next 7 sts. 1 cable st across next 8 sts, working around the fpdc’s from 2 rows below. 1 sc in next 2 sts. 1 cable st across next 8 sts, working around the fpdc’s from 2 rows below. 1 sc in next 2 sts. 1 cable st across next 8 sts, working around the fpdc’s from 2 rows below. 1 sc in next 8 sts. Turn your work.
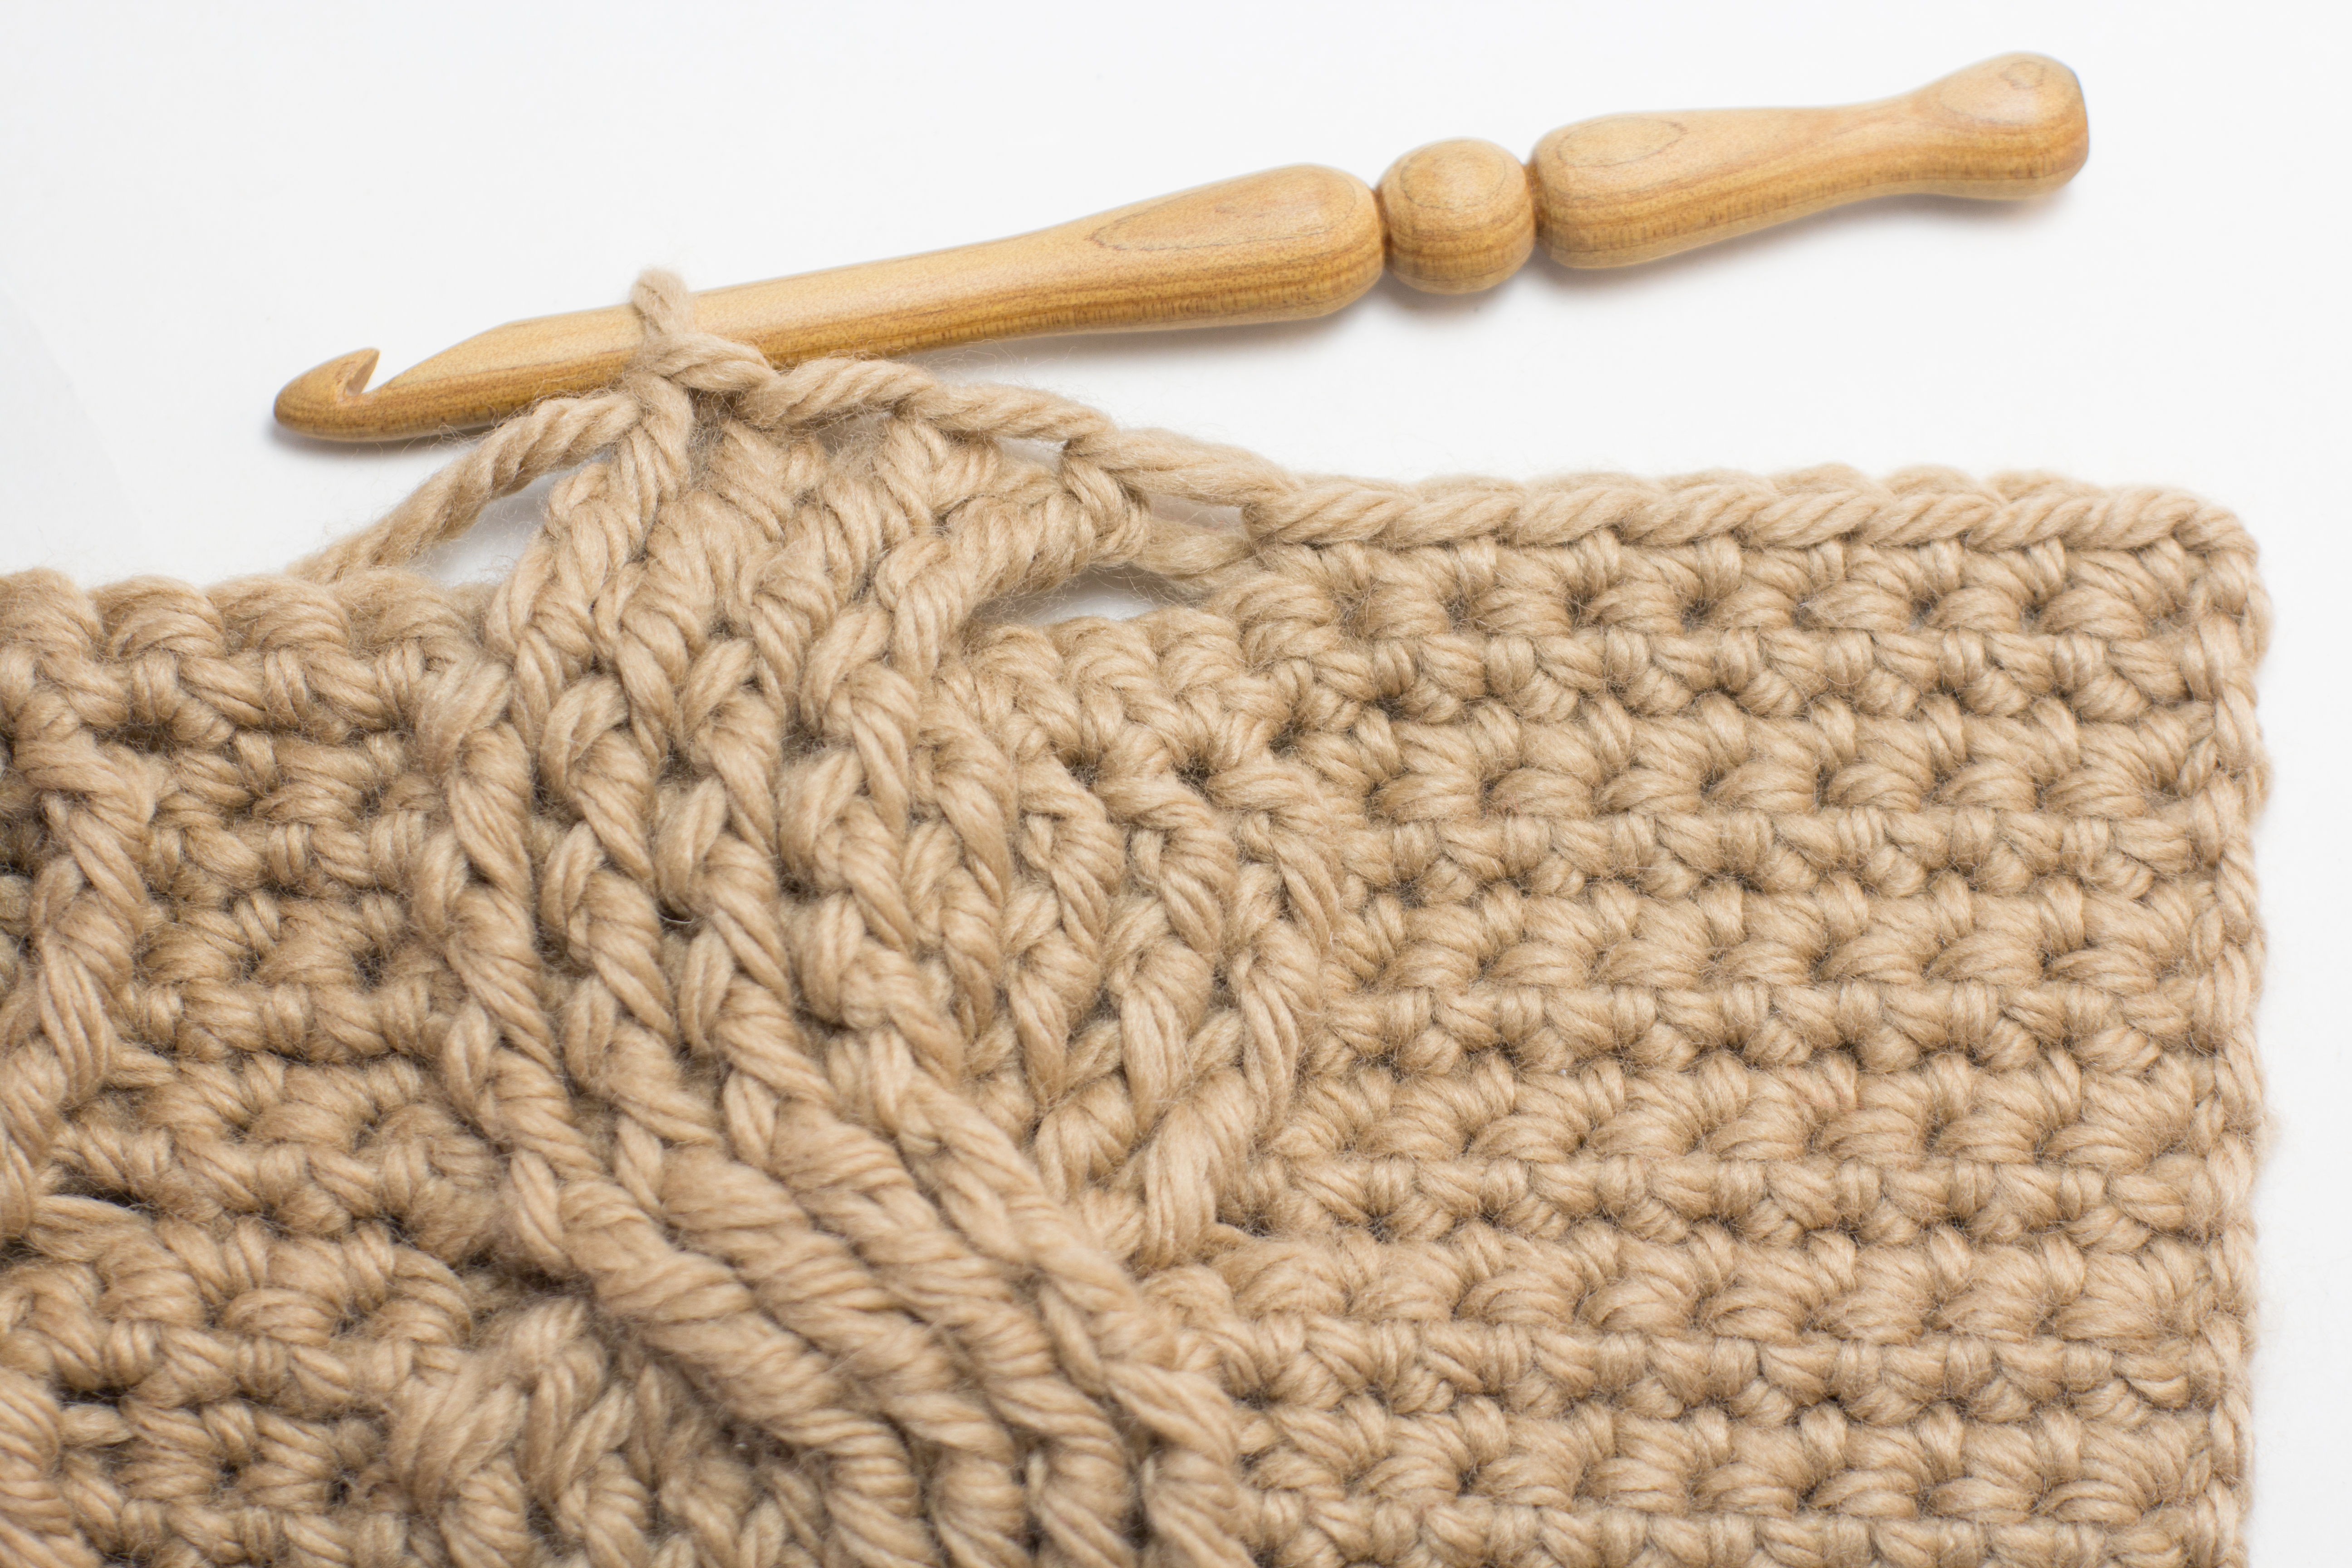
- Row 8: Repeat row 2.
- Row 9: Repeat row 5.
- Row 10: Repeat row 2.
- Row 11: Repeat row 5.
- Row 12: Repeat row 2.
- Row 13: Repeat row 5.
- Row 14: Repeat row 2.
- Row 15 – 70: Repeat rows 7-14.
Fasten off, weave in loose ends.
Back of Cover / Lower Flap
Ch45 using super chunky yarn and 8mm hook.
- Row 1: 1 sc in 2nd ch from hook. 1 sc in next 43 sts. Turn your work. (44 sts)
- Row 2 – 34: Ch1, 1 sc in same st. 1 sc in next 43 sts. Turn your work.
Fasten off, weave in loose ends.
Back of Cover / Top Flap
Ribbed Section
Ch8 using super chunky yarn and 8mm hook.
- Row 1: 1 hdc in 2nd ch from hook. 1 hdc in next 6 sts. Turn your work. (7 sts)
- Row 2: 1 sl st in the next 7 sts. Turn your work. (7 sts)
- Row 3: Ch1, 1 camel hdc in same st. 1 camel hdc in next 6 sts. Turn your work.
- Row 4 – 13: Repeat rows 2–3.
- Row 14: Repeat row 2.
- Row 15: Ch1, 1 camel hdc in same st. 1 camel hdc in next st. Ch3, skip 3 sts. 1 camel hdc in next 2 sts. Turn your work.
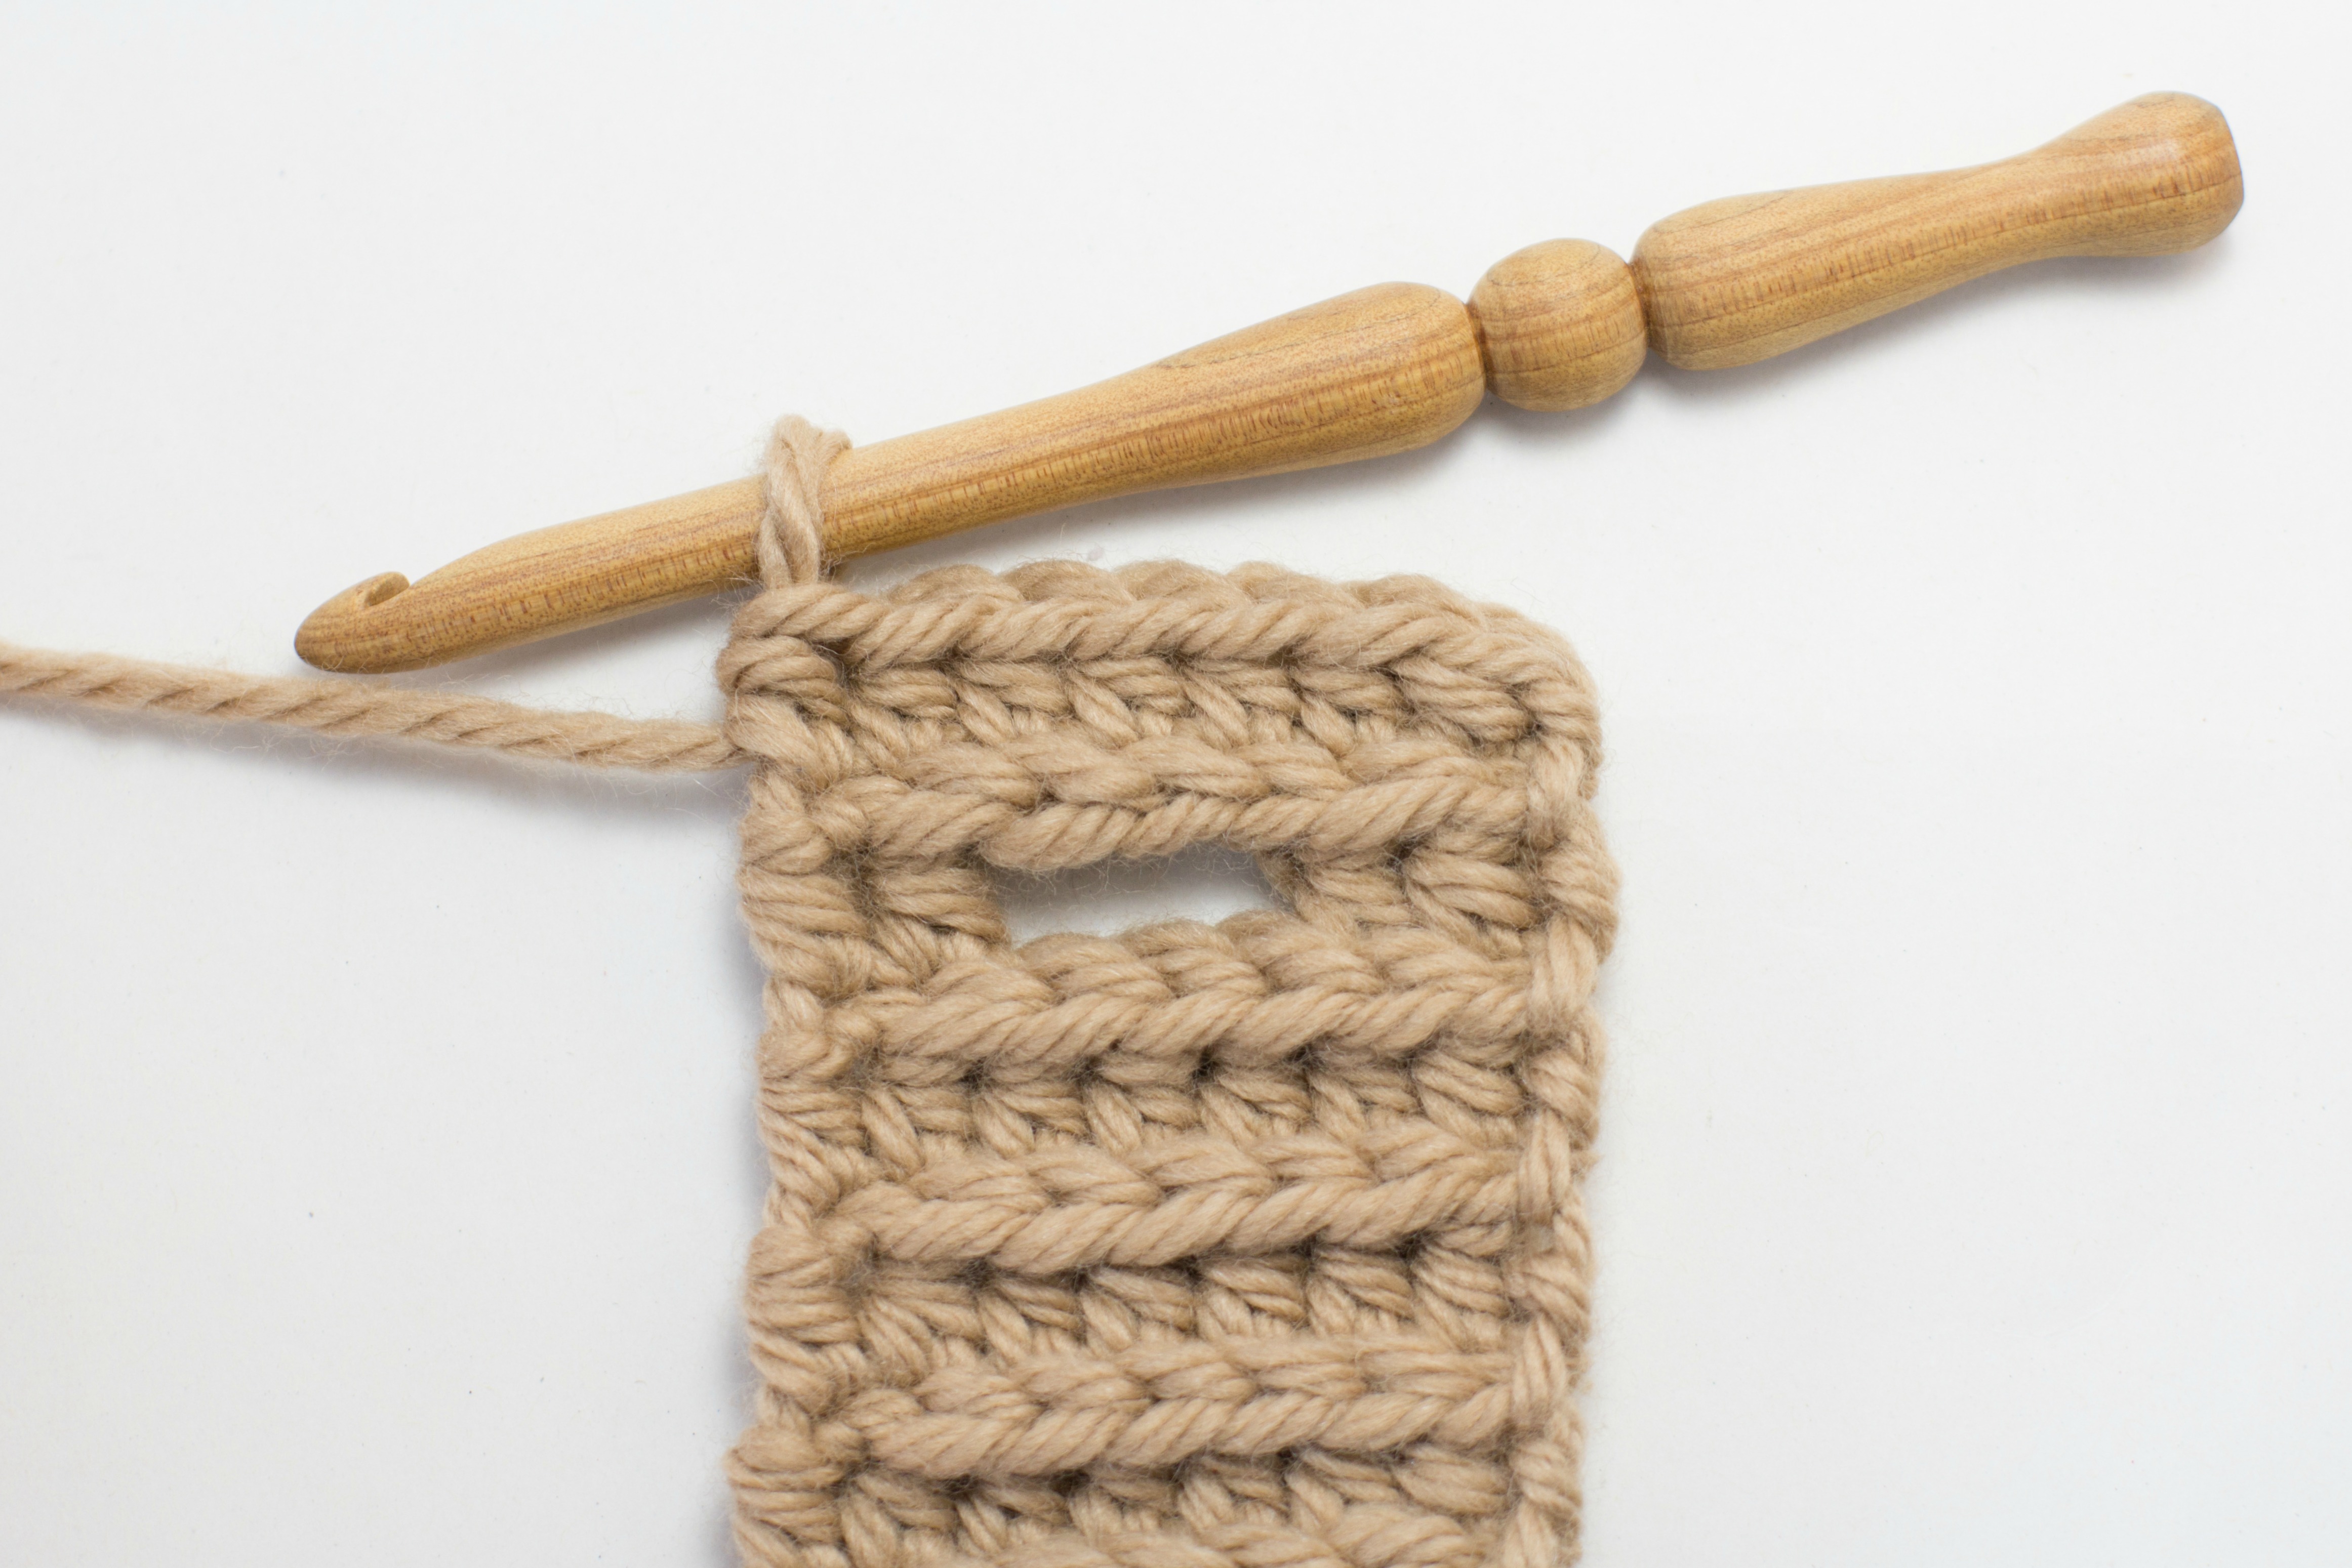
- Row 16 – 27: Repeat rows 2–3.
- Row 28: Repeat row 2.
- Row 29: Repeat row 15.
- Row 30 – 41: Repeat rows 2–3.
- Row 42: Repeat row 2.
- Row 43: Repeat row 15.
- Row 44 – 57: Repeat rows 2–3.
Fasten off, weave in loose ends.
Main Section
Place the “Ribbed Section” sideways so that “Row 57” is to your right and “Row 1” is to your left, with the ribbed side facing upwards.
- Row 1: Attach yarn to the last st you crocheted in “Row 57”, ch 1, 1 sc in the same st. Crochet 43 sc sts across. Turn your work. (44 sts)
- Row 2 – 25: Ch1, 1 sc in same st. 1 sc in next 43 sts. Turn your work.
Fasten off, weave in loose ends.
Finishings
Place the “Cabled Front” on top of the “Lower Flap” and sew them together all along the edges. Place the “Button Flap” on top of the “Cabled Front”, making sure to overlap the “Ribbed Section” with the “Lower Flap”, and sew them together all along the edges. Sew 1 button beneath each button hole.


