Crafting a Delightful Crochet Chick: Step-by-Step Guide for Beginners and Experts
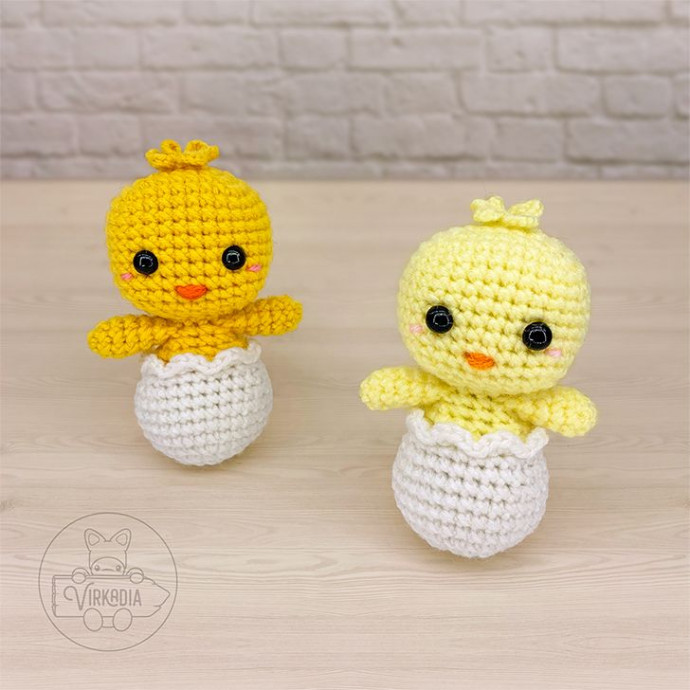
Crocheting a beautiful chick is such a delightful and rewarding craft project! The vibrant colors and intricate stitches come together to create a charming and adorable little bird. With some yarn and a crochet hook, you can bring this cute chick to life and add a touch of handmade warmth to your home.
Supplies
- Size H-8 (5 mm) crochet hook
- Medium (4) weight yarn in 2 colors:
- Yarn A – yellow (example uses Caron One Pound: Sunflower)
- Yarn B – white (example uses Red Heart Super Saver: Soft White)
- 10mm black safety eyes (x2)
- Black embroidery floss
- Pink embroidery floss or pink yarn (example uses Red Heart Super Saver: Perfect Pink)
- Orange embroidery floss or orange yarn (example uses Big Twist Value: Orange)
- Polyester fiberfill
- Yarn needle
- Scissors
- Stitch markers
Alternate Yarn Supplies
Color Variation 2 (as seen on the right in cover photo):
- Medium (4) weight yarn in 2 colors:
- Yarn A – light yellow (example uses Red Heart Super Saver: Pale Yellow)
- Yarn B – white (example uses Red Heart Super Saver: Soft White)
- Pink embroidery floss or pink yarn (example uses Red Heart Super Saver: Baby Pink)
- Orange embroidery floss or orange yarn (example uses Red Heart Super Saver: Pumpkin)
Terminology
This free crochet chick pattern uses English (US) terminology:
- st (sts) = stitch (stitches)
- ch = chain stitch
- sl st = slip stitch
- sc = single crochet
- sc2tog = single crochet 2 together (over the span of 2 stitches), also known as a decrease
- sc3tog = single crochet 3 together (over the span of 3 stitches)
Please note that this pattern is written so that each crochet stitch abbreviation is attached to a number, such as 1sc, 2sc, etc. This number denotes how many of that stitch is to be worked into the same stitch.
Special Stitch Instructions
This pattern is worked in the round, with each round joined at the end with a slip stitch. Unless otherwise instructed, the first stitch of your next round will always be worked into the same stitch as your joining slip stitch has been worked into.
Be sure to always keep the ‘right side’ of your stitches facing outwards as you work. The right side is the front side of the stitch that is facing you as you are completing each stitch.
Pattern Instructions | Free Crochet Chick Amigurumi
Crochet Chick Head Tuft
With yarn A (yellow), leave a long beginning tail for sewing (~1 ft) and chain 54, pulling each chain tight as you go.
Fasten off and leave a short tail for tying. Set aside for now and continue to round 1 of the head.

Crochet Chick Head – Rounds 1 to 5
With yarn A (yellow), make a magic ring (or ch 4, sl st into 1st st to form ring, ch 1).
- Rnd 1: 6sc into ring, sl st into 1st st to join, ch 1 (6).
- Rnd 2: 2sc into each st around, join, ch 1 (12).
- Rnd 3: [1sc into next st, 2sc into next st] 3 times, [1sc into next st, 3sc into next st, 1sc into next st] 2 times, join, ch 1 (19).
- Rnd 4: [2sc into next st, 1sc into each of next 2 sts] 3 times, [1sc into each of next 2 sts, 3sc into next st, 1sc into each of next 2 sts] 2 times, join, ch 1 (26).
- Rnd 5: [1sc into each of next 3 sts, 2sc into next st] 3 times, [1sc into each of next 3 sts, 3sc into next st, 1sc into each of next 3 sts] 2 times, join, ch 1 (33).
Secure your working loop with a stitch marker and follow the instructions below for sewing on the head tuft before continuing to round 6.
Adding the Tuft
Retrieve the long chain set aside earlier. With your yarn needle, thread your long beginning tail above any stitch from round 1 of the head, from front to back, and pull your entire tail through to the back.
As you pass your tail to the back, or inside, of your work, take care not to pull your chain stitches through. The long chain sequence should remain on the front side of your work.
Now, pass your needle back out to the front, above the next stitch from round 1. Count 9 stitches forward on your chain sequence and sew through the 9th chain stitch. Then, thread your tail back through the head, in the same place as you’ve last exited from.
Repeat these steps 4 more times, for a total of 5 loops of chains around the first round of your chick’s head.

For the 6th and final loop of the tuft, simply thread the end tail of your chain sequence through the same space as you first passed your beginning tail through at the very start.
Knot your beginning and end tails together on the inside of your piece to secure your sewing and trim any excess tail.
Remove your stitch marker from your working loop and continue to round 6 of the head.
Crochet Chick Head – Rounds 6 to 13
- Rnd 6: 1sc into each st around, join, ch 1 (33).
- Rnds 7 to 12 (6 rnds): repeat rnd 6 (33).
- Rnd 13: sc2tog over next 2 sts, 1sc into each of next 30 sts, 2sc into next st, join, ch 1 (33).
Secure your working loop with a stitch marker and follow the instructions below for adding the eyes, blush, and beak before continuing to round 14.
Adding Eyes
Using the example piece below as reference, insert both safety eyes through the center of the front of your head. The front of the head should be on the flattest side (between your 3sc increases in rounds 3 to 5), a quarter turn before your joining seam.
The safety eyes should be inserted between rounds 10 and 11 and should sit 6 stitches apart.

Adding Blush
Rotate your piece so that the beginning rounds face upwards and your last round faces downwards. Using the example piece below as reference, embroider a blush line using pink embroidery floss or yarn next to each eye.
Each blush line should start 1 round down (between rounds 11 and 12) and 1 stitch outwards from where each eye was inserted, and span 1 stitch length outwards (away from the center of the face).

Begin by inserting your needle from inside to outside, 1 round down and 1 stitch outwards from where you’ve inserted the eye. Pull through, leaving some tail inside for tying later. Then, insert your needle back in, 1 more stitch outwards.
If using yarn, you may skip ahead to tying both ends together on the inside of your piece. If using embroidery floss, pass your needle back out through the same space as you’ve last exited from and pull through. Reinsert your needle, again, 1 stitch outwards in the same place as before.
Repeat these last steps 3 more times, or until you are satisfied with the size of your blush. Then, gently tie both ends together on the inside of your piece. Take extra care as you tie your ends not to pull the threads too tight! After finishing your knot, trim any excess length.
Adding Beak
The beak should be embroidered between rounds 12 and 13 and be centered between the eyes. The beak will be 2 stitches wide.
Begin by inserting your needle from inside to outside, 2 rounds down and 2 stitches right from where you’ve inserted the left eye, and pull through, leaving some tail inside for tying later.
Then, insert your needle back in, 2 more stitches to the right, and back out through the same space as you’ve last exited from. Repeat this step 3 more times, or until you are satisfied with the bulk of the beak.
On the next pass, insert your needle 2 stitches to the right again, as before, but do not exit. Instead, pull through and remove your needle. Then, gently tie both ends together on the inside of your piece, taking extra care not to pull the threads too tight!
Crochet Chick Head – Rounds 14 to 16
Remove stitch marker and continue to the next round. Begin stuffing as you go.
- Rnd 14: [sc2tog over next 2 sts, 1sc into each of next 3 sts] 3 times, [1sc into each of next 3 sts, sc3tog over next 3 sts, 1sc into each of next 3 sts] 2 times, join, ch 1 (26).
- Rnd 15: [1sc into each of next 2 sts, sc2tog over next 2 sts] 3 times, [1sc into each of next 2 sts, sc3tog over next 3 sts, 1sc into each of next 2 sts] 2 times, join, ch 1 (19).
- Rnd 16: [sc2tog over next 2 sts, 1sc into next st] 3 times, [1sc into next st, sc3tog over next 3 sts, 1sc into next st] 2 times, join (12).
Fasten off yarn A and leave a short tail for tying. Set aside for now.
Crochet Chick Wing – Rounds 1 to 6
With yarn A (yellow), make a magic ring (or ch 4, sl st into 1st st to form ring, ch 1).
- Rnd 1: 6sc into ring, sl st into 1st st to join, ch 1 (6).
- Rnd 2: [1sc into each of next 2 sts, 2sc into next st] 2 times, join, ch 1 (8).
- Rnd 3: 1sc into each st around, join, ch 1 (8).
- Rnd 4: 1sc into each st around, join, ch 1 (8).
- Rnd 5: 1sc into each st around, join, ch 1 (8).
- Rnd 6: 1sc into each st around, join (8).
Fasten off and set aside for now.
Repeat rounds 1 to 6 to create a second wing, then continue to the chick egg below.
Crochet Chick Egg – Rounds 1 to 12
With yarn B (white), make a magic ring (or ch 4, sl st into 1st st to form ring, ch 1).
- Rnd 1: 6sc into ring, sl st into 1st st to join, ch 1 (6).
- Rnd 2: 2sc into each st around, join, ch 1 (12).
- Rnd 3: [1sc into next st, 2sc into next st] 6 times, join, ch 1 (18).
- Rnd 4: [2sc into next st, 1sc into each of next 2 sts] 6 times, join, ch 1 (24).
- Rnd 5: [1sc into each of next 3 sts, 2sc into next st] 6 times, join, ch 1 (30).
- Rnd 6: [2sc into next st, 1sc into each of next 9 sts] 3 times, join, ch 1 (33).
- Rnd 7: 1sc into each st around, join, ch 1 (33).
- Rnd 8: 1sc into each st around, join, ch 1 (33).
- Rnd 9: [sc2tog over next 2 sts, 1sc into each of next 9 sts] 3 times, join, ch 1 (30).
- Rnd 10: [1sc into each of next 8 sts, sc2tog over next 2 sts] 3 times, join, ch 1 (27).
- Rnd 11: [sc2tog over next 2 sts, 1sc into each of next 7 sts] 3 times, join, ch 1 (24).
- Rnd 12: in FLO of each st around, [3sc into next st, sl st into each of next 2 sts] 8 times, join (40).
Fasten off yarn B and weave in tail. When weaving in your tail, take care not to sew into or over any of the back loops left over from round 11, as you will be working into these loops in round 13.
Crochet Chick Body – Rounds 13 to 16
To continue with the chick’s body, you will now be working into the back loops of round 11 that were omitted during your last round. Do not work into the scalloped stitches of round 12!
Join yarn A (yellow) by inserting your hook into the back loop only (left over from round 11) of the first stitch of your next round. Pull up a loop of yarn A and chain 1.
- Rnd 13: in BLO of each st around, [1sc into each of next 2 sts, sc2tog over next 2 sts] 6 times, join, ch 1 (18).
- Rnd 14: [sc2tog over next 2 sts, 1sc into each of next 4 sts] 3 times, join, ch 1 (15).
- Rnd 15: [1sc into each of next 3 sts, sc2tog over next 2 sts] 3 times, join, ch 1 (12).
Retrieve both wings set aside earlier and flatten the top round of each wing so that the stitches form two parallel lines of 4 stitches each. During round 16, you will be working through both layers of the wing and the current round of the body all at once to connect the wings onto the body.
Alternatively, if you have trouble with this method, you may instead work a normal round of single crochet stitches (1sc into each st around, join). If finished this way, the wings may then be sewn onto the body individually, using a length of yarn A, between rounds 15 and 16 on either side of the body. Choose whichever method works best for you!
- Rnd 16: [1sc into next st, 1sc into each of next 4 sts of both wing and body together, 1sc into next st] 2 times, join (12).
Fasten off yarn A and leave a long (~3 ft) tail for sewing.
Stuff your piece until full, then continue to the instructions for sewing the body and the head together below.
Sewing Together
Retrieve the head and align it in your desired direction on top of the body. With the long end tail left over from fastening off of the body, sew around the entire circumference of the head and body, stitch by stitch, to connect both pieces together.
If you have trouble getting your needle into the crevice between the head and neck, try sewing very loosely, as shown above, leaving a large gap between the head and the body for you to more easily maneuver in. Then, once you’ve completed sewing around the full circumference, you may go back and tighten each strand of your sewing individually. Just be careful to tighten the strands in the same sequence as you’ve sewn them!
Once your head and body are connected, secure your sewing with a knot to the end tail from the head, or to a nearby stitch. Then, trim your tail, and weave in any excess length.

