How to Crochet an Adorable Ladybug
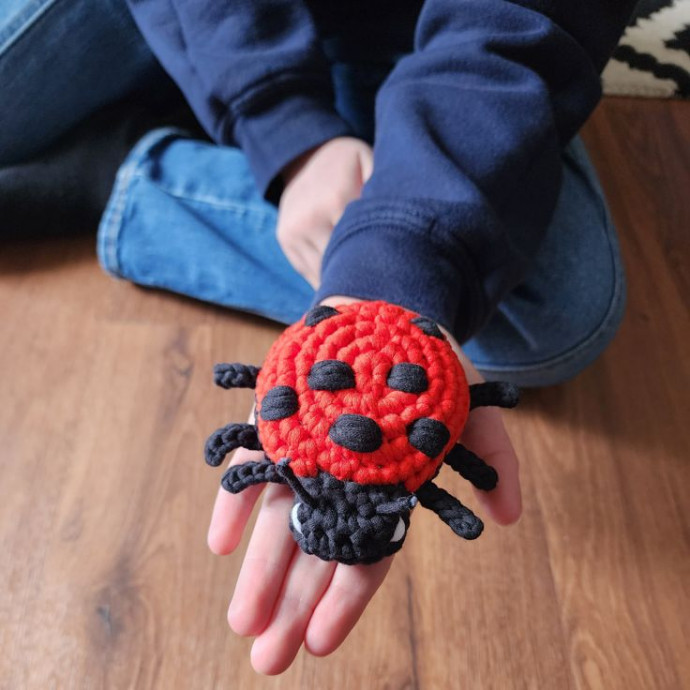
Crocheting an adorable ladybug can be such a fun and delightful project! With just a few simple stitches and some bright red and black yarn, you can bring this cute little critter to life. Whether you're making it as a gift for a friend or adding it to your collection of crochet creations, the process is bound to bring a smile to your face.
Supplies
Yarn: The Woobles Easy Peasy Yarn. 5.3 oz (150 g) and 164 yds (150 m). 75% Cotton and 25% Nylon. Medium Worsted Weight Yarn [4]. Machine wash.
Color: 1 skein Snow Place Like Home, Let’s Ketchup Soon and The Coal Shebang.
Crochet Hooks: 4 mm (G) and 5 mm (H)
Finished Project: Ladybug: 0.88 oz (25 g) and 27 yds (25 m)
Scissors, Tapestry Needle (yarn needle) and Stitch Markers.
Difficulty Level
Easy
Finished Sizes
Ladybug width approximately 3 inches X 4 inches length; not including legs.
Gauge
First 3 rounds of the body circle measures approximately 2 inches diameter.
You can substitute any yarn and hook for this stitch pattern – just remember when you substitute if your gauge is different, the finished size, and amount of yarn used for your project will also be different.
Abbreviations
US Crochet Terms
- beg – beginning
- ch – chain
- DMR – double magic ring
- g - grams
- m – meters
- oz – ounces
- R – row
- rem – remaining
- rep – repeat
- Rnd – round
- RS – right side
- sc – single crochet
- sk – skip
- sl st – slip stitch
- st/sts – stitch/stitches
- yds – yards
- * to ** – Repeat the instructions between the asterisks the number of times indicated. This repeat will contain multiple instructions.
- [] – at the end of the row – the total number of stitches
- () – important notes AND sets of stitches to be worked within one stitch, or space
Notes
When I work into the foundation chain, I prefer working into the back bar (back bump) of the chain. Feel free to work in the back loop instead if you prefer.
Please note: By working into the Back Bar, there will be no gaps across the nose of the ladybug. If you work under the BL you will see spaces along this center line.
I use a DMR to begin, but you can substitute your favorite starting method for projects made in rounds if you prefer.
Do not slip stitch to join or chain up unless specified in the instructions.
Photo tutorials follow the pattern.
Simple Crochet Ladybug Pattern with Step-by-Step Photos
This project is made in pieces which are assembled into a ladybug.
Crochet Ladybug Body Pattern
The ladybug body pieces are made in continuous rounds. Do not slip stitch to join. You may want to use a stitch marker to keep track of the first stitch of each round as you crochet. I have staggered the increase rounds to make the circle ‘rounder’ so the increases do not fall on the same stitch for each round.
Top of Ladybug
Using your 5 mm (H) crochet hook (or size required for gauge).
Using Red Yarn:
- Rnd 1: In a DMR, make 6 sc. [6 sc]
- Rnd 2: 2 sc in each st around. [12 sc]
- Rnd 3: *2 sc in the next st, 1 sc in the next st**. Work from * to ** around. [18 sc]
- Rnd 4: *1 sc in each of the next 2 sts, 2 sc in the next st**. Work from * to ** around. [24 sc]
- Rnd 5: *1 sc in the next st, 2 sc in the next st, 1 sc in each of the next 2 sts**. Work from * to ** around. [30 sc]
- Rnd 6: *2 sc in the next st, 1 sc in each of the next 4 sts**. Work from * to ** around. Sl st to join. Finish off leaving an 8-inch yarn tail for assembly. [36 sc]
Bottom of Ladybug
Using Black Yarn:
- Rnd 1: In a DMR, make 6 sc. [6 sc]
- Rnd 2: 2 sc in each st around. [12 sc]
- Rnd 3: *2 sc in the next st, 1 sc in the next st**. Work from * to ** around. [18 sc]
- Rnd 4: *1 sc in each of the next 2 sts, 2 sc in the next st**. Work from * to ** around. [24 sc]
- Rnd 5: *1 sc in the next st, 2 sc in the next st, 1 sc in each of the next 2 sts**. Work from * to ** around. [30 sc]
- Rnd 6: *2 sc in the next st, 1 sc in each of the next 4 sts**. Work from * to ** around. Sl st to join. Finish off leaving a short yarn tail for weaving in. [36 sc]
Place these 2 pieces aside and proceed to the Ladybug Head Pattern.
Ladybug Head Pattern
The ladybug head begins as a straight row. We work on both sides of the foundation chain to create the shape. Then we work in continuous rounds to increase the size of the head. You may wish to use a stitch marker to keep track of your place.
Using your 5 mm (H) crochet hook (or size required for gauge).
Using Black Yarn:
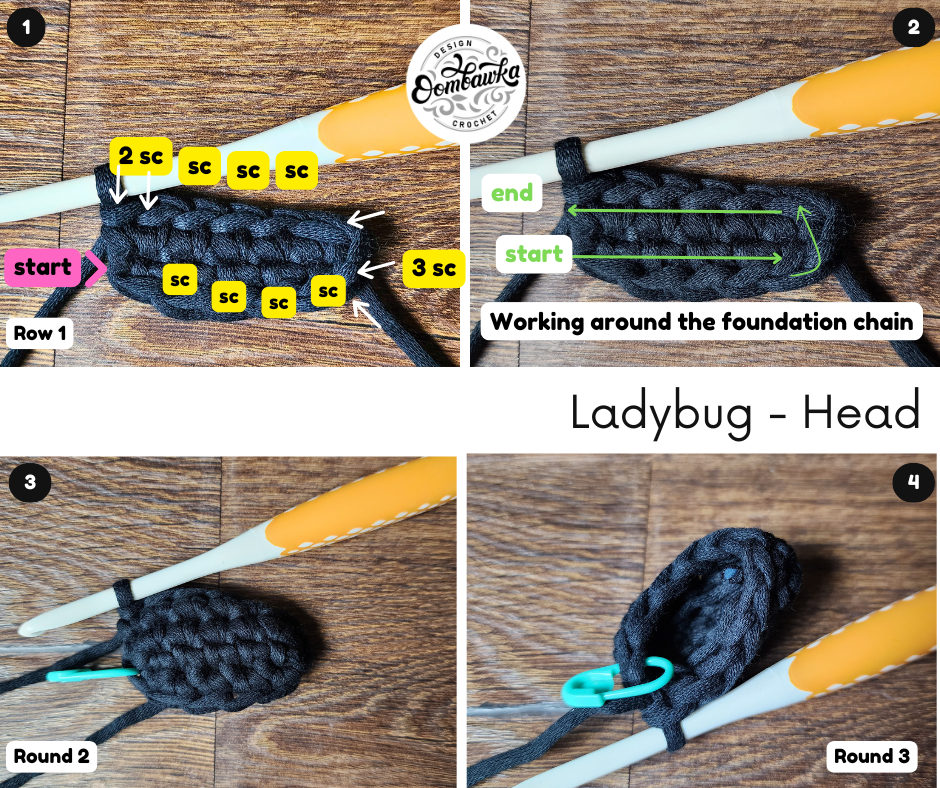
- R1: Ch 6, sk 1 ch, working in the back bar of the chains (*see notes), make 1 sc in each of the next 4 chs and 3 sc in the last ch.
- Rotate your work to continue across the base of the foundation row.
- Note: you begin working in the chain after the one that already has 3 sc in it.
- Work the following stitches under both remaining loops (this means under the front loop and back loop of the chains).
- Make 1 sc in each of the next 3 chs and 2 sc in the last ch. [12 sc]
- Rnd 2: 1 sc in each st around. [12 sc]
- Rnd 3: Rep Rnd 2. Sl st to join. Finish off leaving an 8-inch tail of yarn for assembly. [12 sc]
Place this piece aside and proceed to the Ladybug Leg Pattern.
Ladybug Leg Pattern
The ladybug legs are crocheted in rows. I recommend working in the back bar of the chains for the legs but you may work under the back loop only if you prefer.
Make 6.
Using your 4 mm (G) crochet hook (or size required for gauge).
Using Black Yarn:
- R1: Ch 5, sk 1 ch, working in the back bar of the chains, make 1 sl st in each rem ch across. Finish off leaving a 5-inch yarn tail for assembly.
Proceed to Finishing Instructions
Finishing Instructions
TIP: When sewing through the project that is filled with fiberfill you will likely have bits of fiberfill that come loose to the front of your project. I like to keep my finger snug against the part of the project where the needle exits to stop some of the fiberfill from escaping. This makes it easier to clean up the stray fibers later as most of it stays beneath the fabric.
Assembling The Body
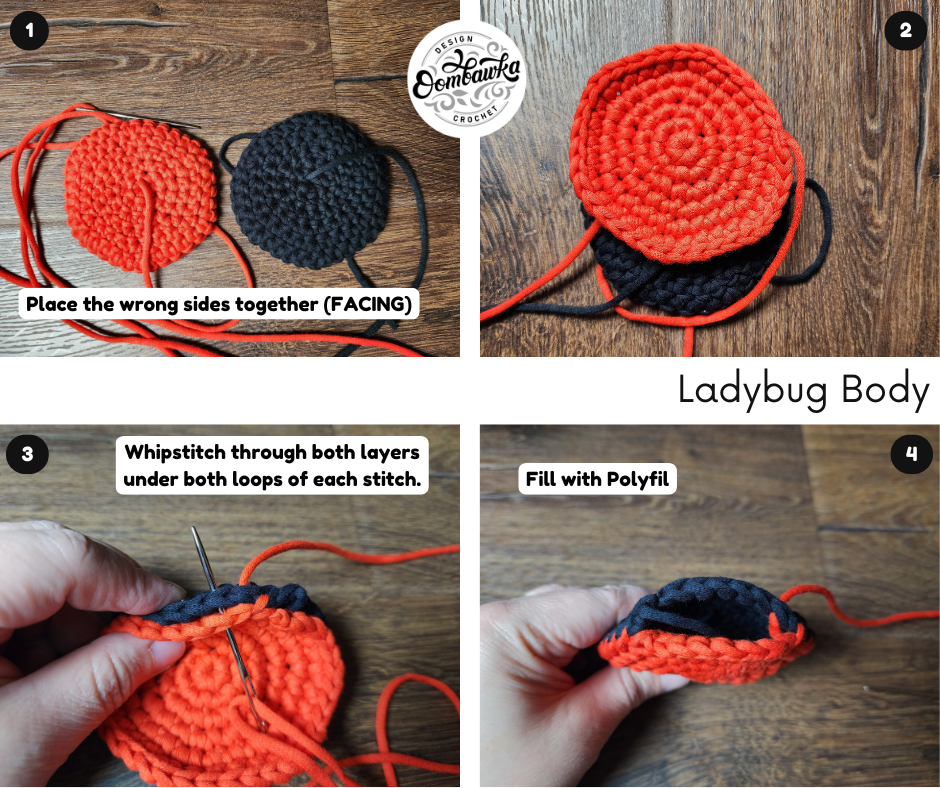
Take your red and black body circles and place the RS (right sides) facing outwards. Line up the stitches. Using your red yarn tail, whip stitch through both loops of both circles all the way around leaving about 8 stitches unworked. Fill the body firmly with Fiberfil stuffing but do not overstuff. Whip stitch the remaining stitches closed. Finish off and weave in your end.

Assembling the Head
Take your Ladybug body and find where you closed and finished off the whip stitching. There will be a slight jog there at the end and we will be covering that bit up with the head. Using your black yarn, sew the outer edge of stitches across the body (I worked over approximately 5 stitches). Continue sewing to the red section of the body remembering to stuff the head gently with a small amount of fiberfill. Finishing sewing the head to the body. Finish off and weave in the yarn ends.
The White Markings on the Face
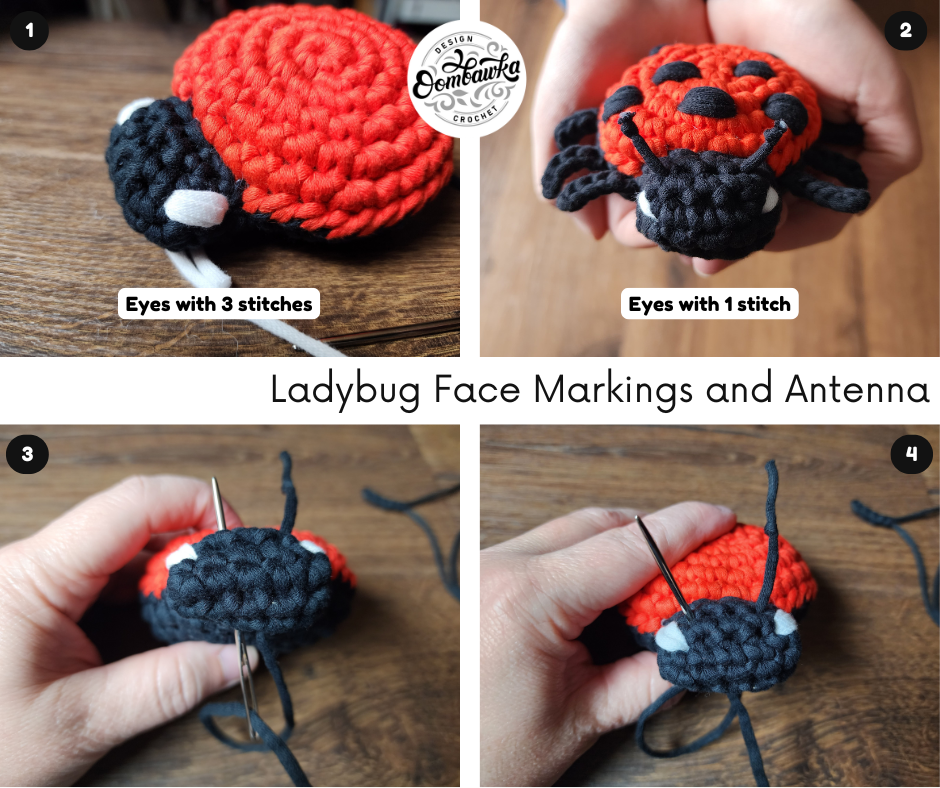
Cut a length of white yarn and sew a line for the white markings on the Ladybugs face. My initial ladybug markings were made using 3 stitches and my final ladybug markings were made with just 1 stitch. See photos for examples.
The Antenna
Cut a 6 to 7 inch yarn tail. Tie a small knot close to one end of the yarn tail. Thread the yarn tail on your needle and feed it through the Ladybug’s head (see photo for suggested placement), down through the base of the head and then back up through the top of the head where you want your second antenna. Tie a knot on the second antenna, as close to the same height as the first knot on the first antenna as you can. Trim the excess yarn above the antennas to match.
Attaching the Legs
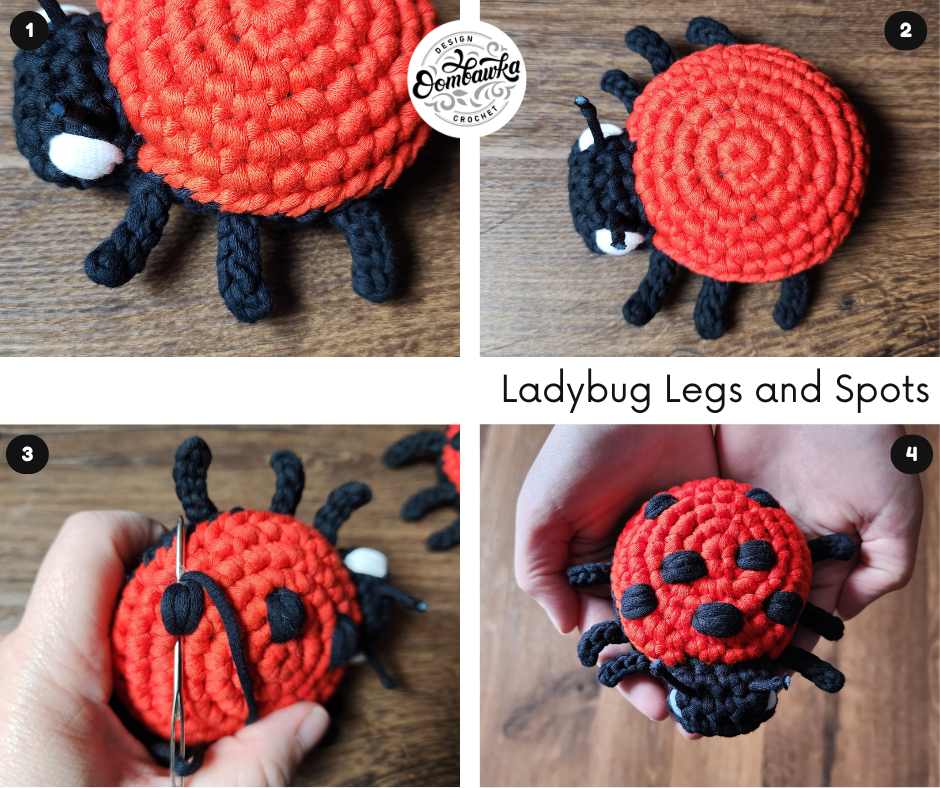
Please use my photo for placement of the legs. Using your yarn needle and yarn tail, sew the legs into place. I sewed both yarn ends inside the body in multiple directions and then trimmed the ends at the surface of the body. You will still see the end of the yarn after trimming. Simply pop it back through the fabric with your yarn needle to hide it.
The Ladybug Spots
You can put as many, or as few spots on your ladybug as you’d like! I chose to follow a photograph of a real 7 spot ladybug for my spots. Initially I had made some small circles using the yarn but found they stood up too far from the body of the ladybug and chose to hand sew these instead. You can alternately cut small circles from a sheet of black felt and glue them to your ladybug.
I made my spots using 7 stitches for each. They go through only 1 hole on each side, 7 times, before being continued through the Ladybug’s body to the next spot. Remember my tip from the beginning of the finishing instructions.
After you are done, weave the yarn through the inside of the Ladybug and finish off.


