Crochet Sonic Plushie Doll Craft Guide
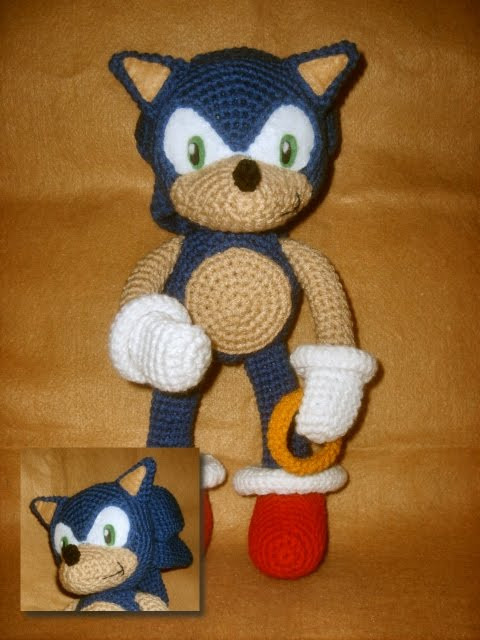
If you're looking for a fun and adorable project to work on, creating a Crochet Sonic Plushie Doll might just be the perfect choice! This craft is not only a delightful way to showcase your creativity but also an excellent opportunity to bring a beloved character to life in yarn form. With its vibrant colors and unique design, this plushie will undoubtedly add a touch of whimsy to any collection or make a fantastic gift for a Sonic fan. So, grab your crochet hook and let's get started on crafting a cuddly companion that is sure to bring joy and nostalgia with every stitch!
Materials
- WW yarn in blue, tan, red, and white
- G Hook
- Fiberfill
- Small amounts of felt in white, green, black, and tan
- Sewing needle and thread to match yarns and felts
Notes
Gauge isn't terribly important, as long as your hook and yarn choices result in a tight even stitch so that the stuffing won't come through.
Numbers in ( ) at the end of each round or row indicate the total number of stitches in that round or row.
I prefer to join my rounds and the pattern was designed by joining rounds. If you prefer working in continuous rounds, that will work, but your results may be a little different from the dolls shown.
I highly recommend using a good sewing thread and strong sewing needle to sew your doll parts together. This will create a more pleasing seam/joining with less bulk. Thread also allows you to make small adjustments during the sewing process that yarn cannot do.
I also recommend using the 'invisible decrease' method when working with dolls like this. Simply make your decrease stitches the same as you normally do, only work them through the 'FRONT LOOPS only'. Work all your other sc's through both loops, only work the decrease stitches through the front loops. This isn't completely invisible, but it does greatly reduce the unsightly gaps that standard decrease stitches will cause when working in the round and making repeated decreases.
Please read through entire pattern and assembly before you begin, to help you understand the process.
Body
Rnd 1: 7 sc in magic ring (7)
Rnd 2: 2 sc in each sc around (14)
Rnd 3: sc in next sc, 2 sc in next sc around (21)
Rnd 4: sc in next 2 sc, 2 sc in next sc around (28)
Rnd 5: sc in next 3 sc, 2 sc in next sc around (35)
Rnd 6: sc in next 4 sc, 2 sc in next sc around (42)
Rnd 7: sc in next 5 sc, 2 sc in next sc around (49)
Rnd 8-12: sc in each sc around (49)
Rnd 13: sc in next 5 sc, dec over next 2 sc around (42)
Rnd 14: sc in next 4 sc, dec over next 2 sc around (35)
(begin stuffing here if you haven't already - stuff moderately firm, continue stuffing as you progress)
Rnd 15: sc in next 3 sc, dec over next 2 sc around (28)
Rnd 16: sc in next 2 sc, dec over next 2 sc around (21)
Rnd 17: sc in next sc, dec over next 2 sc around (14)
Rnd 18: dec over next 2 sc around (7)
F/O and leave a tail. Add any stuffing needed to finish out the shaping. Weave tail through last round and pull gently to close. Secure and weave in ends.
Tan Belly Spot
Rnd 1: 7 sc in magic ring (7)
Rnd 2: 2 sc in each sc around (14)
Rnd 3: sc in next sc, 2 sc in next sc around (21)
Rnd 4: sc in next 2 sc, 2 sc in next sc around (28)
Rnd 5: sc in next 3 sc, 2 sc in next sc around (35)
F/O and weave in ends. Pin to center of body as shown and carefully sew down. (I chose to use the 'back' of the body to add the belly spot to, it leaves the 'nicer' beginning rounds exposed at the back, and the spot covers any irregularities that occur when making repetitive decreases.)
Head
Rnd 1: 7 sc in magic ring (7)
Rnd 2: 2 sc in each sc around (14)
Rnd 3: sc in next sc, 2 sc in next sc around (21)
Rnd 4: sc in next 2 sc, 2 sc in next sc around (28)
Rnd 5: sc in next 3 sc, 2 sc in next sc around (35)
Rnd 6: sc in next 4 sc, 2 sc in next sc around (42)
Rnd 7: sc in next 5 sc, 2 sc in next sc around (49)
Rnd 8: sc in next 6 sc, 2 sc in next sc around (56)
Rnd 9: sc in next 7 sc, 2 sc in next sc around (63)
Rnd 10-13: sc in each sc around (63)
Rnd 14: sc in next 7 sc, dec over next 2 sc around (56)
Rnd 15: sc in next 6 sc, dec over next 2 sc around (49)
Rnd 16: sc in next 5 sc, dec over next 2 sc around (42)
Rnd 17: sc in next 4 sc, dec over next 2 sc around (35)
(begin stuffing here if you haven't already - stuff moderately firm, continue stuffing as you progress)
Rnd 18: sc in next 3 sc, dec over next 2 sc around (28)
Rnd 19: sc in next 2 sc, dec over next 2 sc around (21)
Rnd 20: sc in next sc, dec over next 2 sc around (14)
Rnd 21: dec over next 2 sc around (7)
F/O and weave in ends. Add any stuffing that might be needed to finish the shaping. There is no real need to close up the hole at the neck.
Muzzle
*using tan*
Rnd 1: 8 sc in magic ring (8)
Rnd 2: sc in next sts, 2 hdc in each of next 2 sts, sc in next 2 sts, 2 hdc in each of next 2 sts, sc in last st (12)
Rnd 3: sc in next 2 sts, 2 hdc in each of next 2 sts, sc next 4 sts, 2 hdc in each of next 2 sts, sc in last 2 sts (16)
Rnd 4: sc in next 3 sts, 2 hdc in each of next 2 sts, sc in next 6 sts, 2 hdc in each of next 2 sts, sc in last 3 sts (20)
Rnd 5: sc in next 4 sts, 2 dc in each of next 2 sts, sc in next 8 sts, 2 dc in each of next 2 sts, sc in last 4 sts (24)
Rnd 6: sc in next 5 sts, 2 dc in each of next 2 sts, sc in next 10 sts, 2 dc in each of next 2 sts, sc in last 5 sts (28)
Rnd 7: slip stitch in next 6 sts, 3 dc in each of next 2 sts, sc in next 12 sts, 3 dc in each of next 2 sts, slip stitch in last 6 sts (36 - 12 slip stitches, 12 sc, 12 dc)
F/O. Weave in ends. Stuff lightly to moderately.
Nose
Rnd 1: 4 sc in magic ring (4)
Rnd 2-3: sc in each sc around (4)
F/O. Stuff loose ends into nose (that should be about enough stuffing for it).
Ears
(make 2)
Rnd 1: 4 sc in magic ring (4)
Rnd 2: sc in next sc, 2 sc in next sc, sc in next sc, 2 sc in next sc (6)
Rnd 3: sc in next 2 sc, 2 sc in next sc, sc in next 2 sc, 2 sc in next sc (8)
Rnd 4: sc in next 3 sc, 2 sc in next sc, sc in next 3 sc, 2 sc in next sc (10)
Rnd 5: sc in next 4 sc, 2 sc in next sc, sc in next 4 sc, 2 sc in next sc (12)
Rnd 6: sc in next 5 sc, 2 sc in next sc, sc in next 5 sc, 2 sc in next sc (14)
F/O weave in ends. Cut a triangle shape from tan felt and sew to inside of front of ear as shown. VERY lightly stuff the ear, only just enough to give it the shape, without overstuffing.
Hands/Arms
(make 2)
Begin at hand with white.
Rnd 1: 7 sc in magic ring (7)
Rnd 2: 2 sc in each sc around (14)
Rnd 3-9: sc in each sc around (14)
Rnd 10: sc in next 5 sc, dec over next 2 sc, sc in next 5 sc, dec over last 2 sc (12)
Rnd 11: Working in front loops only, 2 sc in each sc around (24)
Rnd 12-13: sc in each sc around (24)
Rnd 14: slip stitch in each sc around (24)
F/O, weave in ends.
Begin arm:
Rnd 1: Attach tan yarn to any free loop on hand from round 11. Sc in same loop as join. Sc in next sc, dec over next 2 sc, * sc in next 2 sc, dec over next 2 sc * repeat from * to * around (9)
Rnd 2-14: sc in each sc around (9)
Rnd 15: stuff arm light to moderately to shape, but not overstuff. Hand is very lightly stuffed if desired. Flatten end of arm and sc through all layers across end. (4)
F/O weave in ends.
Feet/Legs
(make 2)
Begin at feet with red:
Rnd 1: 8 sc in magic ring (8)
Rnd 2: sc in next sc, 2 sc in next sc around (12)
Rnd 3: sc in next 2 sc, 2 sc in next sc around (16)
Rnd 4: sc in next 3 sc, 2 sc in next sc around (20)
Rnd 5: sc in next 4 sc, 2 sc in next sc around (24)
Rnd 6-11: sc in each sc around (24)
Rnd 12: sc in each sc around, do not join round, ch 1 and turn (24)
Rnd 13-15: repeat rnd 12 (24)
(begin 'heel')
Rnd 16: sc in next 10 sc, ch 1 turn (10)
Rnd 17-19: repeat rnd 16 (10)
F/O. Leave long tail. Line up the edges of heel flap with opposite side of work (it will resemble a shoe shape). Using tail and yarn needle, whip stitch the two sides to each other matching the stitches. Sew across the bottom of the 'heel'. Weave in ends.
Begin leg with 'sock roll':
Rnd 1: Attach white to a stitch at the center of the 'heel' portion of the foot, sc in same stitch as joining. Sc 14 more sc evenly spaced around the opening of the foot. Slip stitch to the first sc of the round. (15)
Rnd 2: working in Front Loops Only, 2 sc in each sc around (30)
Rnd 3: working through all loops again, sc in each sc around (30)
Rnd 4: sc in next sc, 2 sc in next sc around (45)
Rnd 5: sc in each sc around (45)
Rnd 6: sc in next sc, dec over next 2 sc around (30)
F/O. Weave in ends. The 'sock' should roll naturally into shape, but you can always arrange it however you prefer.
Stuff foot moderately firm, but not overstuffed. Shape as you stuff.
Upper leg:
Rnd 1: Attach blue yarn to a free loop from rnd 2 of the 'sock' roll. Sc in same loop as joining, and each loop around (15)
Rnd 2: sc in each sc around to last 2 sc, dec over last 2 sc (14)
Rnd 3: repeat rnd 2 (13)
Rnd 4: repeat rnd 2 (12)
Rnd 5-16: sc in each sc around (12)
Stuff leg moderately firm. F/O and weave in ends.
Hair / Spikes
Large Spikes
(make 6)
Rnd 1: 4 sc in magic ring (4)
Rnd 2: sc in next sc, 2 sc in next sc, sc in next sc, 2 sc in last sc (6)
Rnd 3: sc in next sc, 2 sc in next sc around (9)
Rnd 4: sc in each sc around (9)
Rnd 5: sc in next 2 sc, 2 sc in next sc around (12)
Rnd 6: sc in each sc around (12)
Rnd 7: sc in next 3 sc, 2 sc in next sc around (15)
Rnd 8-9: sc in each sc around (15)
Rnd 10: sc in next 4 sc, 2 sc in next sc around (18)
Rnd 11-12: sc in each sc around (18)
Rnd 13: sc in next 5 sc, 2 sc in next sc around (21)
Rnd 14-15: sc in each sc around (21)
Rnd 16: HDC in first 10 sc. F/O and weave in ends. (10 hdc)
Small Spikes
(make 2)
Rnd 1: 4 sc in magic ring (4)
Rnd 2: sc in next sc, 2 sc in next sc, sc in next sc, 2 sc in last sc (6)
Rnd 3: sc in next sc, 2 sc in next sc around (9)
Rnd 4-5: sc in each sc around (9)
Rnd 6: sc in next 2 sc, 2 sc in next sc around (12)
Rnd 7-8: sc in each sc around (12)
Rnd 9: sc in next 3 sc, 2 sc in next sc around (15)
Rnd 10-11: sc in each sc around (15)
Rnd 12: HDC in first 8 sc. F/O and weave in ends. (10 hdc)
Spikes are left unstuffed.
Tail
Rnd 1: 3 sc in magic ring (3)
Rnd 2: sc in each sc around (3)
Rnd 3: 2 sc in each sc around (6)
Rnd 4: sc in each sc around (6)
Rnd 5: sc in next sc, 2 sc in next sc around (9)
Rnd 6: sc in each sc around (9)
Rnd 7: sc in next 2 sc, 2 sc in next sc around (12)
Rnd 8: sc in each sc around (12)
Rnd 9: sc in next 3 sc, 2 sc in next sc around (15)
Rnd 10: sc in each sc around (15)
F/O, weave in ends. Stuff tail moderately firm.
Final Assembly
I recommend using a good sewing thread and needle to sew parts together and to the body. You can use matching yarn, but this tends to create bulk at joinings which is not always desired. I also highly recommend pinning parts before sewing to assure placement desired and that you're happy with how it looks before making it permanent. Small adjustments can be made during the sewing process if needed.
Sew ears to top of head as shown. Sew head to body. Muzzle is sewn to the bottom center of the face, centered with ears as shown. Nose is sewn to center top of muzzle.
Spikes are left 'flat' and curved slightly at the widest end, with the 10 HDC facing up. The spikes are arranged on the back of the head in three rows roughly in the order shown (three curved around top of the back of the head, three curved around the center of the back of the head, and the two small spikes are at the bottom of the back of the head, facing more in a downward position). The top row of spikes will have the 'center' spike placed centered between the ears and about 2 rows behind them. The other spikes can then be placed in relationship to the top center spike.
Pin all the spikes to the head before sewing. This way you can be certain of the placement. I found that sewing from the bottom spikes upwards helped. Small adjustments can be made during the sewing process. Be certain that the row of hdc is always 'up' on the spikes (this is the easiest part of the piece to sew through onto the head and gives you a spike that can be 'adjusted' and changed around somewhat to suit.
Sew arms to sides of body as shown and position as desired. Legs are sewn to the bottom of the body as shown, making sure that the feet are positioned as desired.
Tail is sewn to bottom of body on the back as shown.
Cut white felt piece in the shape of eyes as shown. Position and pin before sewing to ensure you're happy with the placement. Cut small ovals of green felt for eyes and sew or glue in position desired. Smaller ovals of black are placed inside of the green felt for pupils. Tiny ovals of white felt for 'catch lights' are last.
For the 'brow ridge', Ch 38 with blue yarn. Do not fasten off yet. Pin this chain evenly around the eyes as shown, add or remove any chains needed to complete the brow ridge around the eyes. F/O chain and sew carefully around white part of eyes. Weave any loose ends of the chain into the doll to hide them.
Mouth is simply embroidered with black floss or yarn as shown.
If you wish, you can add a 'gold ring' as shown in the pictures by chaining 25 with gold yarn. Join the chain to create a ring. Sc in each ch around and join. Slip stitch in each sc around and join to the first slip stitch. This will cause the ring to naturally 'curl' into a rounded shape, you might need to help it along a little. Sew to hand or however desired.


