Crochet Princess Doll

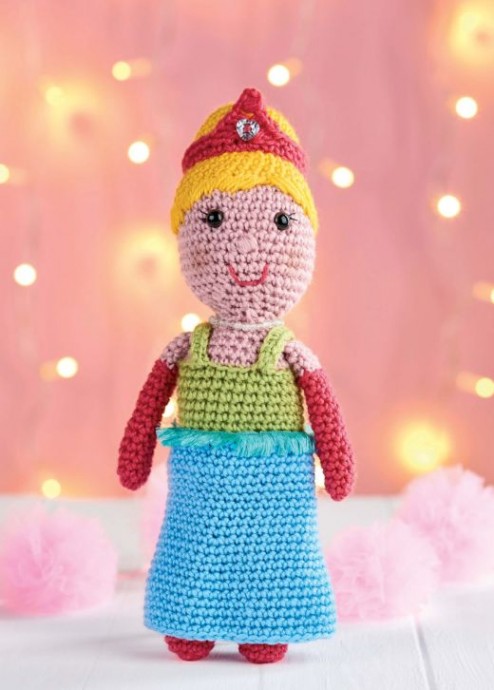
Crochet Princess Dolls are a delightful addition to any collection or a charming gift idea for someone who adores handmade treasures. These enchanting dolls are meticulously crafted with intricate details and vibrant colors that will surely capture your heart. Whether displayed on a shelf or cherished as a playtime companion, each Princess Doll exudes a sense of whimsy and elegance that is simply irresistible.
WHAT YOU NEED...
- With Harry and Meghan’s wedding only a matter of weeks away, we’re celebrating in true crafty style. Heather Gibbs' crochet princess doll is the perfect beginner project and ideal for royal revellers. Know someone getting married? This also makes an incredibly unique wedding gift and the perfect keepsake to remember the big day by. Simply change up the hair to match the bride and create the dress from white yarn – we can hear the wedding bells chiming already!
Essentials...
Yarn: yellow, blue, green, pink, red
Stitch markers
Tapestry needle
Stuffing
Black embroidery thread
Blusher
Sparkly button
Seed beads
Cotton thread
INSTRUCTIONS
- Head - Using 3.5mm hook and Pink make a magic ring, work 6dc into ring. Six sts
Rnd 1: 2dc in each st to end. 12 sts
Rnd 2: (1dc, 2dc in next st) to end. 18 sts
Rnd 3: (2dc, 2dc in next st) to end. 24 sts
Rnd 4: (3dc, 2dc in next st) to end. 30 sts
Rnd 5: (4dc, 2dc in next st) to end. 36 sts
Rnds 6-12: 1dc in each st to end
Rnd 13: 18dc, mb in next st, 1dc in each st to end
Insert safety eyes between Rnds 8-9 approx five sts apart
Rnds 14-15: 1dc in each st to end
Rnd 16: (4dc, dc2tog) to end. 30 sts
Rnd 17: (3dc, dc2tog) to end. 24 sts
Rnd 18: (2dc, dc2tog) to end. 18 sts
Rnd 19: (1dc, dc2tog) to end. 12 sts
Rnd 20: 1dc in each st to end
Stuff
Fasten off, leaving a long tail leg - Leg & Body - LEG
Make two
Using 3.5mm hook and Red make a magic ring, work 6dc into ring. Six sts
Rnd 1: 2dc in each st to end. 12 sts
Rnds 2-4: 1dc in each st to end Join Pink to back loop only of any st
Rnd 5: working in back loops only, 1dc in each st to end
Rnds 6-13: 1dc in each st to end Change to Green
Rnds 14-16: 1dc in each st to end
Fasten off first Leg onlyBODY
Using 3.5mm hook and Green crochet Legs tog as folls:
Rnd 17: 1dc in each st around first Leg, 2ch (counts as two sts), join with a sl st to second Leg, 1dc in each st around second leg, 1dc in each of next 2ch. 28 sts
Rnds 18-24: 1dc in each st to end
Stuff
Rnd 25: working in back loops only, 1dc in each st to end
Rnds 26-30: 1dc in each st to end
Note: stuff as you go
Join Pink to back loop only of any st at back of Body
Rnd 31: 1dc in each st to end
Rnd 32: (5dc, dc2tog) to end. 24 sts
Rnds 33-35: rep Rnds 16-18 of Head. 12 sts
Fasten off - Skirt - Using 3.5mm hook join Blue to any front loop of Rnd 25 of Body
Rnd 1: working in front loops only (6dc, 2dc in next st) to end. 32 sts
Rnd 2: (7dc, 2dc in next st) to end. 36 sts
Rnds 3-12: 1dc in each st to end
Rnd 13: (8dc, 2dc in next st) to end. 40 sts
Rnds 14-16: 1dc in each st to end
Rnd 17: (9dc, 2dc in next st) to end. 44 sts
Rnds 18-22: 1dc in each st to end
Fasten off - Arm - Make two
Stuff as you go, leaving upper half unstuffed
Using 3.5mm hook and Red make a magic ring, work 7dc into ring. Seven sts
Rnds 1-13: 1dc in each st to end Join Pink to back loop only of any st
Rnd 14: working in back loops only, 1dc in each st to end
Rnds 15-16: 1dc in each st to end
Fasten off, leaving a long tail - Dress Strap & Wig Cap - DRESS STRAP
Make two
Using 3.5mm hook and Green make 13ch
Row 1: starting in second ch from hook, 1dc in each st to end. 12 sts
Fasten off, leaving a long tailWIG CAP
Using 3.5mm hook and Yellow make a magic ring, work 6dc into ring. Six sts
Rnds 1-9: rep Rnds 1-9 of Head. 36 sts
Fasten off, leaving a long tail - Bun & Tiara - BUN
Using 3.5mm hook and Yellow make a magic ring, work 6dc into ring. Six sts
Rnds 1-4: rep Rnds 1-4 of Head. 30 sts
Rnds 5-10: 1dc in each st to end
Fasten off, leaving a long tailTIARA
Using 3.5mm hook and Red make 30ch, join with a sl st to make a ring
Rnds 1-2: 1ch, 1dc in each st to end, join with a sl st to first st
Rnd 3: 1ch, 13dc, miss two sts, 4tr in next st, 3ch, mb in third ch from hook, (2ch, 4tr) in next st, miss two sts, 1dc in each st to end
Fasten off, leaving a long tail - To Make Up - Attach Wig Cap to top of Head at slight angle so face is exposed. Using Yellow embroider strands of hair around Wig Cap to create fringe. Stuff Bun and sew to top of Wig Cap. Add sparkly button to middle front of Tiara, attach Tiara around Bun. Attach Head and Arms to Body. Sew Dress Straps onto dress. Add a short length of Tulip Teal around top of Skirt. Add blusher to cheeks. Weave in all ends.


