Crochet Brie the Dog
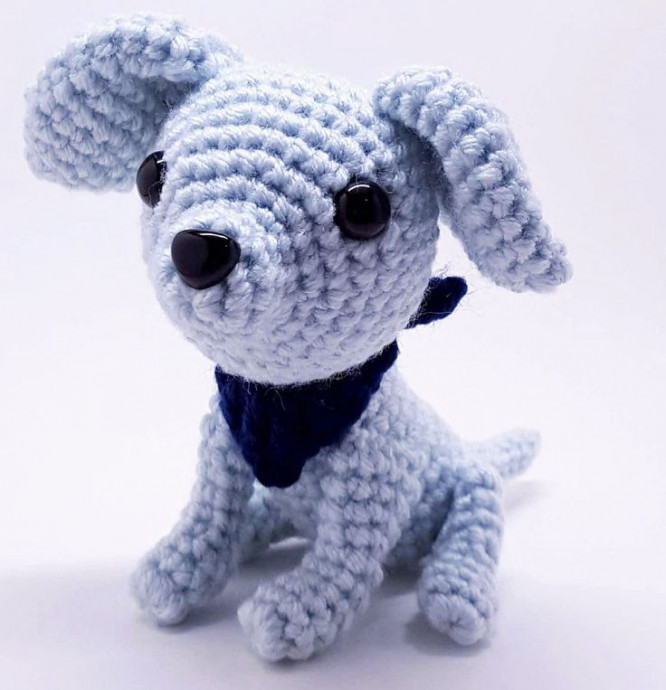
Crochet Brie the Dog is an adorable and delightful yarn creation that captures the essence of our furry friends with its soft, huggable design. This charming crocheted dog brings a smile to anyone's face with its button eyes and meticulously crafted details. Whether displayed as a cute decorative piece or given as a special handmade gift, Crochet Brie the Dog radiates warmth and joy, making it a lovable addition to any crochet enthusiast's collection.
Materials:
2.25mm/B crochet hook
3.50mm/E crochet hook for bandana
Worsted weight yarn
Worsted weight yarn for the bandana
10 mm safety eyes
10 mm safety nose
Fiberfill
Stitch markers
Yarn needle
Pins
Abbreviations:
MC = Magic Circle
Sc = single crochet
St = stitch
Sl st = slip stitch
Rnd = round
Sc rnd = sc in ever st of the round
CC = Yarn color change (Counts as first st of the rnd)
Inc = Increase, 2 sc in same st
Dec = Decrease, next 2 sts crocheted together
[…] = repeat instructions within brackets as specified
Techniques:
Magic circle: Essential to the start of most amigurumi
Invisible decrease: Good for preventing gaps and giving a more uniform look to your sc’s.
Working in front lps: For my patterns I always work sc’s in the front loops of the stitch, unless otherwise specified. By working in only the front loops the sc’s will stack up straighter than if you worked them in both loops.
Stitch markers: I use a stitch marker (bobby pin) for keeping track of the beginning of my rounds, I place it in the first stitch of the round.
Staggered rounds: Staggered rounds off set the patterns inc’s or dec’s so you don’t get that pinwheel look and it is more of a circle instead of a hexagon. For example, [4 sc, inc] x6 is an even inc round that can be a staggered round, so it would become, 2 sc, inc, [4 sc, inc] x5, 2 sc, the even sc’s are split at the beginning of the round.
Close: Closing a piece is threading your yarn needle with the yarn end and putting it through each of the front loops of the last rounds’ sc’s, usually 6, and pulling tight. It should look like a mini magic circle, then put the needle through the center of it and out through the piece. Tie your knot and stuff ends back into the piece.
Whip stitch: Usually means the finished piece is folded flat with the last sc or yarn end at the edge of the piece. Thread yarn needle with yarn end, and again with only the front loops, ‘zigzag,’ or whip stitch the opening closed.
Head
Starts of with the snout, the safety nose is placed between rounds 1 and 2.
RND 1: 6 sc in MC (6 sts)
RND 2: 6 inc (12sts)
RND 3-4: Two sc rnds (12 sts)
Insert nose between rnds 1 and 2
RND 5: sc, inc [2 sc, inc] x3, sc (16 sts)
RND 6: [sc, inc] x8 (24 sts)
RND 7: sc, inc, [2 sc, inc] x7, sc (32 sts)
RND 8: sc rnd (32 sts)
RND 9: [3 sc, inc] x8 (40 sts)
RND 10-13: Four sc rnds (40 sts)
Place eyes between rnds 8 and 9 and about 9 sts/sc apart
RND 14: [3 sc, dec] x8 (32 sts)
RND 15: sc rnd (32 sts)
RND 16: sc, dec, [2 sc, dec] x7, sc (24 sts)
Begin stuffing the head
RND 16 [sc, dec] x8 (16 sts)
RND 17: 8 dec (8 sts)
Fully stuff and Close
Ears x2
This is where pins will come in handy. I usually pin and re-pin the ears on the head several times before attaching them. I give a rough idea of where to start, but it’s much easier to pin and decide where you want them before you start sewing. Ears are shape in an ‘S’ shape with the bottom of ear bending out and the top of the ear bent in toward the head.
RND 1: 4 sc in MC (4 sts)
RND 2: 4 inc (8 sts)
RND 3: [sc, inc] x4 (12 sts)
RND 4: sc, inc, [2 sc, inc] x3, sc (16 sts)
RND 5: sc rnd (16 sts)
RND 6: [3 sc, inc] x4 (20 sts)
RND 7-10: Four sc rnds (20 sts)
RND 11: [3 sc, dec] x4 (16 sts)
Whip stitch opening closed. Place an ear on the head starting between rnds 11 and 12 and pin it. Pin the other to match, and once you decide on placement begin attaching the ears. I leave one ear still pinned and removed the other. Sew that one on and then realign the second ear and sew it on.
Body
Since the dog has a rather big head it can be pretty top heavy if you don’t attach it to the body in a good place. Find the right angle you want and then set the head back a rnd or two before you start sewing it to the body. Mind that the decreases in the body’s pattern create a curve for the back, so be sure to have it facing the right way when attaching it to the head.
RND 1: 6 sc in MC (6 sts)
RND 2: 6 inc (12 sts)
RND 3: [sc, inc] x6 (18 sts)
RND 4: sc, inc, [2 sc, inc], sc x6 (24 sts)
RND 5-7: Three sc rnds (24 sts)
RND 8: dec, 20 sc, dec (22 sts)
RND 9: sc rnd (22 sts)
Rnd 10: dec, 18 sc, dec (20 sts)
RND 11: sc rnd (20 sts)
RND 12: dec, 16 sc, dec (18 sts)
RND 13: sc rnd (18 sts)
RND 14: dec, 14 sc, dec (16 sts)
RND 15: dec, 12 sc, dec (14 sts)
Fully stuff. The body can be sewn on any which way, it all depends on how you want the head oriented, but be sure to place the head back a few rnds else you might have balance issues. In the picture I started between rnds 13 and 14 of the head. Stuff the neck as you sew the pieces together.
Front legs x2
The legs are are not stuffed, but flattened and shaped to be more like a dog’s leg. Bend the paws to be perpendicular to the rest of the leg and then flatten the leg opposite how the paw is flattened.
RND 1: 8 sc in MC (8 sts)
RND 2-7: Six sc rnds (8 sts)
RND 8: [3 sc, inc] x2 (10 sts)
RND 9: sc rnd (10 sts)
RND 10: [4 sc, inc] x2 (12 sts)
No need to stuff. Flatten the ‘paw’ end one way then flatten the ‘leg’ the opposite way. Whip stitch the opening closed, start between rnds 13 and 14 of the body and angle the leg so the paw with be parallel with the bottom of the body. Sew on the leg across the span of four rnds of the body. Five sts between the legs when looking from the front.
Back legs x2
Backs legs are formed the same as front, only one rnd shorter.
RND 1: 8 sc in MC (8 sts)
RND 2-5: Four sc rnds (8 sts)
RND 6: [3 sc, inc] x2 (10 sts)
RND 7: sc rnd (10 sts)
RND 8: [4 sc, inc] x2 (12 sts)
RND 9: [5 sc, inc] x2 (14 sts)
Bend and shape the same as the front legs. Whip stitch the opening of the back legs closed and start between rnds 7 and 8 and sew directly down across five rnds of the body.
Tail
The tail is a fairly simple shape, you can add as many sc rnds as you like to make it longer or shorter.
RND 1: 3 sc in MC (3 sts)
RND 2: 3 inc (6 sts)
RND 3-7: Seven sc rnds (6 sts)
To attach to the body, start between rnds 3 and 4 and at the center of the dog’s back.
Bandana
Done in the color of your choice. A nice little detail, but I kept if really simple so feel free to create it however you like.
ROW 1: Ch 30+1, turn
ROW 2: 10 sl st, 2 sc, 2 dc, tr, (ch 3, sc in third ch from hook), tr, 2 dc, 2 sc, 10 st sl
Weave in ends and tie around the dogs neck.

