Crochet Milo the Monkey
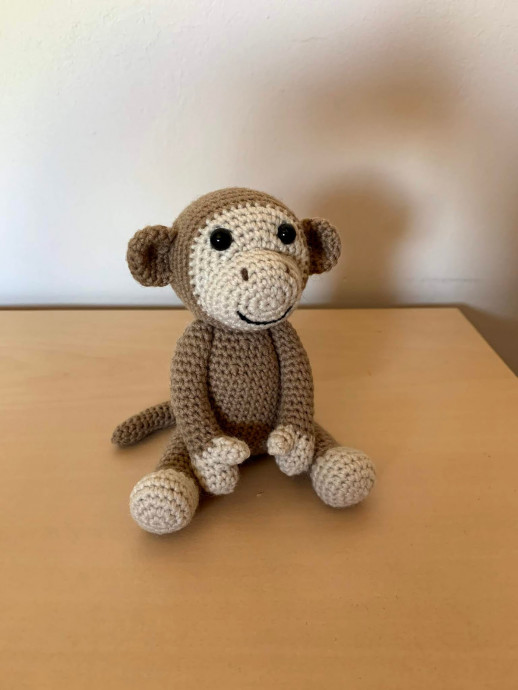
Crochet Milo the Monkey is an adorable amigurumi pattern that is perfect for both beginners and experienced crocheters. With its detailed instructions and step-by-step photos, crafting this lovable little monkey is a breeze. From Milo's playful expression to his cute little tail, each element is carefully designed to bring out his fun and charming personality. Whether you're looking to enhance your crochet skills or create a special handmade gift, Milo the Monkey is sure to bring joy and smiles to whoever crosses his path. So grab your yarn and hook, and get ready to embark on a delightful crochet adventure with Milo!
You will need:
Yarn needle
Soft toy filling
8mm safety eyes
3mm crochet hook (This pattern can be made with any size yarn and hook. I recommend using a hook 1 size smaller than suggested on the yarn)
DK Yarn – Approx. 140m
oSirdar Snuggly DK – Brown
oSirdar Snuggly DK – Oatmeal
oSirdar Snuggly DK – Black (for mouth detail)
Stitches and abbreviations used: (US terminology)
MR - Magic ring (sc unless otherwise specified)
Ch - Chain
SC - Single crochet
Inc - Increase stitch (2 single crochets into one stitch)
Dec - Decrease stitch (single crochet 2 stitches together)
FLO – Front loop only
BLO – Back loop only
YO – Yarn Over
ST - Stitch
SLST - Slip stitch
R – Round or Row
FO - Finish Off
Other things to note.
Most of this pattern is worked in continuous rounds. It is helpful to use a stitch marker to keep track.
The number in ( ) at the end of each round indicates the total stitch count for that round.
* * indicates repeated series of stitches.
Use invisible decreases for a neater finished product. This is done by using the FLO of the stitches while making the decrease.
Changing colour – complete the stitch before the colour change by working the last yarn over of the stitch with the new colour.
Stitches in [ ] are worked into one stitch.
Remember to stuff the product little and often as you work.
Head – Starting in oatmeal
1.
6sc into MR (6)
2.
*Inc * x6 (12)
3.
*1sc, inc * x6 (18)
4.
*1sc, inc, 1sc * x6 (24)
5.
*3sc, inc * x6 (30)
6.
*2sc, inc, 2sc * x6 (36)
7.
*5sc, inc * x6 (42)
8.
Change to brown - *3sc, inc, 3sc * x6 (48)
9-16.
Sc (48) – 8 rounds – Place safety eyes between R5-6, approx. 8st apart
17.
*3sc, dec, 3sc * x6 (42)
18.
*5sc, dec * x6 (36) - Stuff the head and continue stuffing until closed
19.
*2sc, dec, 2sc * x6 (30)
20.
*3sc, dec * x6 (24)
21.
*1sc, dec, 1sc * x6 (18)
22.
*1sc, dec * x6 (12)
23.
*dec * x6 (6)
FO – Close hole
Muzzle – Oatmeal
1.
6sc into MR (6)
2.
*Inc * x6 (12)
3.
1sc, inc x3, 3sc, inc x3, 2sc (18)
4.
2sc, inc x3, 6sc, inc x3, 4sc (24)
5.
3sc, inc, 2sc, inc. 8sc, inc, 2sc, inc, 5sc (28)
6-7.
Sc (28) – 2 rounds
FO – Leaving long yarn tail, sew to the bottom half of the face between R1-7, stuffing as you sew.
Using a stand of brown yarn, embroider on the nose detail.
Using a strand of black yarn, embroider on the mouth detail. See pictures for guidance.
Ears x2 – Brown
1.
6sc into MR (6)
2.
*Inc * x6 (12)
3.
*1sc, inc * x6 (18)
4-5.
Sc (18) – 2 rounds
6.
*dec, 1sc * x6 (12)
FO – Leaving yarn tail, sew to the head between R12-14. Approx. 16st apart. This piece is not stuffed.
Body – Brown
1.
6sc into MR (6)
2.
*Inc * x6 (12)
3.
*1sc, inc* x6 (18)
4.
*1sc, inc, 1sc * x6 (24)
5.
*3sc, inc * x6 (30)
6.
*2sc, inc, 2sc * x6 (36)
7-19.
Sc (36) – 13 rounds
20.
*7sc, dec * x4 (32) - Stuff the piece and continue stuffing until end.
21.
Sc (32)
22.
*3sc, dec, 3sc * x4 (28)
23.
*5sc, dec * x4 (24)
24.
*2sc, dec, 2sc * x4 (20)
FO – Leaving yarn tail, sew to R10-18 of the head.
Thumbs x2 – Oatmeal
1.
5sc into MR (5)
2.
SC (5)
FO – Leaving yarn tail to close any gaps from joining to the hand in the next step.
Hands & Arms x2 – Starting in Oatmeal
1.
6sc into MR (6)
2.
Inc x5, 1sc (11)
3-4.
Sc (11) – 2 rounds
5.
2sc, 5sc around the thumb, 9sc around the rest of the hand. (16)
6.
*dec, 2sc * x 4 (12) – Use the yarn tail from the thumb to close up any gaps from joining.
7.
Change to Brown – *4sc, dec * x2 (10)
8-21.
Sc (10) – 14 rounds - Stuff the piece and continue stuffing until end.
22.
*dec * x5 (5)
FO – Close hole. Leaving yarn tail, sew to the top of the body just below where the head is joined with the thumbs facing forward, approx. 8st apart.
Legs x2 – Starting in Oatmeal
1.
6sc into MR (6)
2.
*Inc * x6 (12)
3.
*1sc, inc * x6 (18)
4.
*8sc, inc * x2 (20)
5-6.
Sc (20) – 2 rounds
7.
6sc, dec x4, 6sc (16)
8.
6sc, dec x2, 6sc (14)
9-22.
Change to Brown – sc (14) –14 rounds - Stuff the piece and continue stuffing until end.
23.
*dec * x7 (7)
FO - close hole, leaving yarn tail, sew the legs to the side of the body at approx. R5-9 of the body.
Tail – Brown
1.
6sc into MR (6)
2.
*Inc, 2sc * x2 (8)
3-20.
Sc (8) - 18 rounds – Stuff lightly
FO – Leaving yarn tail, sew to body at the centre of the
back at R5-7.
No comments
Write a comment


