Create Your Own Crochet Amigurumi Marie Ufufy Toy Inspired by Disney's Aristocats
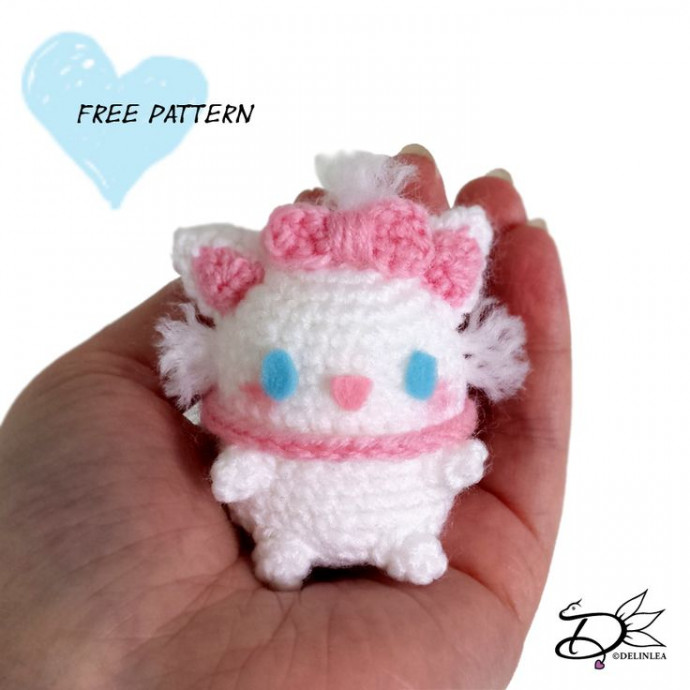
The Crochet Amigurumi Marie Ufufy Toy is an absolute delight for any Disney fan! This sweet and charming handmade toy captures the essence of Marie from the beloved movie "The Aristocats" perfectly. With its adorable design and soft texture, it's a wonderful addition to any toy collection or as a thoughtful gift for someone special.
Required Materials
For this DIY you’ll need:
- Yarn: I used thin acrylic yarn in white and pink.
- Crochet hook.
- Stitch marker.
- Yarn needle.
- Sewing pins (optional).
- Scissors.
- Fiber fill.
- Pink and blue felt.
- Key chain.
- Glue (optional).
Stitches Used
- CH = Chain.
- SC = Single Crochet.
- ST = Stitch.
- Inc = Increase.
- Dec = Decrease.
- Slst = Slip Stitch.
- (…) = Repeat the space in brackets the given number of times.
- […] = Total number of stitches.
Pattern
Body
In white:
1: 6SC in magic ring. [6]
2: 2SC in each ST around. [12]
3: (1SC, inc), 6 times. [18]
4: (2SC, inc), 6 times. [24]
5: SC in each st around. [24]
6: SC in each st around. [24]
7: (3SC, inc), 6 times. [30]
8: SC in each st around. [30]
|
17: SC in each st around. [30]
18: (3SC, dec), 6 times. [24]
19: (2SC, dec), 6 times. [18] Stuff the body here.
20: (1SC, dec), 6 times. [12]
21: Dec all around. [6]
Fasten off and weave in the tail.
Legs (4)
In white:
1: 4SC in magic ring. [4]
2: (1SC, inc), 2 times. [6]
Fasten off and leave a long tail for sewing. You don’t have to stuff them, just flatten.
Tail
In white:
Chain 5, insert in the second chain from hook, 4SC.
Fasten off and leave a long tail for sewing.
Ears (2)
In white:
1: 4SC in magic ring. [4]
2: (1SC, inc), 2 times. [6]
3: (1SC, inc), 3 times. [9]
4: (2SC, inc), 3 times. [12]
Fasten off and leave a long tail for sewing.
Inside of the Ears (2)
In pink:
1: Chain 3, insert in the second chain from hook, 2SC, turn. [2]
2: Chain 1, dec. [1]
Fasten off and leave a long tail for sewing.
Bow on Top of Her Head
In pink:
1: Chain 7, insert in the 2nd chain from hook, 6SC, turn. [6]
2: Chain 1, 6SC. [6]
3: SLST around the bow for a nice edge.
Fasten off and leave a long tail. Use a yarn needle to go to the middle of the bow and wrap the tail tightly around several times and fasten off.
Bow for on Her Back
In pink:
1: Chain 11, insert in the 2nd chain from hook, 10SC, turn. [10]
2: Chain 1, 10SC. [10]
3: Chain 1, 10SC. [10]
4: SLST around the bow for a nice edge.
Fasten off and leave a long tail. Use a yarn needle to go to the middle of the bow and wrap the tail tightly around several times and fasten off.
Collar
In pink:
Chain 32 and SLST in the first chain to make it round.
Assembling
Start with sewing on the legs, use some sewing pins first to make sure you position them right before sewing them on. This way you can easily move them around until you are happy with the look. The ‘arms’ go just under the middle of the body. Sew them on securely.
Sew the inside of the ears to the ears, and sew those to the body. To give Marie some fluff on top of her head and on the sides of her face, I took 2 pieces of white yarn, tied a knot in the middle and pulled both ends through the side with a yarn needle, to the middle of the head and on the sides of the face, just under the ears. Make sure the knot disappears inside the body. Cut the yarn slightly longer as you want and with the yarn needle, you can untwist the yarn, so it gets fluffy. Now you can give them the final haircut.
Time for the bow on top of her head. I glued it on, but you can totally sew them on if you prefer. Now put on her collar, and sew or glue it on, so it stays in place. And don’t forget to sew the big bow to her back, on her collar.
Cut her eyes out of blue felt and a nose out of pink felt and glue those on. Give her some blush on her cheeks with some soft pastel chalk or makeup.
You are finished now! I hope you enjoyed making Marie! Of course, you can add lashes and eyebrows with needle and thread, but I was just lazy and I like how she turned out this way!

