Crochet Pizza Face Amigurumi
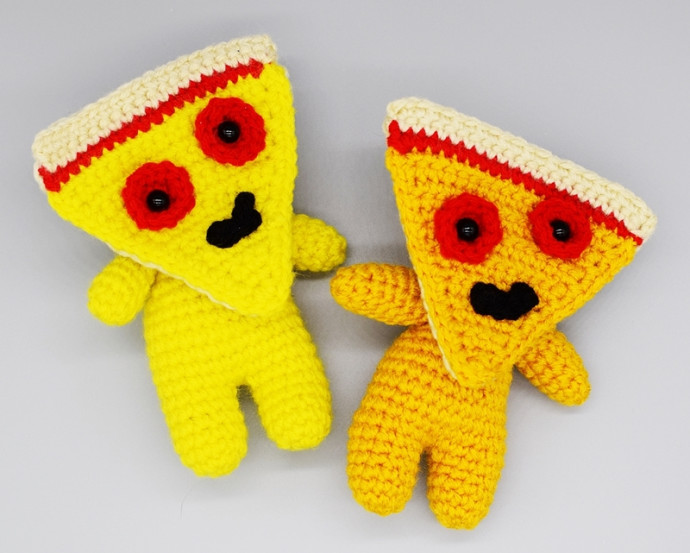
Crochet Pizza Face Amigurumi is a delightful and unique craft project that combines the coziness of crochet with the deliciousness of pizza. Imagine creating a cute, miniature pizza with adorable googly eyes and a big smile! This amigurumi can be a charming addition to your collection or a fun gift for a pizza lover.
SUPPLIES
3.75mm (F) hook
Polyfil
Yarn needle
Two safety eyes
4 medium worsted weight yarn, you will need a small amount in the following colors:
Cheese color – yellow or gold
Sauce color – red or maroon
Crust color – beige or tan
Olive color – black
This amigurumi doll is worked in the round without joining each round. The pizza slice is made in rows. The body, arms, pizza slice, and face are all made separately and sewn together using a yarn needle.
ABBREVIATIONS
st = stitch
sc = single crochet
dc = double crochet
ch = chain
sl st = slip stitch
inc = increase (work two single crochet in one stitch)
dec = decrease (2 single crochet together)
[…] = repeat instructions in brackets the indicated number of times
(…) = number of stitches in that row.
LEGS (make 2)
Cheese color yarn.
Rnd 1. sc 6 in magic ring (6)
Rnd 2. inc in next 6 st. (12)
Rnd 3-6. sc around (12)
First leg – cut yarn and fasten off.
Second leg – do not cut yarn. These two legs will be attached in the next step.
BODY & HEAD
This will be worked off the two legs.
Continue with the second leg.
Rnd 1. (This round will connect the two legs) Ch 2, sc into any stitch on the first leg, sc 12 st around first leg, sc 2 into beginning chain, sc 12 around second leg (28) stuff legs now or after the next few rows.
Rnd 2-7.sc around (28)
Rnd 8. [sc 5, dec] 4 times (24)
Rnd 9. [sc 2, dec] 6 times (18)
Rnd 10. 18 sc (18)
Rnd 11. [sc 1, dec] 6 times (12)
Rnd 12. [dec] 6 times (6) stuff the rest of the body
Rnd 13. [inc] 6 times (12)
Rnd 14. [sc 1, inc] 6 times (18)
Rnd 15. [sc 2, inc] 6 times (24)
Rnd 16-18. sc 24 (24)
Rnd 19. [sc 2, dec] 6 times (18)
Rnd 20. [sc 1, dec] 6 times (12)
Rnd 21. [dec] 6 times (6)
Stuff and finish by closing hole at top of head. Tail will not be used for sewing, so stuff tails inside or weave in.
ARMS
Make 2.
Cheese color yarn.
Rnd 1. sc 6 in magic ring. (6)
Rnd 2. [sc 1, inc] (9)
Rnd 3-9. sc 9 (9)
Finish, tie off, and stuff. Leave a long tail for sewing.
ASSEMBLY
Assemble in this order for best results!*
Attach arms to body.
Using long tail and yarn needle, pinch together and sew closed the top of each arm. Position arms as desired on the body and sew on across the top. If it helps, use a stitch marker or small pin to hold the arms in place while working. My arms are positioned at the top of the body, just under the head, to create shoulders.
Create face on top of pizza slice.
Sew on pepperoni slice using tails, then attach safety eyes in the middle of each OR just use the safety eye to secure the pepperoni to the slice. Sew or glue on olive mouth.
My positioning of the face – left eye: middle is five rows from the top of the yellow. Right eye: middle is three rows down from top of the yellow. Mouth is around six rows up from the point.
Sew together top and bottom of pizza.
Using long tail from the bottom pizza piece, sew the top and bottom together. I sewed into the back of the top slice so the stitching would not be visible on the front. When finished, do not cut off tail – weave it through the slice so it is in position to sew the slice onto the head, around five rows from top and in the center.
Sew pizza slice to front of face.
Using tail, sew pizza slice onto the front of the head.

