Crochet Adorable Pizza
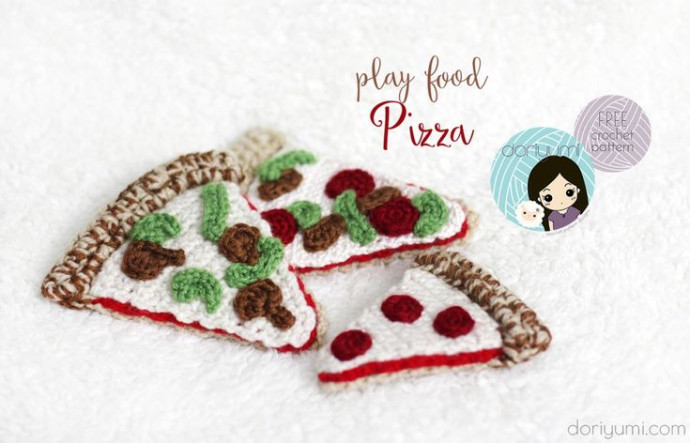
Crocheting an adorable pizza can be such a fun and cozy project! Imagine using vibrant yarn colors to bring out the cheesy goodness, creating tiny pepperoni slices or even cute mushroom details. The best part is there are no calories to worry about with this delightful crochet creation. So, grab your crochet hook, pick your favorite toppings, and get ready to stitch up a slice of pizza that will bring a smile to anyone's face.
SUPPLIES
- Crochet hook G/4.0mm
- Yarn needle (I use Clover Chibi Bent Tip Needle Set)
- Stitch marker (I use Clover Locking Stitch Markers)
- Worsted weight yarn, I used the following yarn:
- Pizza Base: Red Heart Super Saver, Buff
- Pizza Crust add-0n: Red Heart Soft, Toast
- Sauce: Red Heart Super Saver, Cherry Red
- Cheese: Red Heart Super Saver, Aran
- Pepperoni: Red Heart Soft, Wine
- Sausage & Mushroom: Red Heart Soft, Toast
- Green Pepper: Red Heart Soft, Guacamole
NOTES
- Please read through the entire pattern before you start.
- Sizing: approx. 6″ in length x 5″ wide.
- Gauge: Not essential as long as you keep your tension consistent.
- Tip: Try to use the same weight yarn for the pizza base, sauce and cheese so that they all match up. Particularly with Red Heart yarns, the Soft yarn is a lighter worsted weight than the Super Saver, therefore when mixing these two worsted weight yarns, your pizza pieces may not turn out to be the same size.
ABBREVIATIONS
ch = chain
sc = single crochet
sc2tog = single crochet two together
sl st = slip stitch
st(s) = stitch(es)
rep = repeat
* – * = repeat instructions between asterisks as many times as directed
PATTERN INSTRUCTIONS
PIZZA BASE & CRUST
With light brown yarn, ch 2.
Row 1: Work 2 sc in second ch from hook. Ch 1, turn. (2)
Row 2: 2 sc in each of next 2 sts. Ch 1, turn. (4)
Rows 3-4: 1 sc in each st across. Ch 1, turn. (4)
Row 5: 2 sc in first st. 1 sc in next 2 sts. 2 sc in last st. Ch 1, turn. (6)
Rows 6-7: 1 sc in each st across. Ch 1, turn. (6)
Row 8: 2 sc in first st. 1 sc in next 4 sts. 2 sc in last st. Ch 1, turn. (8)
Rows 9-10: 1 sc in each st across. Ch 1, turn. (8)
Row 11: 2 sc in first st. 1 sc in next 6 sts. 2 sc in last st. Ch 1, turn. (10)
Rows 12-13: 1 sc in each st across. Ch 1, turn. (10)
Row 14: 2 sc in first st. 1 sc in next 8 sts. 2 sc in last st. Ch 1, turn. (12)
Rows 15-16: 1 sc in each st across. Ch 1, turn. (12)
*Stop here for small pizza and work on rows 25-29.
Row 17: 2 sc in first st. 1 sc in next 10 sts. 2 sc in last st. Ch 1, turn. (14)
Rows 18-20: 1 sc in each st across. Ch 1, turn. (14)
Row 21: 2 sc in first st. 1 sc in next 12 sts. 2 sc in last st. Ch 1, turn. (16)
Rows 22-24: 1 sc in each st across. Ch 1, turn. (16)
We will now work on the pizza crust.
Join dark brown yarn with light brown yarn, then ch 2. We will be working with both yarns together (light brown & dark brown at once) to create the pizza crust.
Rows 25-29: 1 hdc in each st across. Ch 2, turn. (16)
Fasten off and leave a long tail for sewing.
To form the crust, fold the last few rows inwards to row 24. Using the long tail & a yarn needle, secure crust to base. Fasten off and weave in ends.
SAUCE
With red yarn, ch 2.
Follow the same pattern (rows 1-24) of the pizza crust.
Fasten off and leave a long tail for sewing.
Position sauce on top of the pizza base. Using the long tail & a yarn needle, secure sauce to pizza base around the edges.
Fasten off and weave in ends.
CHEESE
With white/cream yarn, ch 2.
Follow the same pattern (rows 1-24) of the pizza crust.
Fasten off and leave a long tail for sewing.
Position cheese on top of the sauce. Using the long tail & a yarn needle, secure cheese to sauce around the edges.
Fasten off and weave in ends.
PIZZA TOPPINGS
Sausage
With brown yarn, ch 5.
Row 1: 3 sc in second ch from hook. 1 sc in next 2 sts. 3 sc in last st. Continue working around the chain, 1 sc in next 2 sts. Sl st in first sc to join. (10)
Fasten off and leave a tail to sew on pizza.
Pepperoni – Large
With red yarn, work magic ring, ch 1 to secure ring.
Round 1: Work 6 sc in ring (6)
Round 2: 2 sc in each st around (12)
Sl st in first st to join.
Fasten off and leave a tail to sew on pizza.
Pepperoni – Small
With red yarn, work magic ring, ch 1 to secure ring.
Round 1: Work 4 sc in ring (4)
Round 2: 2 sc in each st around (8)
Sl st in first st to join.
Fasten off and leave a tail to sew on pizza.
Green Pepper
With green yarn, ch 11.
Row 1: 1 sc in second ch from hook, sc2tog, 1 sc in next 4 sts, sc2tog, 1 sc in last st. (8)
Fasten off and leave a tail to sew on pizza.
You can position the pepper slice straight or curved like an upside down U. Stitch down using leftover tail.
Mushroom
With brown yarn, ch 6.
Row 1: Sl st in 3rd ch from hook and in next 2 sts. In last st, work [1 sc, 6 dc, 1 sc] all in that last st. Sl st in next st and fasten off. Leave a tail to sew on pizza.
ASSEMBLY
Sew each topping to pizza however you like – work a piece of art! Weave in any loose ends.
You can also use hot glue to secure the toppings.
Try overlapping the toppings for a more 3d effect.

