Crochet Rooster Potholder
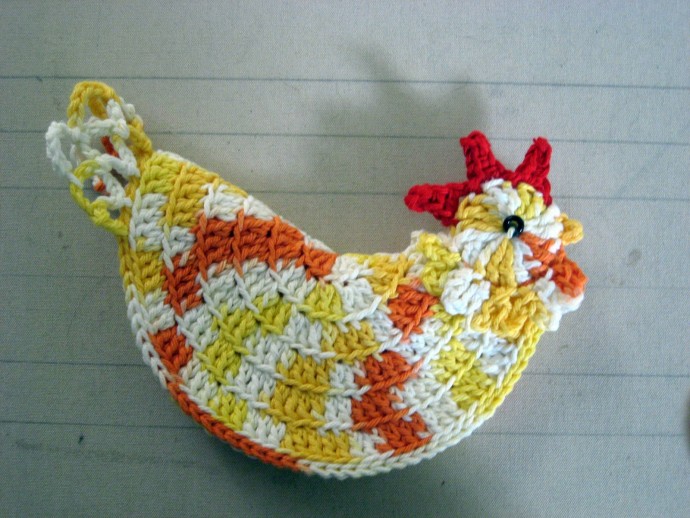
If you're looking to add a touch of charm to your kitchen, a Crochet Rooster Potholder is just the thing you need! This cute and practical accessory not only protects your hands from hot pots and pans but also brings a smile to your face every time you use it. The intricate crocheted details of the rooster design make it a unique and eye-catching addition to your kitchen decor. Whether you're an experienced crocheter or just starting out, crafting your own Crochet Rooster Potholder can be a fun and rewarding project. So, why not brighten up your cooking space with this delightful and functional piece that combines style and functionality in one friendly little rooster?
Materials:
Main Color 2.1 oz or 60 gr of Sugar ’n Cream.
Small amount of red for the Comb on the Head.
Small amount of yellow or orange for the Beak.
Crochet hook “G”.
Felt, pony beads, or googly eyes
Body: (make 2)
Using Main Color make a Magic Loop. (or ch 5, sl st to form a ring)
Row 1: Ch 3, make 17 dc in ring, sl st join. (18 sts)
Use Back Loops only for Row 2 – 6.
Row 2: Ch 3, dc in same st, 2 dc in each st in row, sl st join. (36 sts)
Row 3: Ch 3, dc in same st, dc 1, [2 dc, dc 1]; repeat [ ] around row, sl st join. (54 sts)
Row 4: Ch 3, dc in same st, dc 1, [2 dc, dc 2]; repeat [ ] around row, sl st join. (72 sts)
Row 5: Ch 3, dc in same st, dc 1, [2 dc, dc 3]; repeat [ ] around row, sl st join. (90 sts)
Row 6: Ch 3, dc in same st, dc 1, [2 dc, dc 4]; repeat [ ] around row, fasten off. (108 sts)
Make another one just like this one, don’t fasten off.
Place both pieces together with wrong sides together. Sl st or sc (using the Back loops of Face piece and of Back piece). Continue on with Tail.
Tail:
Row 1: * Ch 6, sk 1, sl st in next st, repeat from * 4 times more, ch 3, sk 1, dc. (6 ch spaces)
Row 2: Turn work around and sl st into ch space, * ch 6, sl st in next ch-6 space, repeat from * 3 times more, ch 3, dc in ch-6 space. (5 ch spaces)
Row 3: Turn, sl st into ch space, * ch 6, sl st in next ch-6 space, repeat from * 3 times more. (4 ch spaces)
Fasten off, weave in tails.
Head:
With Main Color make a Magic Loop. (or ch 5, sl st to form ring)
Row 1: Ch 4, make 17 tr in ring, sl st join. (18 sts) Fasten off.
Repeat head pattern for the other side of head but don’t fasten off.
- This is Point A: *ch 6, sl st in next st, repeat from * 7 times more. (8 – ch 6 loops)
- Pick up first piece, place wrong sides together. Turn work so first piece is facing, sl st to the first piece, (working on the first piece only) * ch 6, sl st in next st* repeat between * 7 times more. (8 – ch 6 loops)
- Sl st join to Point A, (there should be 18 unused stitches, 9 stitches on each piece of the Head) fasten off leaving a 12” tail to sew head to body.
Comb: (top feather thingy)
Sl st join red yarn in 3rd st from last fasten off, work on both pieces, *ch5, sc in Camel hump of 2nd and 3rd ch from hook, make 1 hdc in next ch, sk 1, sl st in next st, repeat from * 2 times more.
Fasten off.
Beak:
Sl st join yellow yarn in 1st st from Head fasten off, work on both pieces, ch 3, sc in Camel hump of 2nd ch from hook, sl st in next st, fasten off. Weave in Comb and Beak tails.
Fold body in half and sew head to opposite side of tail. Insert head down like a glove and sew at base of loops.
Glue circles of red felt in center of each head side for eyes. Or, embroider or sew on beads or googly eyes.


