Crochet the Cutest Snowman Hot Pad
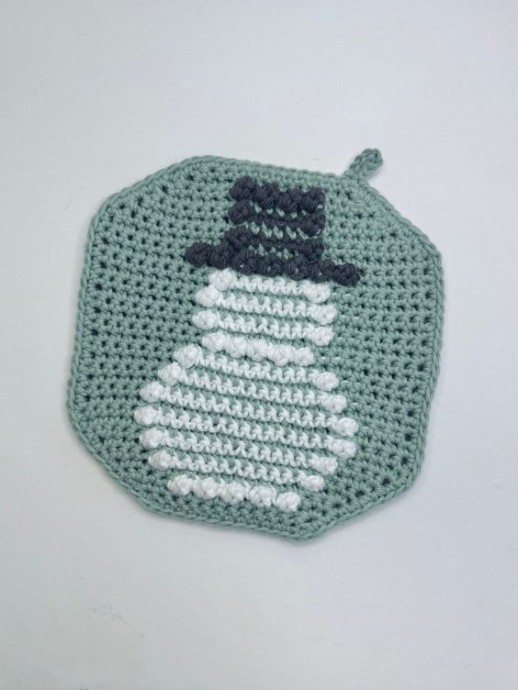
If you’re looking to add some adorable charm to your kitchen, why not try crocheting the cutest snowman hot pad? This fun and festive project is perfect for the winter season and will bring a smile to your face every time you use it. With its cozy design and practical use, this snowman hot pad makes for a delightful addition to your home decor or a thoughtful handmade gift for a friend.
What you will need for the Snowman Hot Pad crochet pattern
- Worsted weight (#4), cotton yarn
- 134 yds: Main Color – 103 yds, White – 21 yds, Black – 10 yds
- 4.00 mm (G) hook
- Yarn Needle
- Scissors
Pattern Notes
* Intermediate pattern.
** Written in US crochet terms.
* Finished size = 8.5″ tall x 8″ wide.
** Gauge: 7.5 sc x 8.25 rows = 2″.
* Chain stitch at the beginning of row does not count as a stitch. Always place 1st stitch of each row in same stitch as beginning chain unless stated otherwise.
** When changing colors, I do not fasten off the Main Color. I drop the Main Color and join the next color. I clip the white or black colors after completing that row.
* I used a combination of tapestry & intarsia crochet techniques. Be sure to leave some slack in the carried yarn and always carry the yarn on the WS.
** To change colors do not complete sc. Leave 2 loops on hook, yarn over with new color and pull through 2 loops on hook.
* Each hot pad is made up of 2 pieces, a front and back that is connected with a sc border.
** Stitch count is only listed on each row when there is a change.
* Starting at the bottom right corner, odd numbered rows are read – and are RS rows. Even numbered rows are read → and are WS rows.
** Cotton yarn is recommended as acrylic yarn will likely melt when placing a hot pan on it.
**NOTE** The Hot Pad is to help protect your countertops when placing a hot pan on it. It is not intended to pick up or remove hot items from an oven or stove. This does not replace an oven mitt.
Popcorn Stitch Tutorial
1. Place 4 sc into the same st on previous Row.
2. Remove hook from the 4th stitch and insert into 1st of the 4 just made working from back to front.
3. Pick up the loop from the 4th sc and pull through. Be sure the popcorn is facing away from you.
Stitch Key
ch = chain
MC = Main Color
PC = Popcorn Stitch
rep = repeat
RS = Right Side
sc = single crochet
st = stitch
sc dec = single crochet decrease
sc inc = single crochet increase
slst = slip stitch
WS = Wrong Side
Front panel:
With MC, ch 14.
←Row 1 (RS):
sc in 2nd ch from hook and in each ch across, ch 1, turn. (13 sc)
→Row 2(WS):
sc inc, sc in next 11, sc inc, ch 1, turn. (15 sc)
←Row 3 (RS):
sc inc, sc in next 2, join white, PC, *sc, PC; rep from *3 more times, join MC, sc in next 2, sc inc, ch 1, turn. (5 PC, 21 sc)
→Row 4 (WS):
sc inc, sc in next 15, sc inc, ch 1, turn. (19 sc)
←Row 5 (RS):
sc inc, sc in next 2, join white, PC, sc in next 11, PC, join MC, sc in next 2, sc inc, ch 1, turn. (2 PC, 19 sc)
→Row 6 (WS):
sc inc, sc in next 19, sc inc, ch 1, turn. (23 sc)
←Row 7 (RS):
sc inc, sc in next 3, join white, PC, sc in next 13, PC, join MC, sc in next 3, sc inc, ch 1, turn. (2 PC, 23 sc)
→Row 8 (WS):
sc inc, sc in next 23, sc inc, ch 1, turn. (27 sc)
←Row 9 (RS):
sc in next 5, join white, PC, sc in next 15, PC, join MC, sc in next 5, ch 1, turn. (2 PC, 25 sc)
→Row 10 (WS):
sc in each st across, ch 1, turn. (27 sc)
←Row 11 (RS):
sc in next 5, join white, PC, sc in next 15, PC, join MC, sc in next 5, ch 1, turn. (2 PC, 25 sc)
→Row 12 (WS):
rep Row 10.
←Row 13 (RS):
sc in next 6, join white, PC, sc in next 13, PC, join MC, sc in next 6, ch 1, turn. (2 PC, 25 sc)
→Row 14 (WS):
rep Row 10.
←Row 15 (RS):
sc in next 7, join white, PC, sc in next 11, PC, join MC, sc in next 7, ch 1, turn. (2 PC, 25 sc)
→Row 16 (WS):
rep Row 10.
←Row 17 (RS):
sc in next 9, join white, PC, *sc, PC; rep from *3 more times, join MC, sc in next 9, ch 1, turn. (5 PC, 22 sc)
→Row 18 (WS):
rep Row 10.
←Row 19 (RS):
sc in next 8, join white, PC, sc in next 9, PC, join MC, sc in next 8, ch 1, turn. (2 PC, 25 sc)
→Row 20 (WS):
rep Row 10.
←Row 21 (RS):
rep Row 19.
→Row 22 (WS):
rep Row 10.
←Row 23 (RS):
sc in next 9, join white, PC, sc in next 7, PC, join MC, sc in next 9, sc inc, ch 1, turn. (2 PC, 25 sc) Finish off white yarn.
→Row 24 (WS):
rep Row 10.
←Row 25 (RS):
sc in next 7, join black, PC, *sc, PC; rep from *5 more times, join MC, sc in next 7, ch 1, turn. (7 PC, 20 sc)
→Row 26 (WS):
rep Row 10.
←Row 27 (RS):
sc dec, sc in next 8, join black, PC, sc in next 5, PC, join MC, sc in next 8, sc dec, ch 1, turn. (2 PC, 23 sc)
→Row 28 (WS):
sc dec, sc in next 21, sc dec, ch 1, turn. (23 sc)
←Row 29 (RS):
sc dec, sc in next 6, join black, PC, sc in next 5, PC, join MC, sc in next 6, sc dec, ch 1, turn. (2 PC, 19 sc)
→Row 30 (WS):
sc dec, sc in next 17, sc dec, ch 1, turn. (19 sc)
←Row 31 (RS):
sc dec, sc in next 4, join black, PC, *sc, PC; rep from *2 more times, join MC, sc in next 4, sc dec, ch 1, turn. (4 PC, 13 sc) Finish off black yarn.
→Row 32 (WS):
sc dec, sc in next 13, sc dec, ch 1, turn. (15 sc)
←Row 33 (RS):
sc dec, sc in next 11, sc dec. (13 sc)
Finish off, weave in ends.
Back panel:
NOTE: There is not a RS/WS for this panel.
With MC, ch 14.
Row 1:
sc in 2nd ch from hook and in each ch across, ch 1, turn. (13 sc)
Row 2:
sc inc, sc in next 11, sc inc, ch 1, turn. (15 sc)
Row 3:
sc inc, sc in next 13, sc inc, ch 1, turn. (17 sc)
Row 4:
sc inc, sc in next 15, sc inc, ch 1, turn. (19 sc)
Row 5:
sc inc, sc in next 17, sc inc, ch 1, turn. (21 sc)
Row 6:
sc inc, sc in next 19, sc inc, ch 1, turn. (23 sc)
Row 7:
sc inc, sc in next 21, sc inc, ch 1, turn. (25 sc)
Row 8:
sc inc, sc in next 23, sc inc, ch 1, turn. (27 sc)
Rows 9 -26:
sc in each st across, ch 1, turn.
Row 27:
sc dec, sc in next 23, sc dec, ch 1, turn. (25 sc)
Row 28:
sc dec, sc in next 21, sc dec, ch 1, turn. (23 sc)
Row 29:
sc dec, sc in next 19, sc dec, ch 1, turn. (21 sc)
Row 30:
sc dec, sc in next 17, sc dec, ch 1, turn. (19 sc)
Row 31:
sc dec, sc in next 15, sc dec, ch 1, turn. (17 sc)
Row 32:
sc dec, sc in next 13, sc dec, ch 1, turn. (15 sc)
Row 33:
sc dec, sc in next 11, sc dec, ch 1. (13)
Finish off, weave in ends.
Border:
NOTE: The blocks are connected down each of the sides and across the top and bottom. Hold the blocks together being sure to place the back block to the back of the snowman block. Make sure the PC design is on the outside and facing you.
Join yarn on the top right corner. Ch 1, sc around hot pad, working in each row end on the sides and in each stitch along the top and bottom. Place 2 sc in each of the 8 corners. Complete last sc, slst to 1st sc.
Optional hanging loop
Complete last sc, slst to 1st sc, ch 7, slst into same st.
Finish off and weave in ends.

