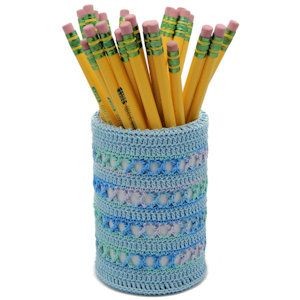
Crochet Lacy X Stitches Pencil Cup

Crafting a Crochet Lacy X Stitches Pencil Cup is such a fun and creative project that can bring a touch of elegance to your desk! The intricate lacy X stitches give the pencil cup a delicate and stylish look, making it a lovely addition to any workspace. You can choose your favorite color of yarn to match your personal style or even make a few in different colors to brighten up your desk.
Materials Needed:
Red Heart Classic Crochet Thread 10: Delft Color#0480
Aunt Lydia's Classic Crochet Thread 10: Ocean Color#0995
1 -15oz clean and empty vegetable can
1 Piece White Sticker Paper 11" x 4-3/16", You can use regular copy paper instead but you will have to glue it onto the can.
Yarn Thickness: 10thread
Gauge: 8sc = 1"
Finished Size: Fits Can 3" Diameter by 4-3/8" H
Skill Level: Intermediate
Special Stitch Note This pattern uses the Crossed Treble Stitch which I found in the Harmony Guide To Crocheting Techniques and Stitches Copyright 1986 Page 9. I do actually write the instructions for this stitch right in the round that it is in and it is not explained separately.
Instructions
RND 1: Using Delft or other solid color. Ch4, join w/slst to first ch to form ring. Ch3, 11dc in ring. Join w/slst to top of ch3. (12dc)
RND 2: Ch3, dc in same st as slst. 2dc in each dc around. Join w/slst to top of ch3. (24dc)
RND 3: Ch3, dc in same st as slst. Dc in next dc. *2dc in next dc. Dc in next dc. Rep from * around. Join w/slst to top of ch3. (36dc)
RND 4: Ch3, dc in same st as slst. Dc in each of the next 2 dc. *2dc in next dc. Dc in each of the next 2 dc. Rep from * around. Join w/slst to top of ch3. (48dc)
RND 5: Ch3, dc in same st as slst. Dc in each of the next 3 dc. *2dc in next dc. Dc in each of the next 3 dc. Rep from * around. Join w/slst to top of ch3. (60dc)
RND 6: Ch3, dc in same st as slst. Dc in each of the next 4 dc. *2dc in next dc. Dc in each of the next 4 dc. Rep from * around. Join w/slst to top of ch3. (72dc)
RND 7:This is where the bottom edge corner is turned up. Stitch around the post just under the front and back lps for each stitch around on this round only. Ch3. Dc around each dc around. Join w/slst to top of ch3.
RND 8: Ch3, dc in each dc around. Join w/slst to top of ch3. Drop Delft but do not fasten off.
The next round is the beginning of your repeating pattern rounds. Join Ocean or another multicolored thread to same st as you dropped the solid color.
RND 9: Ch1. Sc in same st. Sc in each dc around. Join w/slst to first sc.
Pay attention closely to how this next round ends. It is different from most projects that are worked in the round. The stitches overlap to join.
RND 10: Ch4. Sk4 sc. Tr in next st. Ch1. Tr in 3rd st of skipped sts taking the hook behind the first tr. *Sk 2 sts. Tr in next st. Ch1. Tr into first of skipped sts taking the hook behind the tr just made. Rep from * around until you come to where you started. You should have a tr in the very last stitch just before the starting ch4. Now work one more tr in the 2nd skipped stitch at the beginning of the round working in front of the chain 4. Ch1. Join w/slst to top of ch4.
RND 11: Ch1. Sc in same st as slst. Sc in next ch1 sp. *Sc in each of the next 2 sts. Sc in next ch1 sp. Rep from * around. Join w/slst to first sc. Check your stitch count. You should still have 72. Drop Multi and pick up Solid
RND 12: Ch3. Dc in each sc around. Join w/slst to top of ch3. Drop Solid and pick up Multi.
RND 13-26: Rep RNDs 9-12 three times more.
RND 27 & 28: Repeat RND 8. Fasten off leaving an 18" piece of thread. Weave other ends into back of work but not this long end.
Finishing Wrap empty can with paper, slip crochet work over can. Weave long end through last round of work, gather up slightly to secure work onto can. Weave more of the end into work to secure it. Trim excess thread. Enjoy!


