Crochet Lacy Baby Blanket

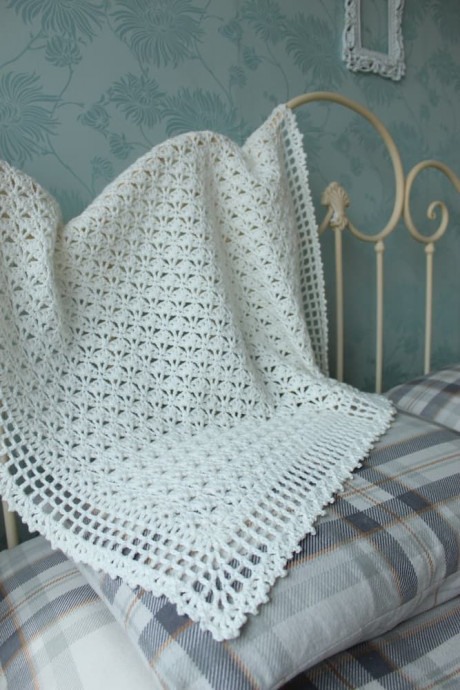
Crocheting a lacy baby blanket can be such a delightful and fulfilling project! The intricate patterns and soft yarns create a cozy and charming piece that is perfect for snuggling up your little one. The delicate lace design adds a touch of elegance and sweetness to the blanket, making it a wonderful handmade gift for a baby shower or a special addition to your nursery.
Materials
- Knitcraft Be My Baby (DK weight; 50% acrylic, 50% polyamide; 235 m per 100g ball) x 4 balls In White
- 4.5 mm crochet hook
- Yarn needle
- Scissors
- blocking mat and pins
Gauge / Tension
3 shells x 8 rows = 4 x 4 inches / 10 x 10 cm measured after blocking
Finished Size
35 inch /89 cm square after firm blocking
Stitches And Abbreviations (US Crochet Terms)
- ch- chain stitch
- sc- single crochet
- dc- double crochet
- ch-sp – chain space
- V st- (1 dc, 1 ch, 1 dc)
- shell- (1 dc, 1 ch) 4 times, 1 dc in same st/sp
- picot – (1 sc, 3 ch, sl st into 2nd ch from hook, 1 sc) in same st/space
- border shell – (1 dc, 1 ch) 3 times, 1 dc in same st/sp
- PM – place stitch marker into the indicated stitch
Lacy Crochet Baby Blanket Pattern Notes
- The baby blanket is worked in corner to corner style diagonaly across
- The pattern starts at the single point
- You increase at both sides of the blanket simultaneously
- once you reach the desired size, you will be decreasing on both sides in order to create a square blanket
- The blanket is finished off with a lace border, row of lacy shellsand picot stitches
- Number of rows determines the finished width and size of the crochet blanket
- For a smaller blanket work equally less rows for both increase and decrease parts
- For a bigger blanket work equally more rows for both increase and decrease parts
Lacy Crochet Baby Blanket Written Pattern
Blanket Increase Part
Chain 5.
Row 1: miss 4 ch (counts as 1 dc + 1 ch-sp), start working into last ch, (1 dc, 1 ch) 3 times, 1 dc in same st, turn.
Row 2: 4 ch (counts as 1 dc + 1 ch-sp here and throughout), 1 dc in same st, 5 ch, 1 V st into 3rd ch of beg 4 ch from previous row, turn.
Row 3: 4 ch, working into first V st (1 dc, 1 ch) 3 times, 1 dc in same st; 1 sc into 3rd dc on the shell 2 rows below working over 5 ch from previous row fixing it in position, 1 shell into last V st, turn.
Row 4: 4 ch, 1 dc in same st at the bottom of 4 ch (counts as first V st), 5 ch, miss next shell, 1 V st into next sc, 5 ch, miss next shell, 1 V st into 3rd ch of beg 4 ch from previous row, turn.
Row 5: 4 ch, working into first V st (1 dc, 1 ch) 3 times, 1 dc in same st; 1 sc into 3rd dc on the shell 2 rows below working over 5 ch from previous row fixing it in position, 1 shell into next V st, 1 sc into 3rd dc on the shell 2 rows below working over 5 ch from previous row fixing it in position, 1 shell into last V st, turn.
Row 6: 4 ch, 1 dc in same st at the bottom of 4 ch (counts as first V st), (5 ch, miss next shell, 1 V st into next sc) repeat across until last shell, 5 ch, miss next shell, 1 V st into 3rd ch of beg 4 ch from previous row, turn.
Row 7: 4 ch, working into first V st (1 dc, 1 ch) 3 times, 1 dc in same st; (1 sc into 3rd dc on the shell 2 rows below working over 5 ch from previous row fixing it in position, 1 shell into next V st) repeat across until last shell, 1 sc into 3rd dc on the shell 2 rows below working over 5 ch from previous row fixing it in position, 1 shell into last V st, turn.
Repeat Row 6 – 7 another 18 times. Then repeat Row 6 one more time.
Row 45: 4 ch, working into first V st (1 dc, 1 ch, 1 dc) in same st; (1 sc into 3rd dc on the shell 2 rows below working over 5 ch from previous row fixing it in position, 1 shell into next V st) repeat across until last shell, 1 sc into 3rd dc on the shell 2 rows below working over 5 ch from previous row fixing it in position, (1 dc, 1 ch, 1 dc, 1 ch, 1 dc) into last V st, turn.
PM around end dc st on both sides of Row 45.
Blanket Decrease Part
Row 46: 1 ch, 1 sc into first dc, 3 ch, miss the first half shell, 1 V st into next sc, (5 ch, miss next shell, 1 V st into next sc) repeat across until last half shell, 3 ch, 1 sc into the 3rd ch of beginning 4 ch, turn.
Row 47: 1 shell into next V st, (1 sc into 3rd dc on the shell 2 rows below working over 5 ch from previous row fixing it in position, 1 shell into next V st) repeat across to last V st (including), 1 sc into last sc, turn.
Row 48: 5 ch (doesn’t count as a st), 1 sc into 3rd dc on the shell, 3 ch, miss the rest of first shell, 1 V st into next sc, (5 ch, miss next shell, 1 V st into next sc) repeat across until last shell, 3 ch, 1 sc into 3rd dc of last shell, turn.
Repeat Row 47 – 48 another 19 times.
Row 87: 1 shell into next V st, 1 sc into 3rd dc on the shell 2 rows below working over 5 ch from previous row fixing it in position, 1 shell into last V st, 1 sc into 3rd dc of last shell, turn.
Row 88: 5 ch (doesn’t count as a st), 1 sc into 3rd dc on the shell, 3 ch, miss the rest of first shell, 1 V st into next sc, 3 ch, 1 sc into 3rd dc of last shell, turn.
Row 89: 1 shell into next V st, 1 sc into last sc.
Do not fasten off.
Lacy Crochet Baby Blanket Border
As you noticed, with right side facing, your blanket has 5 ch-sp running along the decrease section on the left-hand side. We will create these loops on the right-hand side too as they are used for the border.
Turn your work.
(5 ch, 1 sc into 3rd dc of the last shell) (5 ch, sl st into 3rd dc of the edge shell on row below) repeat all the way down the side of the blanket until you reach the last shell above the half shell of Row 45, 5 ch and sl st into top of dc on the half shell of Row 45.
Rnd 1: turn your work, sl st into first 5 ch-sp, 4 ch, 1 dc in first 5 ch-sp (counts as first V st), 1 V st in same 5 ch-sp, *(2 V sts in next 5 ch-sp) repeat across until you reach the last shell,
(1 V st, 2 ch, 1 V st) into sc worked into 3rd dc of the last shell, (2 V sts in next 5 ch-sp) repeat across to marked dc st of Row 45, (1 V st, 2 ch, 1 V st) worked around edge dc, continue working around the edge dc of each row, work 1 V st around each edge dc until you reach Row 1,
work (1 V st, 2 ch, 1 V st) into underside stitch of the first shell, work 1 V st around each edge dc until you reach marked dc of Row 45, (1 V st, 2 ch, 1 V st) worked around edge dc, sl st into 3rd ch of beginning 4 ch.
Rnd 2: sl st into first V st, 5 ch (counts as first dc + 2 ch-sp); *(1 dc into next V st, 2 ch**); repeat around until corner 2 ch-sp, work (1 dc, 3 ch, 1 dc) into the corner 2 ch-sp, 2 ch; repeat from * around ending last repeat at **, sl st into 3rd ch of beginning 5 ch.
Rnd 3 – 4: 5 ch (counts as first dc + 2 ch-sp); *(1 dc into next dc, 2 ch**); repeat around until corner 3 ch-sp, (1 dc, 3 ch, 1 dc) into corner 3 ch-sp, 2 ch; repeat from * around ending last repeat at ** , sl st into 3rd ch of beginning 5 ch.
Border Adjustment
Note: if you adjusted the size of the blanket, you might have to readjust your starting position at this point.
Go back to the last corner 3 ch-sp. The 2 ch-sp immediately after the corner will have sc stitch worked into it on the shell round, the next 2 ch-sp will have a shell worked into.
Alternate between sc and shell until you get to your first 2 ch-sp where your yarn is attached. If the first 2 ch-sp has a sc in it, continue with Rnd 5. If the first 2 ch-so has a shell in it, you need to sl st back into the last 2 ch-sp of Rnd 4 and take that as your first 2 ch-sp.
I explain this in video tutorial (link above), please scroll to 1 hr 11 mins for visual explanation.
Rnd 5: sl st into 2 ch-sp, 1 ch, 1 sc in same 2 ch-sp, *(1 border shell into next 2 ch-sp**, 1 sc into next 2 ch-sp) repeat around until corner 3 ch-sp, 1 shell into corner 3 ch-sp, 1 sc into next 2 ch-sp; repeat around from * ending last repeat at **, sl st to top of first sc.
Rnd 6 (picot edge): sl st into next dc, sl st into first 1 ch-sp and start working into same 1 ch-sp, 1 ch, * 1 picot into each of next three 1 ch-sp, sl st into next sc; repeat from * across to corner shell, 1 picot in each of next four 1 ch-sp, sl st into next sc; repeat around ending last repeat with sl st into first sc.
Fasten off. Firmly block to dimensions.
No comments
Write a comment


