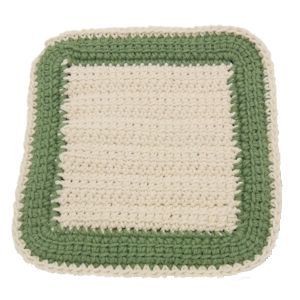
Crochet Side Stitching Pot Holder

Creating a Crochet Side Stitching Pot Holder is a fun and practical way to add a personal touch to your kitchen essentials! Not only does it provide a charming handmade charm to your cooking space, but it also serves a functional purpose in protecting your hands from hot pots and pans. The process of crocheting this pot holder allows for creativity to flourish as you choose the colors and patterns that suit your style. Plus, the unique side stitching adds a special detail that sets it apart from store-bought options. Whether you're a seasoned crocheter or new to the craft, crafting a Crochet Side Stitching Pot Holder is a delightful project that will bring warmth and character to your culinary adventures.
Materials Needed
Worsted weight cotton yarn in ecru and sage green
Size G/6 or 4mm aluminum crochet hook
Yarn Needle for weaving in ends
Yarn Thickness: 3mm
Gauge: 4sc=1"
Finished Size: 7½" x 7¾"
Skill Level: Intermediate
Instructions
Work in rows first, then in rounds. Make 2 same. ROW 1: With Ecru, ch24. Pull up a loop in each of the first 3 chs from hook, you should have 4 lps on hook, yo, pull through 2 loops on hook 3 times. (Pull up a loop in each of the next 2 side bars and in next ch, yo, pull through 2lps on hook 3 times.) Rep bet () across. Ch1, turn
ROW 2: Sc in each st across. Ch3, turn.
ROW 3: Pull up a loop in each of the next 2 chs from hook and in next sc. Yo, pull through 2lps on hook 3 times. *Pull up a loop through each of the 2 side bars and in next sc. Yo, pull through 2lps on hook 3 times. Rep from* across. Ch1, turn.
ROW 4-11: Rep ROWs 2 & 3 consecutively. At the end of ROW 11, fasten off and weave ends into back of work.
Perimeter
You will be working the first round around the perimeter. RND 1: Join green in last corner stitch just made on the top side of the stitch. Ch2, sc around corner but in same stitch to turn corner. Work 20 sc evenly spaced across each side and a sc, ch1, sc in each corner stitch around. When you get back to where you started, join w/slst to first ch of ch2.
In this next round, You are going to end up with 5 stitches in each ch1 corner space around.
RND 2: Slst into the first ch1 sp. Ch3, pull up a loop in each of the next 2 chs from hook and in ch1 sp. Yo, pull up a loop through 2 loops on hook 3 times. [Pull up a loop through each of the next 2 side bars and in same ch1 sp, yo, pull up a loop through 2loops on hook 3 times.] Repeat bet [] a total of 3 times more to have 5 repeats in total in the same chain 1 space. (Pull up a loop through each of the 2 side bars and in next sc. Yo, pull through 2lps on hook 3 times.) Repeat bet () 21 times more on this first side. Rep bet [] 5 times in the next corner ch1 sp. Rep bet () 22 times on the 2nd side. Rep bet [] 5 times more in next ch1 corner sp. Rep bet () 22 times more across 3rd side. Rep bet [] 5 times more for the 4th ch1 corner sp. Rep bet () 22 times for the 4th side. Join w/slst to top of ch3. Fasten off leaving an end long enough to close little gap bet first and last stitch of round and to weave the rest of the end into the back of work.
Final Assembly
Join front to back, wrong sides facing each other and working through both layers at a time, using the ecru color. Join to any stitch and work 1sc in each st around. Join w/slst to first sc. Fasten off and weave all ends into work.


