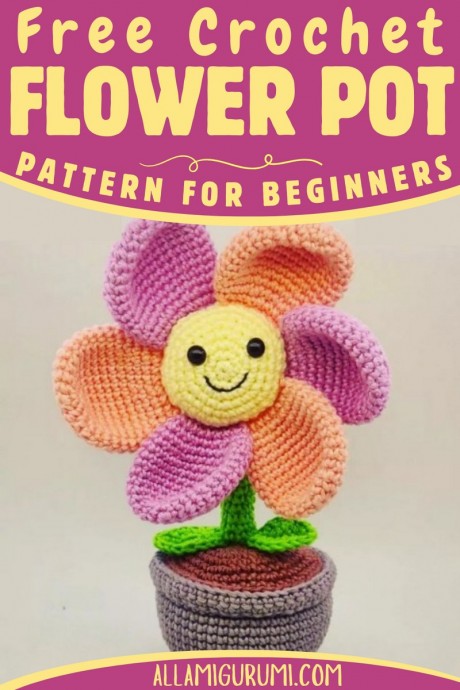
Crochet Flower With Pot Amigurumi

Crochet flower with pot amigurumi is a delightful and charming project that brings a touch of handmade warmth to any space. This craft involves creating intricate and colorful flowers with a cute pot using the amigurumi technique, making it both fun and rewarding. The process of crocheting these miniature flowers allows for creativity to bloom as you choose different yarn colors and experiment with various stitch patterns. Once complete, this dainty creation can brighten up your desk, shelf, or any corner of your home, adding a sweet and personal touch. So gather your yarn, crochet hook, and enthusiasm, and get ready to enjoy the therapeutic and joyful experience of crafting your very own crochet flower with pot amigurumi.
Materials
- Crochet hook
- Yarn in various colors
- 8 mm safety eyes
- Yarn needle
- Fiber filling
- Cardboard
- Wire
- Masking tape
- Scissors
Abbreviations
- sc - Single crochet
- inc - Increase
- dec - Decrease
- ch - Chain
- hdc - Half double crochet
- dc - Double crochet
- dtc - Double treble crochet
- sl st - Slip stitch
- Blo - Back loop only
- Flo - Front loop only
Step by step Pattern
Petal
- 1) 6 sc in magic ring
- 2) 6 inc 12 sc
- 3) (1 sc, 1 inc) x 6 - 18 sc
- 4) (2 sc, 1 inc) x 6 - 24 sc
- 5) (3 sc, 1 inc) x 6 - 30 sc
- 6) - 11) 30 sc
- 12) (3 sc, 1 dec) x 6 - 24 sc
- 13) 24 sc
- 14) (2 sc, 1 dec) x 6 - 18 sc
Fold the petal in half and make 8 sc to close it.
Flower core
- 1) 6 sc in magic ring
- 2) 6 inc - 12 sc
- 3) (1 sc, 1 inc) x 6 - 18 sc
- 4) (2 sc, 1 inc) x 6 - 24 sc
- 5) (3 sc, 1 inc) x 6 - 30 sc
- 6) (4 sc, 1 inc) x 6 - 36 sc
- 7) - 9) 36 sc
- 10) (4 sc, 1 dec) x 6 - 30 sc
- 11) (3sc, 1 dec) x 6 - 24 sc
- Place the 8 mm eyes between rows 3 and 4, 5 sc apart from each other.
- Sew the mouth to the flower core.
- Vase
- 1) 6 sc in magic ring
- 2) 6 inc - 12 sc
- 3) (1 sc, 1 inc) x 6 - 18 sc
- 4) (2 sc, 1 inc) x 6 - 24 sc
- 5) (3 sc, 1 inc) x 6 - 30 sc
- 6) (4 sc, 1 inc) x 6 - 36 sc
- 7) Blo 36 sc
- 8) (5 sc, 1 inc) x 6 - 42 sc
- 9) 42 sc
- 10) (6 sc, 1 inc) x 6 – 48 sc
- 11) 48 sc
- 12) (7 sc, 1 inc) x 6 - 54 sc
- 13) - 20) 54 sc 21) Flo 54 sc
- 22) 54 sc
Soil
- 1) 6 sc in magic ring
- 2) 6 inc - 12 sc
- 3) (1 sc, 1 inc) x 6 - 18 sc
- 4) (2 sc, 1 inc) x 6 - 24 sc
- 5) (3 sc, 1 inc) x 6 - 30 sc
- 6) (4 sc, 1 inc) x 6 - 36 sc
- 7) (5 sc, 1 inc) x 6 - 42 sc
- 8) (6 sc, 1 inc) x 6 - 48 sc
- 9) (23 sc, 1 inc) x 2) - 50 sc
Cut a piece of cardboard to put at the bottom of the vase.
Fold the edge of the vase and sew it.
Sew the soil to the vase and put fibre filling before closing it.
Leaf
- Start with 10 chains
- 1 sc in the third chain, 1 hdc, 1 dc, 2 dtc, 1 dc, 1 hdc, 3 sc, 1 hdc, 1 dc, 2 dtc, 1 dc, 1 hdc, 1 sl st
Stem
- 1) 8 sc in magic ring
- 2) - 15) 8 sc
- Cut a piece of wire and pass it inside the stem so that it reaches from the base of the vase to the core. Wrap a piece of masking tape around the end of the wire so you don't get hurt. Put some fibre filling around the stem wire.
- Sew the petals to the flower's core.
- Pass the wire through the middle of the soil and the underside of the flower core.


