Crochet Think Snow Bath Tissue Cover
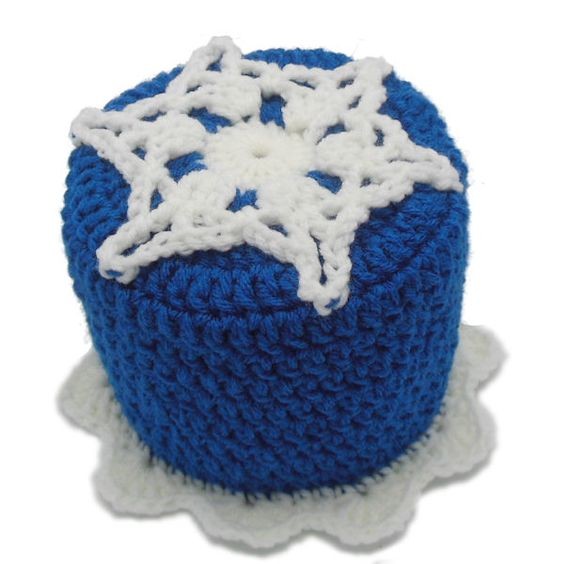
The Crochet Think Snow Bath Tissue Cover is a delightful addition to any bathroom decor. With its charming design of snowflakes crocheted in soft white yarn, it brings a touch of whimsy and coziness to your space. This handmade piece not only adds a unique flair to your bathroom but also serves a practical purpose by discreetly covering your spare toilet paper rolls.
Materials Needed
Small amount white worsted weight acrylic yarn in white
Worsted weight acrylic yarn in Blue Suede by Red Heart Super Saver.
Size H/8 or 5mm aluminum crochet hook
Yarn needle for weaving in ends
Yarn Thickness: 4mm
Gauge: 4dc= 1"
Finished Size: Fits a 1000 count single roll of bath tissue
Skill Level: Beginner to Intermediate
Instructions
RND 1: With White. Ch4, join w/slst to first ch to form ring. Ch3. 17 dc ring. Join w/slst to top of ch3. Fasten off, weave ends in to back of work. (18sts)
RND 2: Join blue to same st as slst. Ch3, dc in same st. 2dc in next stitch. 2dc in back loop of next stitch. *2dc in each of the next 2 sts. 2dc in back loop of next st. Rep from * around. Join w/slst to top of ch3. (36sts)
RND 3: Ch3. Dc in same st as slst. Dc in next st. *2dc in next st. Dc in next st. Rep from * around. Join w/slst to top of ch3. (54sts.)
RND 4: Ch3. Dc in each st around. Join w/slst to top of ch3.
In this next round. There will be 6 stitches you will work your stitch in the back loop only. The front loops is where you will slip stitch the snowflake to when you get to it. You should finish the next round with a dc in the back loop only of the stitch before you join to top of ch3. This is going to be the first front loop you are going to slip stitch the 2nd round of the snowflake to.
RND 5: Ch3. Dc in each of the next 7 sts. Dc in back loop only of next st. *Dc in each of the next 8 sts. Dc in back loop only of next stitch. Rep from * around. Join w/slst to top of ch 3.
RND 6-12: Ch3. Dc in each dc around. Join w/slst to top of ch3.
RND 13: Slip stitch in the back loop only of each stitch around. Join w/slst to first slst. Fasten off blue.
RND 14: Brim: Join white to front loop of RND 13. Ch1, sc in each front loop around. Join w/slst to ch1.
RND 15: Ch1, sc in same st as slst. Sc in next st. (Sk 1 st. 3dc, ch2, 3dc in next st. Sk 1 stitch.) *Sc in each of the next 2 sts. Rep bet () once. Rep from * around. Join w/slst to first sc. Fasten off and weave all ends into back of work.
Snowflake On Top
RND 1: Join white to first front loop on RND 1. Ch3, 2dc in same lp. Ch3. *3dc in next front loop. Ch3. Rep from * around. Join w/slst to top of ch3.
RND 2: Slip stitch into the next dc. Ch6. Slip stitch to front loop of last stitch of base of in RND 5. Ch3. Dc in same dc as last slst in that dc. (Ch3. Sc in next ch3 sp. Ch3. Sk next dc.) *Dc in next dc. Ch3. Slip stitch in next front loop at the base of RND 5. Ch3. Dc in same st as last dc. Rep bet () once. Rep from * around. Join w/slst to 3rd ch of ch6.

