Crochet Beautiful Bird
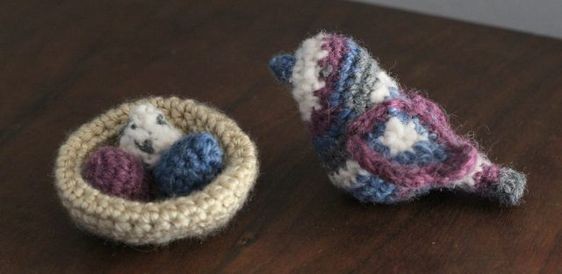
Creating a crochet beautiful bird can be such a delightful and rewarding experience! Picking out vibrant yarn colors, carefully crafting each stitch to form the bird's feathery details, and seeing the final creation come to life can fill you with a sense of accomplishment and joy. Whether you're a seasoned crocheter or just starting out, this project offers a fun way to unleash your creativity and add a charming touch to your space.
Worsted weight yarn, G hook
flo= front loop only
For the color changes I did 1-3 rows of each color randomly and used 4 colors total: blue, variegated blue, gray, purple, off-white, and gray.
Row 1 (beak): 3sc in a loop, tighten loop
Row 2: 2sc, sc, 2sc (5 total)
Row 3: Even around, sl st and change to body color
Row 4: 2sc flo around (10 total)
Row 5: *sc, 2sc* repeat around (15 total)
Row 6: Sc in each of the next 12 stitches, 2sc, sc, 2sc (17 total)
Row 7: Sc in each of the next 12 stitches, 2sc, sc, 2sc, sc, 2sc (20 total)
Row 8: Sc in each of the next 14 stitches, 2sc, sc, sc, 2sc, sc, sc (22 total)
Row 9: Sc, sc, sc, sc, sc2tog, sc, sc2tog, sc, sc, sc, sc, 2sc, sc, sc, sc, sc, sc, sc, sc, 2sc (22 total)
Row 10: sc, sc, sc, sc2tog, sc2tog, sc2tog, sc, sc, sc, 2sc, sc, sc, 2sc, sc, sc, 2sc, sc, sc, 2sc (23 total)
Row 11: sc, sc, sc2tog, sc, sc2tog, sc even rest of row (21 total)
Row 12-13: sc even (21 total)
Row 14: sc, sc, sc2tog, sc, sc2tog, sc in each of the next 4, sc2tog, sc in each of the next 4, sc2tog, sc, sc (17 total)
Row 15: sc in each of the next 11, sc2tog, sc even rest of row (16 total)
Row 16: sc2tog, sc, 2sc, sc, sc2tog, sc, sc, sc2tog, sc, sc2tog, sc, sc (13 total)
Row 17: sc, sc, 2sc, 2sc, sc, sc, sc, sc2tog, sc, sc2tog, sc (13 total)
Stuff
Row 18: sc2tog, sc2tog, 2sc, sc2tog, sc3tog, sc, sc3tog (take the first stitch of the next row, reset row count, 7 total)
Row 19-23: sc even
Row 24: 2sc, sc, 2sc, sl st, 2sc, sc, 2sc
Sl st
Do not stuff tail area, flatten the tail to shape it and sew.
Embroider eyes
Wing
Row 1: 6sc
Row 2: 2sc, 2sc, 2hdc, 2tc, ch 2, sl st in same stitch, 2sc, 2sc
Row 3: Sc, 2sc, sk 1, 5hdc, sl st, 5hdc, sl st, in next stitch hdc dc 2tc, ch 2, sc in each next 6, sl st
Sew in place.
Wing (other)
Row 1: 6sc
Row 2: ch 2, 2tc, 2hdc, 2sc, 2sc, 2sc, 2sc
Row 3: sc, sc, ch 2, in next 2tc dc hdc, sl st, 5hdc, sl st, 5hdc, sk 1, 2sc, sc, sc, sc, sc, sc
Sew in place
Nest (You may wish to make the nest larger if you want the bird to be able to sit on the eggs and inside the nest at the same time. You can try adding another increase, a few more even rows, and another decrease.)
Row 1: 8 hdc in a loop, tighten
Row 2: 2hdc around (16 total)
Row 3: *hdc, 2hdc* repeat around (24 total)
Row 4: *hdc, hdc, 2hdc* repeat around (32 total)
Row 5-9: hdc even around
Row 10: *hdc, hdc, hdc2tog* repeat around (24 total)
Row 11: *hdc, hdc2tog* repeat around (16 total)
Row 12: hdc2tog
Hdc2tog, hdc2tog
Do not stuff. Collapse it together into a bowl shape (Rows 1 and 12 should be touching) and sew it in various places to secure it.
Egg
Row 1: 5sc in a loop, tighten
Row 2: 2sc in each around (10 total)
Row 3: *sc, sc, sc, sc2tog* x 2 (8 total)
Row 4: *sc, sc2tog, sc* x 2 (6 total)
Stuff
Row 5: *sc, sc2tog* x 2 (4 total)
Finish stuffing and stitch up

