Crochet Shark Plant Cozy

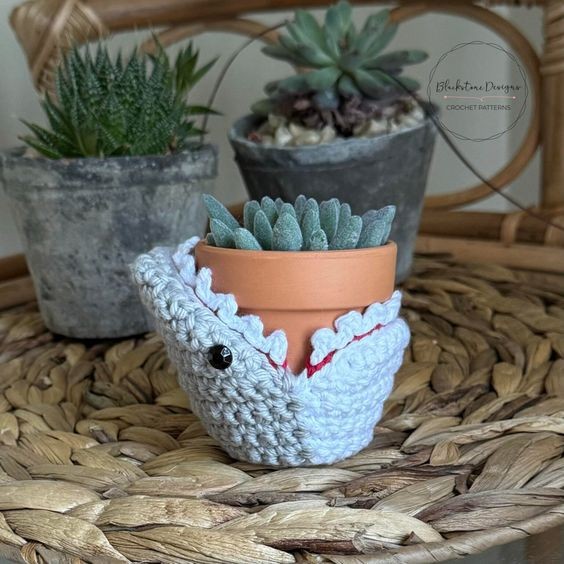
Looking to add a unique touch to your houseplants? Why not try out a Crochet Shark Plant Cozy! This adorable creation not only adds a fun and quirky flair to your indoor green friends but also protects them in style. Imagine your plant being embraced by a cute crocheted shark, creating a whimsical and eye-catching display in any room.
Materials;
100% Cotton Worsted Weight Yarn (#4)
- Gray [.25oz/13yds]
- White [.25oz/13yds]
- Red [Scraps]
F/5/3.75mm Hook
2 – 8mm Black Gem Buttons
Mini Terracotta Pot
Yarn Needle
Scissors
Gauge
Gauge is not critical for this project
Finished Measurements
1.25” Base
3.25” Height
Stitch Guide
hdc = half double crochet
sc = single crochet
sl st(s) = slip stitch(es)
YO = Yarn Over
Skill Level
Easy
Written in U.S. Terms
Notes
- Beginning chains do not count as stitches.
- Where asterisks appear, repeat the instructions between them.
Instructions
With White,
R1. Magic Ring, ch 1, 6 sc in ring (6)
R2. 2 sc arnd (12)
R3. *2 sc, sc* arnd (18)
R4. With White: BLO sc x 9, With Gray: BLO sc x 9, sl st to join, turn (18)
R5. With Gray: *2 sc, sc x 2* 3X, With White: *2 sc, sc x 2* 3X, sl st to join, turn (24)
R6. With White: sc x 12, With Gray: sc x 12, sl st to join, turn (24)
R7. With Gray: *2 sc, sc x 3* 3X, With White: *2 sc, sc x 3* 3X, sl st to join, turn (30)
R8. With White: sc x 15, With Gray: sc x 15, sl st to join, turn (30)
R9. With Gray: *2 sc, sc x 4* 3X, With White: *2 sc, sc x 4* 3X, sl st to join, turn (36)
R10. With White: sc x 18, With Gray: sc x 18, sl st to join, turn (Continue to top jaw) (36)
TOP JAW
With Gray,
R1. sc x 18, turn (leave remaining sts unworked) (18)
R2. Repeat 1
R3. dec, sc x 14, dec, turn (16)
R4. dec, sc x 12, dec, turn (14)
R5. dec, sc x 10, dec, turn (12)
R6. dec, sc x 8, dec, turn (10)
R7. dec, sc x 6, dec, turn (8)
R8. dec, sc x 4, dec, turn (6)
R9. dec, sc x 2, dec; Fasten. (4)
R10. With top jaw facing forward: Attach Yarn to bottom corner and sl st in the end of each row and in each stitch arnd the top jaw only; Fasten.
With Red,
R11. With top jaw facing forward: Attach yarn to top loop only, sl st in each sl st across; Fasten.
With White,
R12. With top jaw facing forward: Attach yarn to top loop only, ch 2, sl st in same space as ch, *sl st x 2, ch 2, sl st in same space as ch* across; Fasten.
BOTTOM JAW
With White,
R1. Attach yarn to 1st unworked stitch on inside of white side: ch 1, dec, sc x 14, dec, turn (16)
R2. Ch 1, dec, sc x 12, dec, turn (14)
R3. Ch 1, dec, sc x 10, dec, turn (12)
R4. Ch 1, dec, sc x 8, dec; Fasten. (10)
R5. With bottom jaw facing forward: Attach Yarn to bottom corner and sl st in the end of each row and in each stitch arnd the top jaw; Fasten
With Red,
R6. With bottom jaw facing forward: Attach yarn to top loop only, sl st in each sl st across; Fasten.
With White,
R7. With bottom jaw facing forward: Attach yarn to top loop only, ch 2, sl st in same space as ch, *sl st x 2, ch 2, sl st in same space as ch* across; Fasten.
Finishing
- Attach “eyes” between R14-15, 2 sts in from the edge; over the “rounded edge”.
- Hide all strings.


