Crochet Finn From Adventure Time
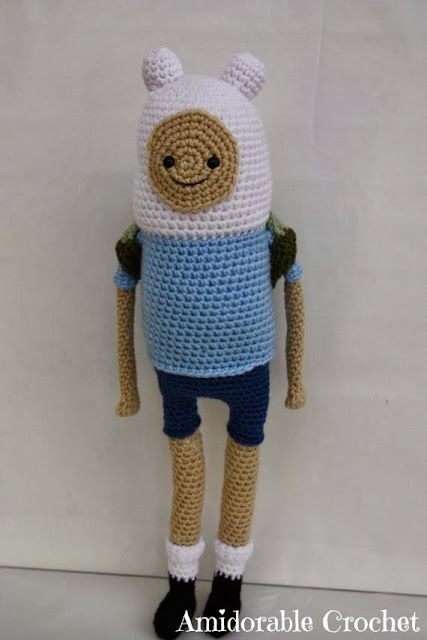
Crochet Finn from Adventure Time is an adorable and fun project for fans of the show or anyone who loves to crochet. Bringing to life the beloved character with yarn and a hook is not only enjoyable but also a great way to show off your crafting skills. The detailed pattern instructions make it accessible to crocheters of all levels, from beginners to experts, so everyone can create their own little Finn to treasure.
Supplies:
Worsted Weight Yarn (Skin, White, Light Blue, Dark Blue, Black, Light Green, Dark Green)
3.5 Crochet Hook
Filling
8mm Safety Eyes
Embroidery Thread
Scissors
Abbreviations:
Ch-Chain
Sc-Single Crochet
Invdec-Invisible Decrease
Fo-Fasten Off
Finished Size:
17 Inches
Head And Body (worked as one piece):
Rd1:With white yarn 6sc in magic ring (or ch2 and 6sc in second ch from hook) (6)
Rd2: 2sc in next st x 6 (12)
Rd3:2sc in next st x 12 (24)
Rd4:Sc x 24 (24)
Rd5:(Sc x 5, 2sc in next st) x 4 (28)
Rd6:Sc x 28 (28)
Rd7:(Sc, 2sc in next st) x 14 (42)
Rd8-23:Sc x 42 (42)
Rd24:Switch to light blue (This counts as a st), sc x 41 (42)
Rd25-39:Sc x 42 (42)
Rd40:Sc x 20, invdec, sc x 20 (41)
Rd41-42:Sc x 41 (41)
Rd43:Sc x 41in front loops, fo (41)
Rd44:Now you will be starting his pants. Roll up your work to the previous rd where you sc’d in the front loops. Starting in the back loop of the first st in rd 43 sc x 41 (41)
Rd45-52:Sc x 41 (41)
Row53: Now you will be starting his first leg. Sc x 13 (13)
Rd54:Skip 28 stitches, this will take you back around to the first st, now sc x 13 (13)
Rd55-56:Sc x 13 (13)
Rd57:Sc x 6, 2sc in next st x 2, sc x 5 (15)
Rd58:Sc x 15 (15)
Rd59:Sc x 15 in front loops, fo, this is the back of your doll (15)
Rd60:Now you will be starting his second leg. With the same side of the doll facing you count over 9 stitches from the first leg, pull up loop sc in st, sc x 12 (13)
Rd61:Jump over and sc in first st of rd 60, sc x 12 (13)
Rd62-63:Sc x 13 (13)
Rd64:Sc x 6, 2sc in next st x 2, sc x 5 (15)
Rd65:Sc x 15 (15)
Rd66:Sc in front loops x 15 (15)
Now stuff your body firmly. Sew the area closed between his legs.
Rd67:Now you will be starting the skin portion of his legs. With the back of your doll facing you, roll up the leg of your shorts on one of the legs to the round where you single crocheted in the front loops. In the center of the back of your leg pull up loop and sc, now you might need to skip a few stitches sc x 10 all the way around (11)
Rd68-87:Sc x 11 (11)
Rd88:Switch to white sc, sc x 10 (11)
Rd89-92:Sc x 11 (11)
Rd89-92:Sc x 11 (11)
Rd93:Change to black sc, sc x 10 (11)
Rd94-96:Sc x 11 (11)
Row97: You will now be starting his foot. Sc x 7 (7)
Row98-101:Turn, ch1, sc x 4, place a st maker in the last st in row 101 (4)
Row102:Now sc around the entire piece to the st before your st marker sc x 19 (19)
Rd103-105:Sc x 20, fo (20)
For the second leg please repeat Rd67-105
Sole Of Foot (Make 2)
Row1:With black yarn ch4 (4)
Row2:Turn, sc x 3 (3)
Row 3-8:Turn, ch1, sc x 3, leave a long tail and fo at the end of rd8 (3)
Ear (Make 2)
Rd1:With skin 6sc in magic ring (6)
Rd2:2sc in next st x 6 (12)
Rd3-6:Sc x 12, leave a long tail and fo at the end of rd6 (12)
Top Of Sock
Row1:With white yarn ch12 (12)
Row2:Turn, sc x 11 (11)
Row 3-7:Turn ch1, sc x 11, leave a long tail and fo at the end of rd7 (11)
Arm (Make 2)
Rd:With skin color 6sc in magic ring (Or ch2, 6sc in second ch from hook) (6)
Rd2:(2sc in next st, sc) x 3 (9)
Rd3:Sc x 9 (9)
Rd4:Bobble st, sc x 8 (9)
Rd5:Invdec, sc x 2, invdec, sc x 3 (7)
Rd6-24:Sc x 7 (7)
Rd25:Switch to light blue sc, sc x 6 (7)
Rd26-32:Sc x 7, leave a long tail and fo at the end of rd32 (7)
Shirt Sleeve (Make 2)
Row1:With light blue ch 10 (10)
Row2:Turn, sc x 9, leave a long tail and fo (9)
Face
Rd1:With skin color 6sc in magic ring (Or ch2, and 6sc in second ch from hook) (6)
Rd2:2sc in next st x 6 (12)
Rd3:(Sc, 2sc in next st) x 6 (18)
Rd4:(Sc x 2, 2sc in next st) x 6 (24)
Rd5:Sc x 24 (24)
Rd6:(Sc x 3, 2sc in next st) x 6, leave a long tail and fo (30)
Backpack
Row1:With darker green ch9 ( 9)
Row2:Turn, sc x 8 (8)
Rd3:Now sc along the opposite side of work sc x 8 (8)
There should now be 16sc in your work.
R4:2sc in next st x 2, sc x 5, 2sc in next st x 2, sc x 7 (20)
Rd5:2sc in next st x 3, sc x 6, 2sc in next st x 3, sc x 8 (26)
Rd6:Sc x 26 (26)
Rd7:Sc, 2sc in next st x 3, sc x 10, 2sc in next st x 3, sc x 9 (32)
Rd8-16:Sc x 32 (32)
Rd17:Change to light green sc, sc x 31 (32)
Rd18-23:Sc x 32 (32)
Now you will be closing up the backpack. Stuff your backpack lightly.
Rd24:Invdec x 16 (26)
Rd25:Invdec x 8 (8)
Rd26:Invdec x 4 (4)
Rd27:Invdec x 2, fo, close and weave in ends (2)
Backpack strap (Make 2)
Row1:With dark green ch3 (3)
Row2:Turn, sc x 2 (2)
Row3-18:Turn, ch1, sc x 2 (2)
Row19:Turn, ch1, Change to light green sc, sc (2)
Row20-30:Turn, ch1, sc x 2 (2)
Row31:Now sc around all sides to give it a nice trim, fo, weave in ends.
Small Circle On Backpack
Row1:Ch5 (5)
Row2:Turn, sc x 4 (4)
Row3:Now sc along the opposite side of your work sc x 4, fo (4)
Assembly
Sew on the shirt sleeves. Stuff both legs, and sew on the soles.Sew on sock cuffs. Sew on arms and ears. Sew on the straps to the backpack and the circle.Add safety eyes to the face, sew on mouth, then sew the face to your doll.
No comments
Write a comment


