Crochet Stripe Baby Hat
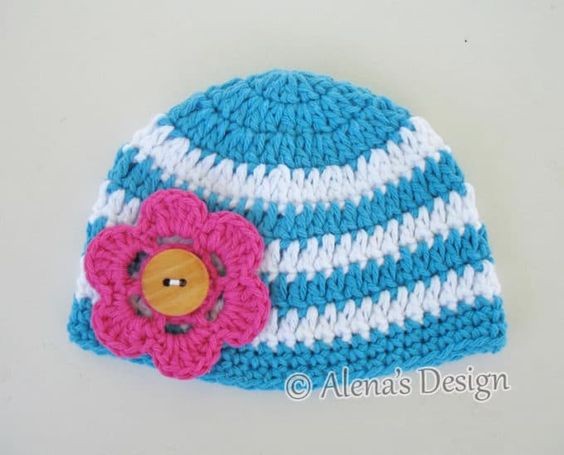
Create a charming baby hat with colorful stripes using the art of crochet. This adorable accessory is perfect for keeping your little one warm and stylish. By combining different yarn colors, you can customize the hat to match any outfit or nursery theme. The crochet technique allows for endless possibilities in terms of design and pattern, making each hat unique and special.
SKILL LEVEL
Easy
SIZE AND FINISHED MEASUREMENTS
0-3 months – 13.0” around, 5.0” tall;
MATERIALS
Sugar ‘n Cream Yarn (100% Cotton; 70.9 g/ 2.5oz.;109m/120yds); Worsted Weight
- Main Color (MC) Bright Blue – approx. 40 yards
- Contrast A White – approx. 20 yards
- Button, about 1″ (25mm);
- Matching thread and needle.
CROCHET HOOK
7 (4.5 mm) crochet hook, OR SIZE TO OBTAIN GAUGE.
GAUGE
14 dc and 7 rows to 4”/10 cm. TAKE TIME TO CHECK YOUR GAUGE.
(Note: Be sure to check your gauge before starting to crochet. If the gauge is larger, change to a smaller hook size, or work tightly. If it is smaller, change to a larger hook size, or work loosely.)
INSTRUCTIONS
Notes:
- A hat is worked in rounds.
- To avoid mistake(s), count stitches in each round when finished.
- Ch 3 at beg of rounds count as dc throughout. Ch 1 at beg of rnd(s) counts as sc throughout.
- When changing color always complete last half of last st worked with next color, keep yarn not used to back of work.
HAT
With MC, ch 4, join with sl st in first ch to form a ring. (Also, you may begin with “magic ring”. A lot of video tutoring is at YouTube for this.)
Rnd 1: Ch 3 (count as dc), work 11 dc in ring; join with sl st to top of beg ch 3 – 12 dc.
Rnd 2: Ch 3, dc in same st, 2 dc in each dc around; join with sl st to top of beg ch 3 – 24 dc.
Rnd 3: Ch 3, 2 dc in next dc, * dc in next st, 2 dc in next st; rep from * around; join with sl st to top of beg ch 3 – 36 dc.
Rnd 4: Drop MC, join A, ch 3, dc in each of next 4 dc, 2 dc in next st, * dc in each of next 5 dc, 2 dc in next st; rep from * around; join with sl st to top of beg ch 3 – 42 dc.
Rnd 5: Drop A, with MC, ch 3, dc in each dc around; join with sl st to top of beg ch 3 – 42 dc.
Rnd 6: Drop MC, with A, ch 3, dc in each dc around; join with sl st to top of beg ch 3 – 42 dc.
Rnd(s) 7-8: Repeat Rnd(s) 5-6 once.
Cut A yarn.
Rnd 9: With MC, ch 1, sc in each st around; join with sl st to top of beg ch 1 – 42 sc.
Rnd(s) 10-11: Repeat last rnd twice.
Fasten off. Secure yarn to WS.
FLOWER
Ch 7, join with slip st to form a ring.
Rnd 1: Ch 1, 12 sc in ring; join with slip st to first sc – 12 sc.
Rnd 2: Ch 4, skip next st, * sc in next st, ch 3, skip next st; rep from * around; join with slip st to first ch of beg ch 4 – 6 petals.
Rnd 3: Ch 1, (sc, 5 dc, sc) in each ch-3 space around; join with slip st to first sc – 6 petals.
Fasten off. Secure yarn to WS.
FINISHING
Sew button to Hat as shown in picture. Place Flower on top of button.
STITCH ABBREVIATIONS
approx – approximately; beg – beginning; ch – chain; dc – double crochet; dc2tog – double crochet two together; hdc – half double crochet; lp(s) – loop(s); MC – main color; rem – remain/remaining; rep – repeat; Rnd(s)- round(s); RS – right side; sc – single crochet; sc2tog – single crochet two sts together; sl st – slip stitch; sp – space(s); st(s) – stitch(es); WS – wrong side; yo – yarn over; ( ) – work instructions within parentheses as many times as directed; * – repeat the instructions following the single asterisk as directed; “ – inches

