Crochet Lace Vintage Potholder
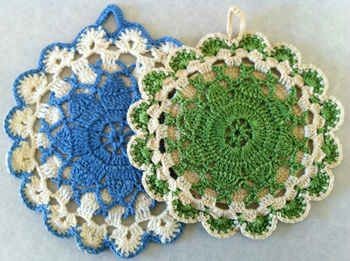
Revamp your kitchen decor with a charming handmade crochet lace vintage potholder. This unique piece adds a touch of nostalgia and elegance to your cooking space, while also serving a practical purpose. The intricate lace design brings a vintage flair to your kitchen, making it a standout accessory that is both functional and stylish.
Skill: Easy
Size: About 6” diameter
Materials: Size 10 Crochet Thread: White and Blue.
Crochet Hook: Steel size 7 (1.65 mm)
JOINING WITH SC
When instructed to join with sc, begin with sl knot on hook, insert hook in st or sp indicated, yo and pull up a loop, yo and draw through both loops on hook.
MOTIF
Rnd 1: (Right Side) Starting at center, with Blue, ch 6, join with sl st to first ch to form ring; ch 6 (counts as first tr and ch 2), * tr in ring, ch 2; rep from * 6 times more; join with sl st to first tr. (8 ch-2 sps)
Rnd 2: Ch 3 (counts as first dc), 4 dc in first sp, ch 1, * 5 dc in next sp, ch 1; rep from * around; join with sl st to first dc. (40 dc)
Rnd 3: Ch 4 (counts as first tr), 2 tr in next 3 dc, tr in next dc ch 3, * tr in next dc, 2 tr in next 3 dc, tr in next dc, ch 3; rep from * around; join. (64 tr)Rnd 4: Ch 4, keeping last lp of next 4 tr on hook, (skip next tr, tr in next tr) 4 times, yo and pull through all lps on hook (first cluster made), ch 7, sl st in ch-3 lp, * ch 7 keeping last lp of next 5 tr on hook, tr in next tr, (skip next tr, tr in next tr) 4 times, yo and pull through all lps on hook (cluster made), ch 7, sl st in ch-3 lp; rep from * around, ending ch 3, tr in first cl. (8 cl)
BACK
Rnd 1: (Right Side) Starting at center, with White, ch 6, join with sl st to first ch to form ring; ch 3 (counts as first dc now and throughout), 15 dc in ring; join with sl st to first dc. (16 dc)
Rnd 2: Ch 3, dc in same st as joining, (2 dc in next dc) around. (32 dc)
Rnd 3: Ch 3, 2 dc in next dc, (dc in next dc, 2 dc in next dc) around. (48 dc)
Rnd 4: Ch 3, dc in next dc, 2 dc in next dc, (dc in next 2 dc, 2 dc in next dc) around. (64 dc)
Rnd 5: Ch 3, dc in next 2 dc, 2 dc in next dc, (dc in next 3 dc, 2 dc in next dc) around. (80 dc)
Rnd 6: Ch 3, dc in next 3 dc, 2 dc in next dc, (dc in next 4 dc, 2 dc in next dc) around. (96 dc)
Rnd 7: Ch 3, dc in next 4 dc, 2 dc in next dc, (dc in next 5 dc, 2 dc in next dc) around. (112 dc)
Rnd 8: Turn, position Motif with right side facing to center of Back, working over any ch-10 lp of Motif, ch 8 (counts as first dc and ch 5), * skip next 3 dc, working over next ch-10 lp, dc in next 4 dc, ch 5; rep from * around, ending with skip next 3 dc, working over next ch-10 lp, dc in next 3 dc; join. (64 dc, 16 ch-5 sps)
Rnd 9: Sl st to ch-5 sp, ch 3, (2 dc, ch 4, 3 dc) in same sp, ch 1, * (3 dc, ch 4, 3 dc) in next ch-5 sp, ch 1; rep from * around; join.
Rnd 10: Sl st to ch-4 sp, ch 3, 7 dc in same sp, sl st in ch-1 sp, * 8 dc in next ch-4 sp, sl st in next ch-1 sp; rep from * around; join. Finish off and weave in ends.
Edging
Rnd 1: With right side facing, join Blue with sc to any dc, working over sl sts into ch-1 sps, sc in each dc and ch-1 sp around, working hanger as follows:
– After any sc in ch-1 sp work sc in next 4 dc, ch 10, sl st in 8th previous dc worked, work 16 sc over ch, working in Rnd 11, continue Edging; joining with sl st to first sc. Finish off and weave in ends.

