Crochet Bunny Bunting: A Delightful Spring Decor Project


Crafting a Crochet Bunny Bunting is a delightful and charming way to add a touch of cuteness to any space! This sweet and playful decor is perfect for Easter or simply to bring some happiness into your home. By using soft pastel yarns and your crochet hooks, you can create a string of adorable bunnies that will make everyone smile.
Hang them up in a child's room, along a mantel, or even outside for a whimsical touch. Get ready to enjoy the fun and satisfaction of bringing these lovable little bunnies to life with each stitch!Materials & Tools Required
Paintbox Cotton Aran in Ballet Pink (Yarn A), Dusty Rose (Yarn B), Peach Orange (Yarn C), Blush Pink (Yarn D), Washed Teal (Yarn E), Daffodil Yellow (Yarn F), Champagne White (Yarn G), Pure Black (Yarn H)
Pom Poms: 6 White ready made
Hook: 3.5mm
Scissors
Darning Needle
Pattern Notes
The pattern is written in UK terms. The bunting is made in 3 separate pieces, the flag first followed by 2 ears. These are then sewn on along with the pom pom.
Measurements
Each Flag should measure approx: 3cm width x 4.5cm length
Ears will measure approx: 1.3cm width x 2.3cm length
Crochet Terms & Abbreviations
Chain (ch): Yarn over, pull through one loop on hook.
Slip Stitch (ss): Insert hook, yarn over pull through stitch and loop on hook
Double Crochet(s) dc(s): Insert hook into stitch, yarn over, pull up a loop, you will have two loops on the hook. Yarn over, pull through remaining two loops.
Treble crochet (tr): Yarn over, insert hook into stitch, yarn over, pull up a loop, you will have three loops on the hook. Yarn over, pull through two loops, yarn over, pull through remaining two loops.
Free Crochet Pattern: Bunny Bunting
Using Yarn A (Make one flag in each colour yarn) x 6 in total. You are viewing this pattern in UK terms.
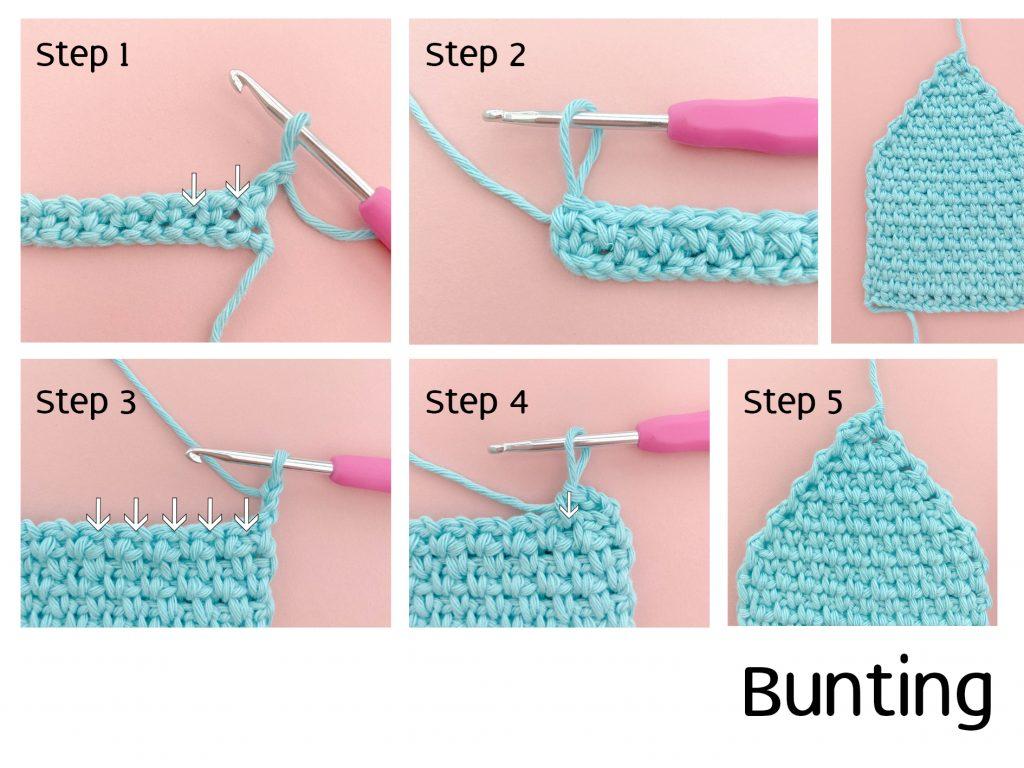
Flag Instructions
Begin with a ch 21
Row 1: 1dc in the 3rd ch from the hook *1ch, skip next st, 1dc in next st* Repeat from * to * until the end of the row.
Row 2: ch2, work your 1st dc in the first ch space from the previous row. *ch1, 1 dc in the next ch space from the previous row* Repeat from * to * until you reach the end of the row. Your last dc should be worked between the ch 2 space and the last dc from the previous row.
Row 3-13: Repeat Row 2
You will now begin the decrease to shape your flag. You will only be working the decrease at the beginning of each row.
Row 14: ch2, sk the first chain space from the previous row and work your 1st dc in the 2nd ch space from the previous row. *ch1, 1 dc in the next ch space from the previous row* Repeat from * to * until you reach the end of the row.
Row 15 – 23: Repeat Row 14 until your work reaches a point. Tie off yarn and sew in ends.
Making the Ears
Make 2 per flag, start with the matching yarn for each flag.
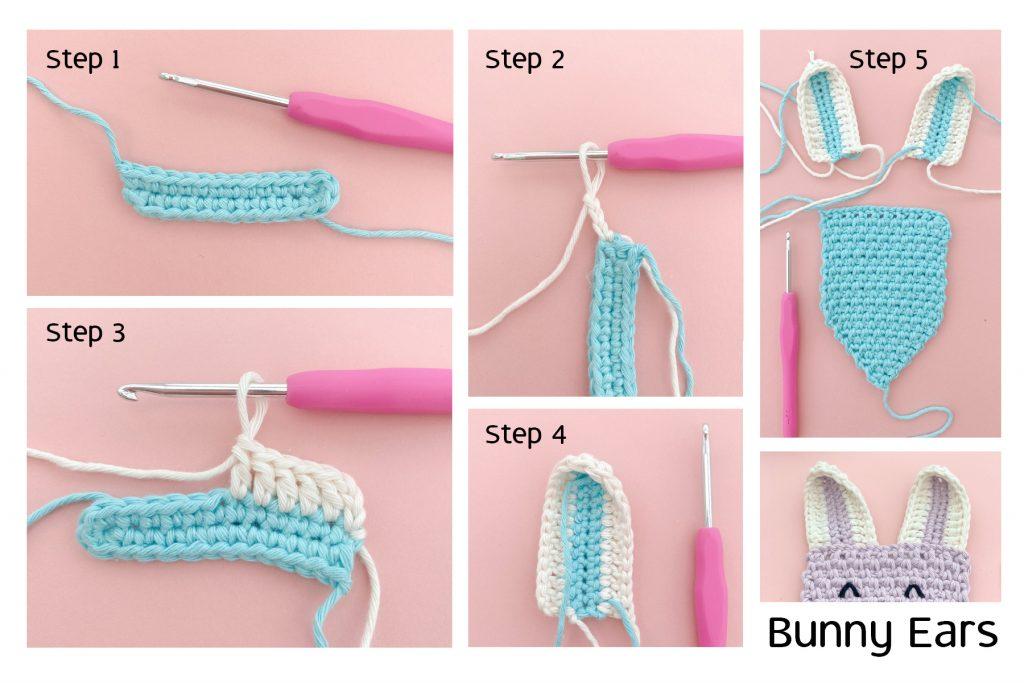
Using Yarn A – Ch 13, 1dc in 2nd ch from hook, 1dc in each of the next 10ch, 4dc in the last ch. Turn your work to crochet along the base of the ch st. 1dc in each st across, ss to 1st st from this round. (26sts).
Tie off yarn and fasten off.
Attach Yarn G to the 1st st, ch 3 (counts as 1tr), work 1tr in each st around (26sts)
Tie off yarn and fasten off. Sew in your loose ends ready to attach your ears to your flags.
Position your ears with the curve at the front of your work and sew to your flag. Sew in any loose ends at the back of your work.
Sew On The Bunny Eyes & Nose
Using Yarn H measure the distance to sew two eyes on equally spaced apart. Once you have sewn the eyes on create a diamond shape in the centre for the nose, then a line underneath the diamond shape.
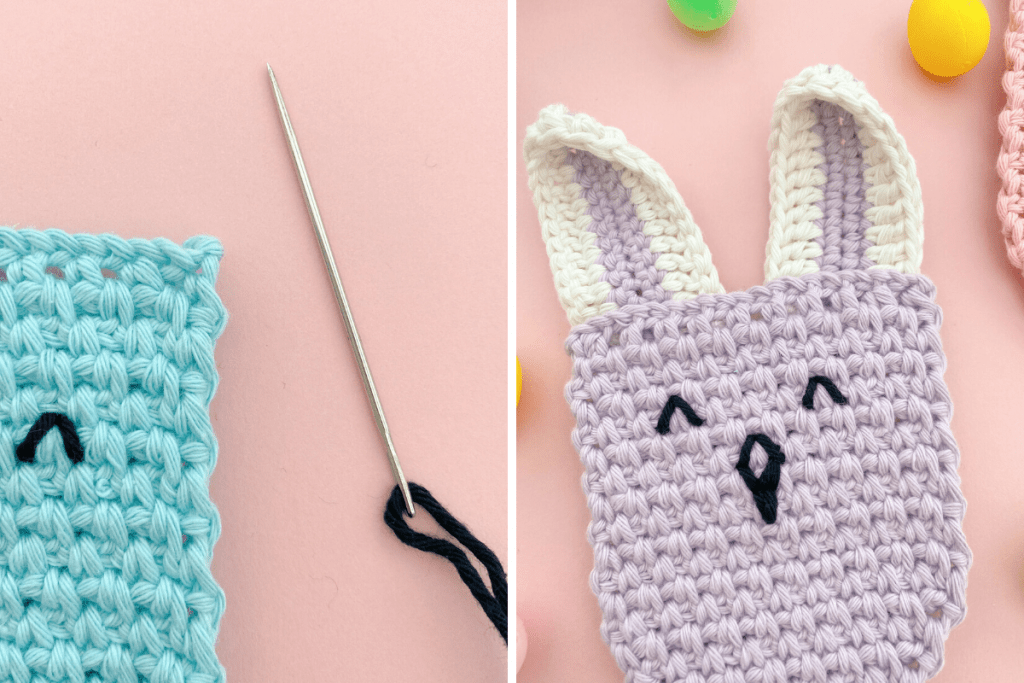
To finish off your bunting, attach a small white pom pom to the base of the flag and thread a long piece of Yarn G through the top of each bunny ear to hang your bunting.