Crochet Pine Grove Pullover Pattern - Cozy and Stylish Handmade Sweater


The Crochet Pine Grove Pullover is a delightful and cozy addition to any wardrobe! This unique pullover combines intricate crochet details with a touch of rustic charm, perfect for those who love a blend of style and comfort. Whether you wear it for a leisurely stroll in the park or a casual coffee date with friends, this pullover is sure to turn heads and keep you warm in style.
Embrace the natural beauty of the pine grove motif and feel cozy all day long with this charming piece!Materials
Light (3) Weight Yarn, Lion Brand Wool Ease DK in Olive 7(7, 7, 8, 8, 8, 9, 9, 9 ) skeins or 1400(1490, 1580, 1660, 1750, 1830, 1890, 1970, 2050) Yards
H/5.00mm Crochet Hook
Needle
Scissors
Stitch Markers (3)
Gauge
14 Sts by 6.5 rows= 4×4”
To make a gauge swatch, work 22 Fsc then complete rows 2-8. Measure within the swatch to check your gauge.
Sizes
XS(S, M, L, XL, 2X, 3X, 4X, 5X)
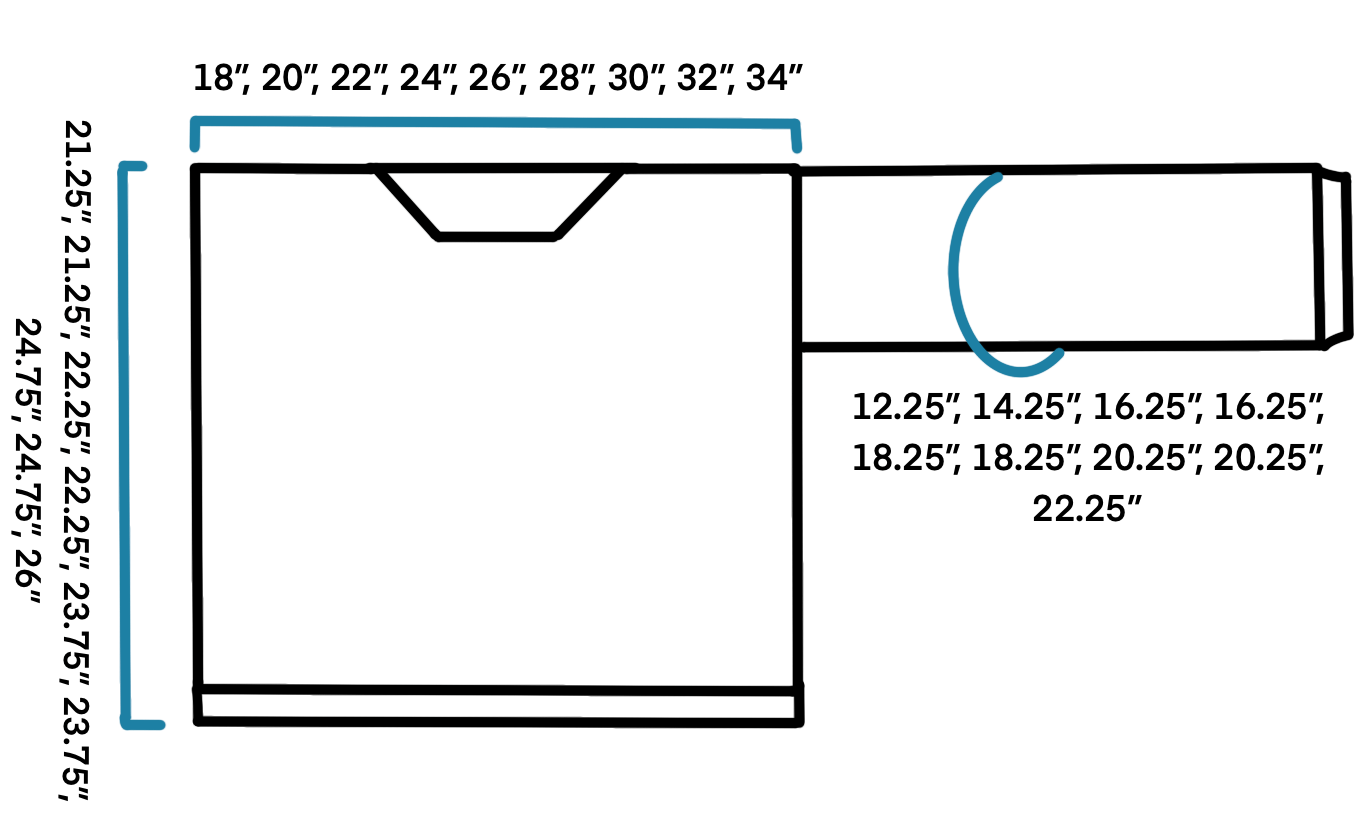
Finished Measurements
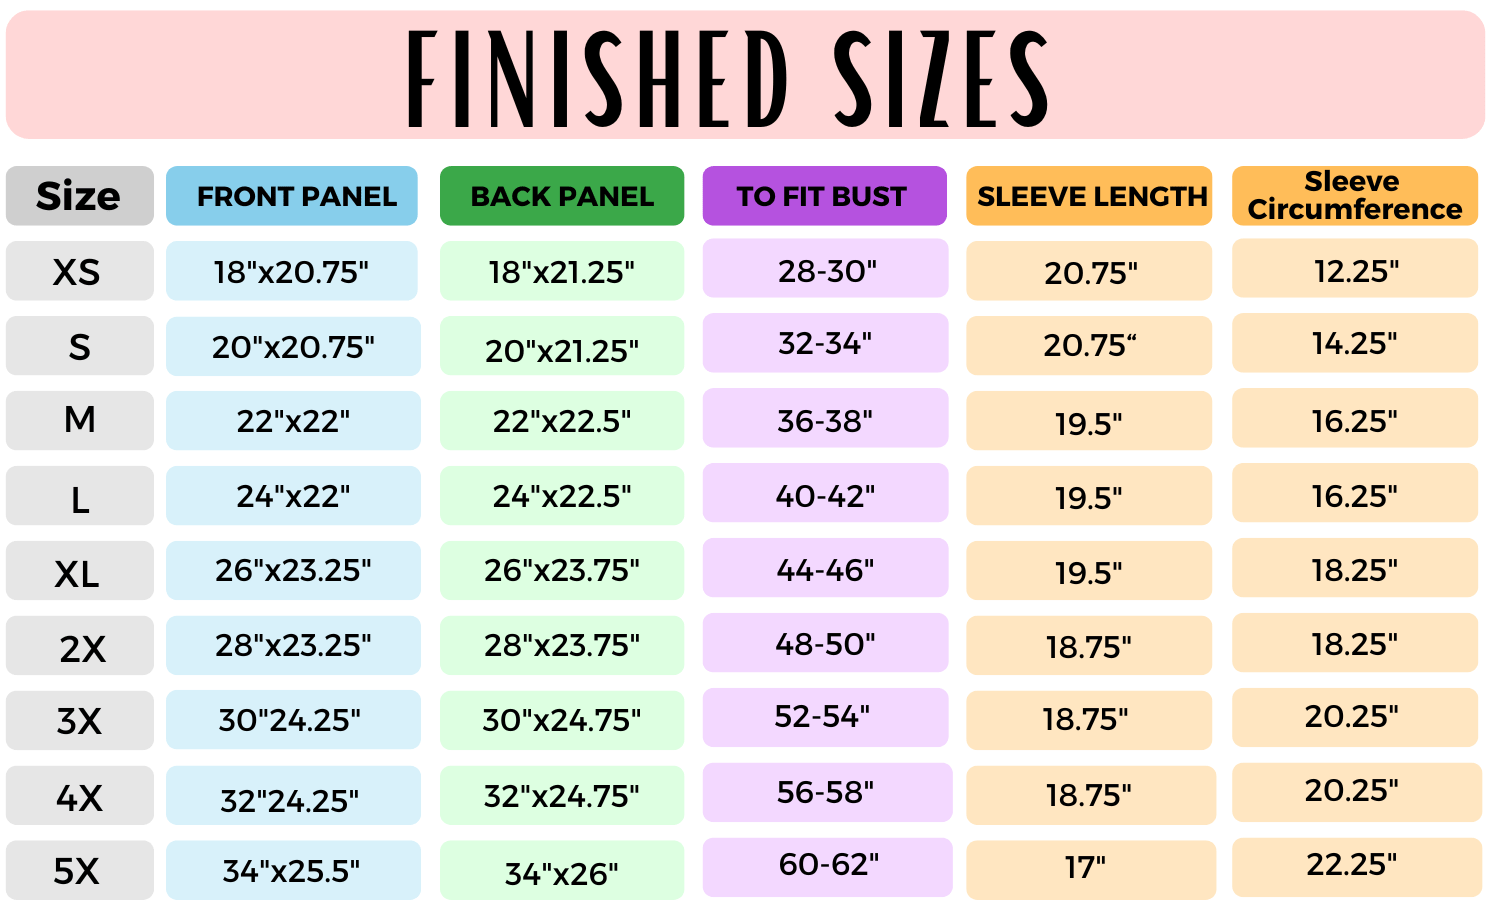
Notes
This sweater is made in 4 separate panels. After seaming you will add the bottom hem and collar.
The starting Ch 3 counts as 1 Dc St.
The neckline shaping instructions are split into separate sections, depending on your size. XS(M, XL, 3X, 5X) are in one section and S(L, 2X, 4X) are in another section. Be aware of the change in sizes listed and be sure to follow the correct set of instructions for your size below.
To adjust the length of your sweater repeat or remove row repeats 3&4 as many times as desired before fastening off the back panel. Add or remove the same amount of rows to your front panel before you begin the neckline shaping. Take into account this will affect the yardage requirements.
To adjust the length of your sleeve, add or remove row repeats 3 & 4 before beginning the “cuff” (final 3 rows) section. Take into account this will affect the yardage requirements.
Stitches and Abbreviations (US Terms)
- Fsc- Foundation Single Crochet
- Sc- Single Crochet
- Ch- Chain
- St(s)- Stitch(es)
- Sk- Skip
- Sl St- Slip Stitch
- Dc- Double Crochet
- Fpdc- Front Post Double Crochet
- Bpdc- Back Post Double Crochet
- Hdc- Half Double Crochet
- Sc2tog- Single Crochet 2 Together
- FLO- Front Loop Only
- RS- Right Side
Pattern
Back Panel
Row 1(RS): 64(71, 78, 85, 92, 99, 106, 113, 120) Fsc, turn. Alternatively you can Ch 1 more than the number listed above, work 1 Sc into the second Ch from the hook and each Ch across for the same St count. (64(71, 78, 85, 92, 99, 106, 113, 120) Sc)
Row 2: Ch 3 (counts as 1 Dc here and throughout), *[Sk the next St, 1 Dc into the next 2 Sts, go back and work 1 Dc into the skipped St] twice, 1 Dc into next St*, repeat from * to * across row, turn. (64(71, 78, 85, 92, 99, 106, 113, 120) Dc)
Row 3: Ch 3, [Sk the next St, 1 Dc into the next 2 Sts, go back and work 1 Dc into the skipped St] twice, *1 Fpdc around next St, [Sk the next St, 1 Dc into the next 2 Sts, go back and work 1 Dc into the skipped St] twice,* repeat from * to * across row until 1 St remains, 1 Dc in final St, turn. (64(71, 78, 85, 92, 99, 106, 113, 120) Dc)
Row 4: Ch 3, [Sk the next St, 1 Dc into the next 2 Sts, go back and work 1 Dc into the skipped St] twice, *1 Bpdc around next St, [Sk the next St, 1 Dc into the next 2 Sts, go back and work 1 Dc into the skipped St] twice,* repeat from * to * across row until 1 St remains, 1 Dc in final St, turn. (64(71, 78, 85, 92, 99, 106, 113, 120) Dc)
Rows 5-33(33, 35, 35, 37, 37, 39, 39, 41): Repeat Rows 3 & 4.
Fasten off.
Front Panel
Repeat Rows 1-28(28, 30, 30, 32, 32, 34, 34, 36) of the back panel. We will now be splitting and shaping the neckline. The shaping of the neckline instructions will be split into 2 separate sets of instructions. One set for sizes XS(M, XL, 3X, 5X) only and the second set for S(L, 2X, 4X) only. Be aware of the change in sizes listed and be sure to follow the correct set of instructions for your size below. If you adjusted the length of your back panel, add or remove the same amount of rows here before moving on to the shoulder shaping.
First Shoulder (Left When Worn)
XS(M, XL, 3X, 5X) ONLY-
Row 29(31, 33, 35, 37): Ch 3, work the regular St repeat across for a total of 21(28, 35, 42, 49) Sts, 1 Dc in next St, leave remaining Sts unworked, turn. (22(29, 36, 43, 50) Dc)
Row 30(32, 34, 36, 38): Ch 3, [Sk the next St, 1 Dc into the next 2 Sts, go back and work 1 Dc into the skipped St] 2 times, *1 Bpdc around next St, [Sk the next St, 1 Dc into the next 2 Sts, go back and work 1 Dc into the skipped St] twice,* repeat from * to * across row until 1 St remains, 1 Dc in final St, turn. (22(29, 36, 43, 50) Dc)
Row 31(33, 35, 37, 39): Ch 3, [Sk the next St, 1 Dc into the next 2 Sts, go back and work 1 Dc into the skipped St] twice, *1 Fpdc around next St, [Sk the next St, 1 Dc into the next 2 Sts, go back and work 1 Dc into the skipped St] twice,* repeat from * to * across row until 8 Sts remain, 1 Fpdc in next, Sk next St, 1 Dc in next 2 Sts, go back and work 1 Dc in skipped St, 1 Hdc, 1 Sc, leave remaining 2 Sts unworked, turn. (20(27, 34, 41, 48) Sts)
Row 32(34, 36, 38, 40): Ch 1 (does not count as a St), Sk over first st leaving it unworked, 1 Hdc in next St, Sk next St, 1 Dc in next 2 Sts, go back and work 1 Dc in skipped St, *1 Bpdc around next St, [Sk the next St, 1 Dc into the next 2 Sts, go back and work 1 Dc into the skipped St] twice,* repeat from * to * across row until 1 St remains, 1 Dc in last St, turn. (19(26, 33, 40, 47) Sts)
Row 33(35, 37, 39, 41): Ch 3, [Sk the next St, 1 Dc into the next 2 Sts, go back and work 1 Dc into the skipped St] twice, *1 Fpdc around next St, [Sk the next St, 1 Dc into the next 2 Sts, go back and work 1 Dc into the skipped St] twice,* repeat from * to * across row until 5 Sts remain, 1 Fpdc in next, Sk next St, 1 Dc in next 2 Sts, go back and work 1 Dc in skipped St, leave last St unworked. (18(25, 32, 39, 46) Sts)
Fasten off, leave a long tail for seaming last row to back panel.
Opposite Shoulder (Right When Worn)
XS(M, XL, 3X, 5X) ONLY-
With your front panel RS up and your finished shoulder on the right hand side, count 22(29, 36, 43, 50) Sts from left to right and join yarn in that St with a Sl St.
Row 29(31, 33, 35, 37): Ch 3, [Sk the next St, 1 Dc into the next 2 Sts, go back and work 1 Dc into the skipped St] 2 times, *1 Fpdc around next St, [Sk the next St, 1 Dc into the next 2 Sts, go back and work 1 Dc into the skipped St] twice*, repeat from * to * across row until 1 remains, 1 Dc in last St, turn. (22(29, 36, 43, 50)Dc)
Row 30(32, 34, 36, 38): Ch 3, [Sk the next St, 1 Dc into the next 2 Sts, go back and work 1 Dc into the skipped St] twice, *1 Bpdc around next St, [Sk the next St, 1 Dc into the next 2 Sts, go back and work 1 Dc into the skipped St] twice,* repeat from * to * across row until 1 St remains, 1 Dc in final St, turn. (22(29, 36, 43, 50)Dc)
Row 31(33, 35, 37, 39): Ch 1, Sk over first St leaving it unworked, 1 Sl St in next St, 1 Sc in following St, 1 Hdc in next St, Sk next St, 1 Dc in next 2 Sts, go back and work 1 Dc in skipped St, *1 Fpdc around next St, [Sk the next St, 1 Dc into the next 2 Sts, go back and work 1 Dc into the skipped St] twice*, repeat from * to * across row until 1 remains, 1 Dc in last St, turn. (20(27, 34, 41, 48) Sts) (Note- the initial skipped st and sl st do not go towards your St count)
Row 32(34, 36, 38, 40): Ch 3, [Sk the next St, 1 Dc into the next 2 Sts, go back and work 1 Dc into the skipped St] twice, *1 Bpdc around next St, [Sk the next St, 1 Dc into the next 2 Sts, go back and work 1 Dc into the skipped St] twice,* repeat from * to * across row until 6 Sts remain, 1 Bpdc around next St, Sk next St, 1 Dc in next 2 Sts, go back and work 1 Dc in skipped St, 1 Hdc in next, leave last St unworked, turn. (remember the Sl St from the previous row does not count as a St here)(19(26, 33, 40, 47) Sts)
Row 33(35, 37, 39, 41): Sk first St, 1 Sl St into next 2 Sts, Ch 3 (counts as 1 Dc), 1 Dc in next St, go back and work 1 Dc into the first Sl St made, *1 Fpdc around next St, [Sk the next St, 1 Dc into the next 2 Sts, go back and work 1 Dc into the skipped St] twice*, repeat from * to * across row until 1 remains, 1 Dc in final St.(18(25, 32, 39, 46) Sts)
Fasten off, leave a long tail for seaming last row to back panel.
First Shoulder (Left When Worn)
S(L, 2X, 4X) ONLY-
Row 29(31, 33, 35): Ch 3, work the regular St repeat across for a total of 25(32, 39, 46) Sts, 1 Dc in next St, leave remaining Sts unworked, turn. (26(33, 40, 47) Dc)
Row 30(32, 34, 36): Ch 3, [Sk the next St, 1 Dc into the next 2 Sts, go back and work 1 Dc into the skipped St] 1 time, *1 Bpdc around next St, [Sk the next St, 1 Dc into the next 2 Sts, go back and work 1 Dc into the skipped St] twice,* repeat from * to * across row until 1 St remains, 1 Dc in final St, turn. (26(33, 40, 47) Dc)
Row 31(33, 35, 37): Ch 3, [Sk the next St, 1 Dc into the next 2 Sts, go back and work 1 Dc into the skipped St] twice, *1 Fpdc around next St, [Sk the next St, 1 Dc into the next 2 Sts, go back and work 1 Dc into the skipped St] twice,* repeat from * to * across row until 5 Sts remain, 1 Fpdc around next St, 1 Hdc in next, 1 Sc in following, leave remaining 2 Sts unworked, turn. (24(31, 38, 45,) Sts)
Row 32(34, 36, 38): Ch 1 (does not count as a St), Sk over first st leaving it unworked, 1 Hdc in next St, *1 Bpdc around next St, [Sk the next St, 1 Dc into the next 2 Sts, go back and work 1 Dc into the skipped St] twice,* repeat from * to * across row until 1 St remains, 1 Dc in final St, turn. (23(30, 37, 44,) Sts)
Row 33(35, 37, 39): Ch 3, [Sk the next St, 1 Dc into the next 2 Sts, go back and work 1 Dc into the skipped St] twice, *1 Fpdc around next St, [Sk the next St, 1 Dc into the next 2 Sts, go back and work 1 Dc into the skipped St] twice,* repeat from * to * across row until 2 Sts remain, 1 Dc in next St, leave last St unworked.
(22(29, 36, 43) Sts)
Fasten off, leave a long tail for seaming last row to back panel.
Opposite Shoulder (Right When Worn)
S(L, 2X, 4X) ONLY-
With your front panel RS up and your finished shoulder on the right hand side, count 26(33, 40, 47) Sts from left to right and join yarn in that St with a Sl St.
Row 29(31, 33, 35): Ch 3, [Sk the next St, 1 Dc into the next 2 Sts, go back and work 1 Dc into the skipped St] 1 time, *1 Fpdc around next St, [Sk the next St, 1 Dc into the next 2 Sts, go back and work 1 Dc into the skipped St] twice*, repeat from * to * across row until 1 St remains, 1 Dc in last St, turn. (26(33, 40, 47)Dc)
Row 30(32, 34, 36): Ch 3, [Sk the next St, 1 Dc into the next 2 Sts, go back and work 1 Dc into the skipped St] twice, *1 Bpdc around next St, [Sk the next St, 1 Dc into the next 2 Sts, go back and work 1 Dc into the skipped St] twice,* repeat from * to * across row until, 5 Sts remain, 1 Bpdc, Sk next St, 1 Dc into the next 2 Sts, go back and work 1 Dc in skipped St, 1 Dc in final St, turn. (26(33, 40, 47)Dc)
Row 31(33, 35, 37): Ch 1, Sk over first St leaving it unworked, 1 Sl St in next St, 1 Sc in following St, 1 Hdc in next St, *1 Fpdc around next St, [Sk the next St, 1 Dc into the next 2 Sts, go back and work 1 Dc into the skipped St] twice*, repeat from * to * across row until 1 St remains, 1 Dc in final St, turn. (24(31, 38, 45) Sts) (Note- the initial skipped st and sl st do not go towards your St count)
Row 32(34, 36, 38): Ch 3, [Sk the next St, 1 Dc into the next 2 Sts, go back and work 1 Dc into the skipped St] twice, *1 Bpdc around next St, [Sk the next St, 1 Dc into the next 2 Sts, go back and work 1 Dc into the skipped St] twice,* repeat from * to * across row until 3 Sts remain, 1 Bpdc around next, 1 Hdc in following, leave final St unworked, turn. (remember the Sl St from the previous row does not count as a St here) (23(30, 37, 44,) Sts)
Row 33(35, 37, 39): Sk first St, 1 Sl St into next St, Ch 3 (counts as 1 Dc), [Sk the next St, 1 Dc into the next 2 Sts, go back and work 1 Dc into the skipped St] 2 times, *1 Fpdc around next St, [Sk the next St, 1 Dc into the next 2 Sts, go back and work 1 Dc into the skipped St] twice*, repeat from * to * across row until 1 remains, 1 Dc in final St.(22(29, 36, 43) Sts)
Fasten off, leave a long tail for seaming last row to back panel.
Sleeves (Make 2)
Row 1(RS): 43(50, 57, 57, 64, 64, 71, 71, 78) Fsc, turn. Alternatively you can Ch 1 more than the number listed above, work 1 Sc into the second Ch from the hook and each Ch across for the same St count. (43(50, 57, 57, 64, 64, 71, 71, 78) Fsc)
Row 2: Ch 3 (counts as 1 Dc here and throughout), *[Sk the next St, 1 Dc into the next 2 Sts, go back and work 1 Dc into the skipped St] twice, 1 Dc into next St*, repeat from * to * across row, turn. (43(50, 57, 57, 64, 64, 71, 71, 78) Dc)
Row 3: Ch 3, [Sk the next St, 1 Dc into the next 2 Sts, go back and work 1 Dc into the skipped St] twice, *1 Fpdc around next St, [Sk the next St, 1 Dc into the next 2 Sts, go back and work 1 Dc into the skipped St] twice,* repeat from * to * across row until 1 St remains, 1 Dc in final St, turn.(43(50, 57, 57, 64, 64, 71, 71, 78) Dc)
Row 4: Ch 3, [Sk the next St, 1 Dc into the next 2 Sts, go back and work 1 Dc into the skipped St] twice, *1 Bpdc around next St, [Sk the next St, 1 Dc into the next 2 Sts, go back and work 1 Dc into the skipped St] twice,* repeat from * to * across row until 1 St remains, 1 Dc in final St, turn. (43(50, 57, 57, 64, 64, 71, 71, 78) Dc)
Rows 5-32(32, 30, 30, 30, 28, 28, 28, 26): Repeat Rows 3 & 4.
Row 33(33, 31, 31, 31, 29, 29, 29, 27): Ch 3 (counts as 1 dc), 1 Dc in next 6 Sts, *1 Fpdc around next, 1 Dc in next 6 Sts*, repeat from * to * until 1 St remains, 1 Dc in last St, turn. (43(50, 57, 57, 64, 64, 71, 71, 78) Dc)
Row 34(34, 32, 32, 32, 30, 30, 30, 28): Ch 1, *Sc2tog*, repeat from * to * across the row, 1(-, 1, 1, -, -, 1, 1, -) Sc in final St, turn. (22(25, 29, 29, 32, 32, 36, 36, 39) Sc)
Row 35(35, 33, 33, 33, 31, 31, 31, 29): Ch 2, 1 Hdc in each St across, turn. (22(25, 29, 29, 32, 32, 36, 36, 39) Hdc)
Fasten off, leave a long tail for seaming arm.
Note
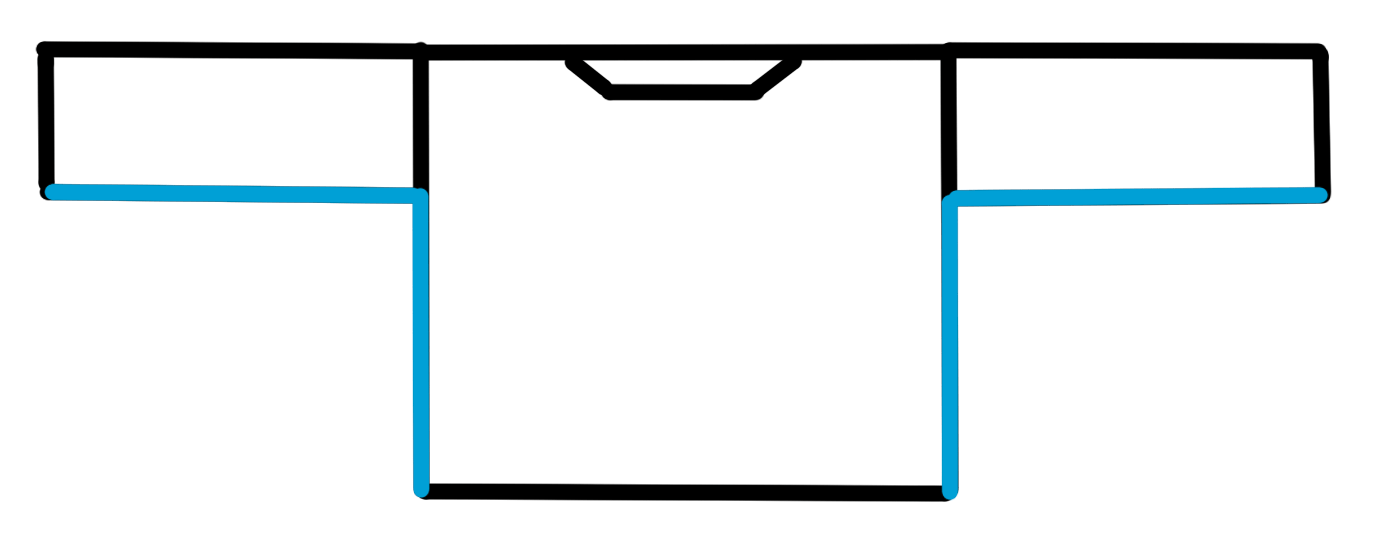
This is a drop-shoulder style pullover. The wider the front/back panels are, the shorter the sleeve needs to be because they join further down your bicep. That’s why the smaller sizes have more rows than the larger. You can easily adjust your sleeve length by adding or taking away as many rows as needed before beginning the “cuff” rows.
Assembly
Block your panels to the measurements listed above. I recommend a steam block.
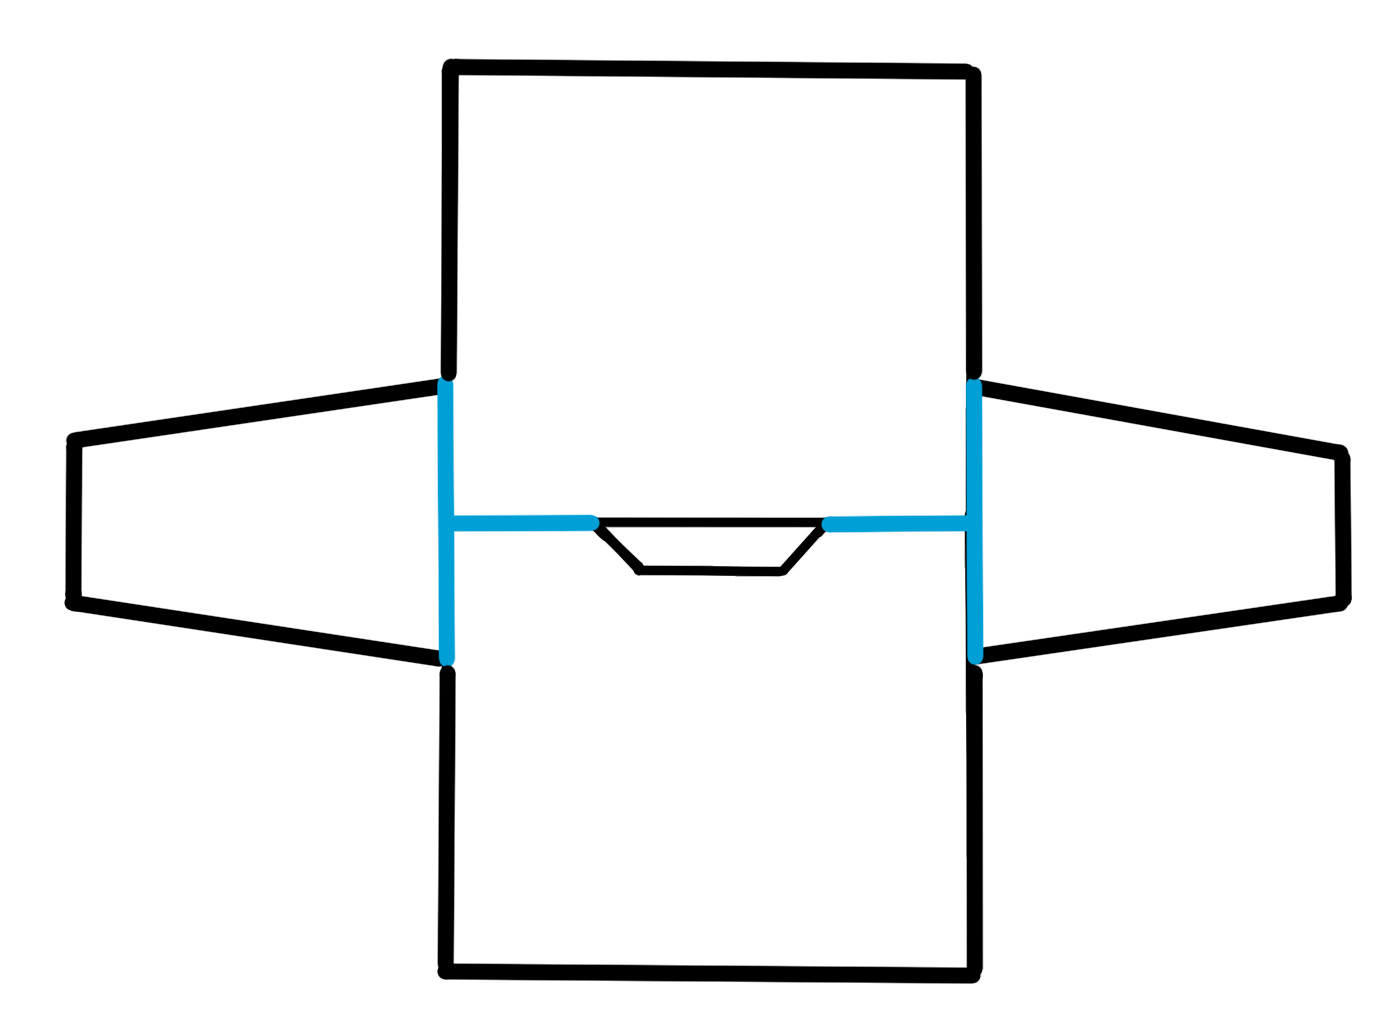
Place your front and back panels together RS facing.
Using your preferred seaming method attach the front panel to the back panel at the shoulders. I used my needle and mattress stitch but you can use any preferred seaming method. Be sure your panels are aligned and that you aren’t bunching or skipping stitches.
Next, using the same joining process as above, we will be attaching the sleeves to the sweater. Make sure the center of the sleeve is aligned with the shoulder seam. Be sure to check that your sleeves are even on both the front and back panel as you go. It is helpful to use SM’s here to keep your sleeve in place as you join.
Finally, fold your pullover so that the back and front panels are on top of each other, RS facing. Seam from the cuffs to the underarm and down the side of the pullover. Leave approximately 2” left un-sewn on both sides of the bottom of the sweater.
Bottom Hem
(Back panel)
With your sweater RS out and upside down, join yarn with a Sl St to Row 1 of the back panel.
Row 1: Ch 3, 1 Dc in each St across, turn. (64(71, 78, 85, 92, 99, 106, 113, 120) Dc)
Row 2: Ch 1, 1 Sc in first St, 1 Sc (FLO) in each St across until 1 remains, 1 Sc in last, turn. (64(71, 78, 85, 92, 99, 106, 113, 120) Sc)
Row 3: Ch 2, 1 Hdc in each St across, turn. (64(71, 78, 85, 92, 99, 106, 113, 120) Hdc)
Row 4: Ch 1, 1 Sc, in first St, 1 Sc (FLO) in each St across until 1 remains, 1 Sc in last, turn. (64(71, 78, 85, 92, 99, 106, 113, 120) Sc)
Row 5: Repeat Row 3.
Do not fasten off or turn after the last row, we are going to add our side slit trim on the first side of the sweater before continuing with the front panel hem.
Ch 1, Sc evenly up the side of the back panel side slit and down the front panel, remove hook and leave about 18” of yarn so that you can come back and work the final few Sc Sts of the trim after we add the front panel hem.
Front Panel Hem
With your sweater RS out and upside down, join yarn with a Sl St to Row 1 of the front panel.
Repeat Rows 1-3 of the back panel hem. Do not fasten off or turn after the last row, we are going to add our side slit trim.
Ch 1, Sc evenly up the side of the front panel side slit and down the back panel. Fasten off when you reach the corner. Go back to the first side and work your final Sts along the front panel hem, when you reach the corner, fasten off.
Note- Exact St count for the side slit trim is not crucial for both the front and back panel hem. Just work your Sts evenly.
Collar
With your sweater RS out and facing up, join yarn with a Sl St to the end of Row 31(31, 33, 33, 35, 35, 37, 37, 39) on the left hand side.
Row 1: Ch 1, Sc evenly up the side of the remainder of the front panel shoulder towards the back panel, 1 Sc in each St along the back panel, Sc evenly down the side of the other front panel shoulder stopping at the end of Row 31(31, 33, 33, 35, 35, 37, 37, 39), turn. Exact St count is not crucial here, just keep your Sts evenly placed.
Round 1: Ch 1, 1 Sc in first St, 1 Sc (FLO) in each St until 1 remains (first St made in Row 1), 1 Sc in final St of Row 1, do not turn, continue working Sc Sts down the final 2 rows of the front panel shoulder, 1 Sc in each St across the front of the panel, Sc evenly up the side of the last 2 rows of the other shoulder, Sl St into the first St to join, turn.
Round 2: Ch 1, 1 Sc in each St around, Sl St to first st to join.
Fasten off.