CrochetMenScarvesHatsGlovesSweatersCardigansSocksOther clothingWomenScarvesHatsGlovesShawls and cover upSweatersCardigansSocksSlippersBagsOther clothingChildrenScarvesHatsGlovesSweatersCardigansSocksSlippersOther clothingHomeBlankets and plaidsRugsHome decorationsPetsSchemesKnittingOther hand-madeChat
Crochet Duck Hat

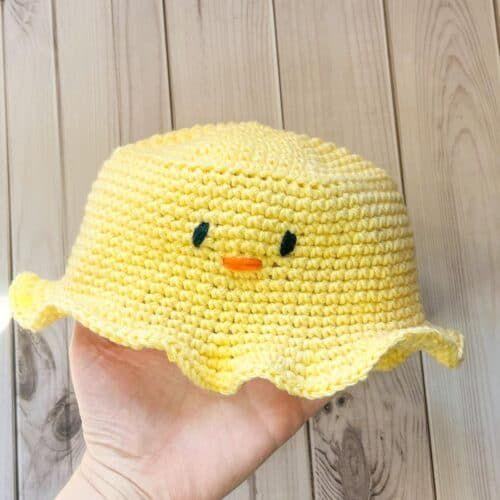
The Crochet Duck Hat is an adorable accessory that adds a touch of whimsy to any outfit! Crafted with soft yarn in bright yellow and orange colors, this hat features a cute duck face with beady eyes and a little beak. It's perfect for adding a fun and charming flair to your winter wardrobe or for dressing up in a playful costume.
Whether you're heading out to the park or just want to spread some cheer, the Crochet Duck Hat is sure to bring smiles wherever you go!Materials
Lily sugar n cream yellow cotton yarn
A little bit of black yarn for eyes
A little bit of orange yarn for the mouth
4.5 mm hook
Tapestry needle
Soft tape measure
Abbreviations (US terms)
Magic ring - mr
Single crochet - sc
Increase - inc
Back loop only - blo
Notes
This hat fits a 5-year-old (about 20.5 inches in circumference); adjust the size as needed.
Hair can affect the size, so consider that while making the hat.
To make your own hat, measure the crown's circumference, note the measurement, and build your hat before the back loop only round for accuracy.
For an adult hat, aim for a last round circumference of 22-23 inches (about 90 stitches, depending on tension and yarn thickness).
I used cotton for the crochet duck bucket hat; acrylic is better for fall or winter.
Cotton and blends breathe better, making them ideal for summer and spring hats.
I used a 4.5mm hook for tighter stitches to maintain the bucket hat shape; adjust the hook size based on your tension for a stiffer or looser fit.
Instructions
Round 1: Using the yellow cotton yarn, make a mr and then sc x6 into the mr. (6)
Round 2: Inc in every sc. (12)
Round 3: Inc, sc. Then repeat until end of round (18)
Round 4: Inc, sc x2. Then repeat until end of round (24)
Round 5: Inc, sc x3. Then repeat until end of round (30)
Round 6: Inc, sc x4. Then repeat until end of round (36)
Round 7: Inc, sc x5. Then repeat until end of round (42)
Round 8: Inc, sc x6. Then repeat until end of round (48)
Round 9: Inc, sc x7. Then repeat until end of round (54)
Round 10: Inc, sc x8. Then repeat until end of round (60)
Round 11: Inc, sc x9. Then repeat until end of round (66)
Round 12: Inc, sc x10. Then repeat until end of round (72)
Round 13: Blo sc in every sc. (72).
Round 14-28: Sc in every stitch. (72). (for adult hats add 2-3 more rounds)
Round 29: Now we are starting on the rim. Inc, sc x5. Then repeat for the rest of the round (84).
If you changed the hat size, that's fine, it just requires a bit of math.
You are to make 12 increases total in this round so divide the number of stitches you currently have by 12. Like so 72 / 6 = 12.
I made an increase with one of the stitches and then normally sc for the other 5 stitches. Yours might be inc, sc x6 or 7 - that's totally okay and if you have extra stitches just fudge it a little. This is a very forgiving hat.
Round 30: Sc in every stitch (84).
Round 31: Inc, then sc x6. Then repeat until the end of the round. (96). We increased by 12 so if you have a different hat size use the same method above for this round.
Round 32: The next couple of rounds is where the hat rim gets frilly, if you prefer to have zero frills - just continue to repeat an increase row of 12 with a sc row with no increases after it.
Inc, sc x2. Then repeat until the end of the round. (128).
We increased by 32 on this round. You increase more or less depending on frill preferences. Having more increases will create a more frilly edge, less but more than 12 increases will create a wavy edge.
Round 33: Inc, sc x2. Then repeat for the rest of the round. (170). Add more rows if you want a larger wavier rim, otherwise fasten off and weave in the tails.
Embroidery:
With the tapestry needle, embroider a small lined mouth in the middle of the hat roughly an inch to two inches long with orange yarn. I made 3 passes for my hat's mouth.
Then when that is done make eyes with the black yarn north of the sides of the mouth. I made those about ¾ of an inch long.
Once that's done your crochet duck bucket hat is all done!
No comments
Write a comment
