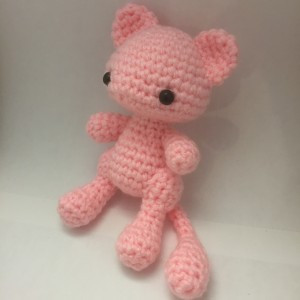
Crafting Crochet Pokemon Amigurumi Toys

Crochet Pokemon Amigurumi toys are a delightful way to bring your favorite Pokemon characters to life in a cozy and cuddly form. Crafting these cute creatures through crochet allows you to personalize every detail, from choosing the perfect yarn colors to adding unique expressions to each toy. Whether you're a crochet enthusiast looking for a fun new project or a Pokemon fan seeking a homemade collectible, creating these Amigurumi toys can be a rewarding and creative experience.
Imagining these little creatures coming to life through your hands is not only fun, but also a great way to add a touch of whimsy and charm to your craft collection. The possibilities are endless when it comes to crafting your own crochet Pokemon Amigurumi toy, making it a wonderful hobby for both beginners and experienced crocheters alike.Materials
- Pink worsted weight yarn (I used Bernat Super Value Baby Pink)
- 8 mm safety eyes
- Polyester fibrefill
- Size 7 (4.5 mm) crochet hook
- Yarn needle
Abbreviations
- ch = chain
- st = stitch
- sc = single crochet
- inc = single crochet 2 into the same stitch
- dec = decrease over the next two stitches (single crochet 2 stitches together or use invisible decrease)
Head
R1: sc 6 into magic ring (6)
R2: inc in each st around (12)
R3: [sc 1, inc] around (18)
R4: [sc 2, inc] around (24)
R5: [sc 3, inc] around (30)
R6-7: sc in each st around (30)
R8: sc 8, inc, inc, sc 10, inc, inc, sc 8 (34)
R9: sc in each st around (34)
R10: sc 15, inc, sc 2, inc, sc 15 (36)
R11: sc in each st around (36)
R12: [sc 4, dec] three times, [dec, sc 4] three times (30)
R13: [sc 3, dec] three times, [dec, sc 3] three times (24)
R14: [sc 2, dec] around (18)
R15: [sc 1, dec] around (12)
Finish with a sl st. Leave 12″ tail for sewing.
Ears (Make 2)
R1: sc 6 into magic ring (6)
R2: [sc 1, inc] around (9)
R3: [sc 2, inc] around (12)
R4: sc in each st around (12)
Finish with a sl st. Leave 8″ tail for sewing.
Body
R1: sc 6 into magic ring (6)
R2: inc in each st around (12)
R3: [sc 1, inc] around (18)
R4-7: sc in each st around (18)
R8: sc 6, dec, sc 2, dec, sc 6 (16)
R9: [sc 2, dec] around (12)
R10: sc in each st around (12)
Finish with a sl st. Leave a short tail and weave in.
Arms (Make 2)
R1: sc 6 into magic ring (6)
R2: [sc 1, inc] around (9)
R3-4: sc in each st around (9)
R5: dec, sc 7 (8)
R6: [sc 2, dec] around (6)
Finish with a sl st. Leave 8″ tail for sewing.
Thigh (Make 2)
R1: ch 4, skip the first ch from hook, inc, sc 2, turn work to continue on the other side of the chain, sc 2, inc (8)
R2: sc 1, inc, sc 4, inc, sc 1 (10)
R3: sc in each st around (10)
Finish with a sl st. Leave 8″ tail for sewing.
Feet (Make 2)
R1: sc 6 into magic ring (6)
R2: sc 1, inc, inc, inc, inc, sc 1 (10)
R3: sc 1, [inc, sc 1] four times, sc 1 (14)
R4: sc 5, dec, dec, sc 5 (12)
R5: sc 3, dec, sc 2, dec, sc 3 (10)
R6: [sc 3, dec] around (8)
R7: sc in each st around (8)
Finish with a sl st. Leave 8″ tail for sewing.
Tail
R1: sc 6 into magic ring (6)
R2: [sc 1, inc] around (9)
R3: [sc 2, inc] around (12)
R4: sc in each st around (12)
R5: [sc 4, dec] around (10)
R6: [sc 3, dec] around (8)
R7: [sc 2, dec] around (6)
R8: dec, sc 4 (5)
R9-17: sc in each st around (5)
Finish with a sl st. Leave 8″ tail for sewing.
Assembly
Insert the safety eyes about 6 stitches apart, in a position 10 rows from the top of the head. Stuff the head with polyfill to desired firmness.
Sew the ears to the head as pictured.
Stuff the body. Use the tail from the head to sew the body to the head.
Sew the arms onto the body.
Sew the thighs onto the body.
Sew the feet onto the body.
Sew the tail onto the body.
