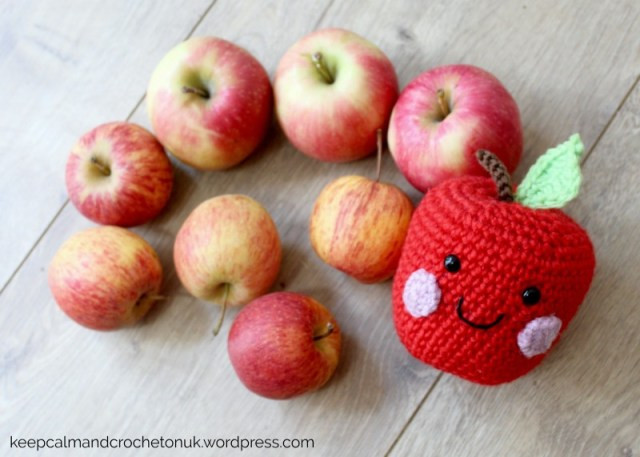
Crochet Amigurumi Apple

Crocheting a cute amigurumi apple is a delightful experience filled with creativity and warmth. The process involves using soft yarn to meticulously craft each stitch, giving life to a charming little fruit that can serve as a playful decoration or a heartfelt gift. From selecting the perfect shades of red and green to carefully shaping the apple's form, every step is an opportunity to infuse your creation with personality and charm.
As you work on this lovely project, you might find yourself immersed in a peaceful state of flow, enjoying the rhythm of your crochet hook bringing the apple to life. Whether you're a seasoned crocheter or new to the craft, making an amigurumi apple is a joyous way to express your creativity and spread smiles wherever it goes.Yarn: (8ply / yarn weight #3 / double knit)
22 g of yarn in the following colour:
- YARN A – Red (or green)
Scraps of the following colours:
- YARN B – Brown
- YARN C – Green
- YARN D – Pink
Materials
3.75mm hook, stitch markers, yarn needle, polyester toy stuffing, 2 x 9mm black safety eyes, black embroidery thread
Difficulty: Easy
Size: Circumference of 29cm (11.4inches)
Gauge: 4dc = 2.5cm (1 inch)
Stitch Guide:
- ch(s) = chain
- st(s) = stitch(es)
- Slip Stitch (sl st): Insert hook in st indicated, yarn over and pull through all loops.
- UK Double Crochet/US Single Crochet (dc/sc): Insert hook in st indicated and pull up a loop (two loops on hook), yarn over, pull through both loops on hook.
- UK Double Crochet/US Single Crochet 2 sts together (dc2tog/sc2tog): Insert hook in st indicated and pull up a loop (two loops on hook), insert hook in next st, yarn over, pull up a loop, yarn over, pull through three loops on hook.
- UK Half Double Treble / US Half Double Crochet (htr/hdc): Yarn over, insert hook in next st and pull up a loop (three loops on hook), yarn over, pull through all three loops on hook.
- UK Treble / US Double Crochet (tr/dc): Yarn over, insert hook in indicated st and pull up a loop (three loops on hook), yarn over, pull through two loops, yarn over, pull through remaining two loops on hook.
Notes:
Using a stitch marker: Sections are worked without joining in continuous rnds (unless specified) – place the stitch marker in the top of the first st to mark start of rnd
Instructions:
Cheeks (Make 2):
Rnd 1: Using 3.75mm hook and YARN D make a magic ring; work 8dc/sc into ring. 8sts
Fasten off but leave a long tail
Stalk:
Using 3.75mm hook and YARN B ch8, sl st into the 2nd ch from the hook; sl st in each st along until end.
Fasten off but leave a long tail
Leaf:
Using 3.75mm hook and YARN C ch7, sl st into the 2nd ch from the hook. Then work the following in the ch; 1dc/sc, 1htr/hdc, 3tr/dc, 1htr/hdc, 1dc/sc, sl st, ch1, then working along the other side of your beginning ch, sl st, 1dc/sc, 1htr/hdc, 3tr/dc, 1htr/hdc, 1dc/sc, sl st to the top of the beginning st
Fasten off but leave a long tail
Apple:
Rnd 1: Using 3.75mm hook and YARN A make a magic ring; work 6dc/sc into ring. 6sts
Rnd 2: (2dc/sc) to end. 12sts
Rnd 3: (1dc/sc, 2dc/sc) to end. 18sts
Rnd 4: (1dc/sc in the next 2sts, 2dc/sc) to end. 24sts
Rnd 5: (1dc/sc in the next 3sts, 2dc/sc) to end. 30sts
Rnd 6: (1dc/sc in the next 4sts, 2dc/sc) to end. 36sts
Rnds 7-13: 1dc/sc in each st
Rnd 14: (1dc/sc in the next 5 sts, 2dc/sc) to end. 42sts
Rnds 15-20: 1dc/sc in each st
Rnd 21: (1dc in the next 5sts, dc2tog/sc2tog) to end. 36sts
Rnd 22: (1dc in the next 4sts, dc2tog/sc2tog) to end. 30sts
- Add eyes between rnds 16-17 approximately 5sts apart
- Using black embroidery thread embroider a mouth over rnds 13-14
- Sew on cheeks either side of the mouth
Rnd 23: (1dc in the next 3sts, dc2tog/sc2tog) to end. 24sts
- Start to stuff; continuing to stuff as you go
Rnd 24: (1dc in the next 2sts, dc2tog/sc2tog) to end. 18sts
Rnd 25: (1dc, dc2tog/sc2tog) to end. 12sts
Rnd 26: (dc2tog/sc2tog) to end. 6sts
- Fasten off but leave a long tail
- Sew up remaining 6sts, then using the yarn tail thread it through the centre of the apple and pull up to create a indent in the bottom for the apple bottom.
- Repeat this process pulling back through the centre of the apple from the top to create the indent for the apple stalk and leaf to sit in. Secure and fasten off.
Making up:
- Using YARN B sew a star shape into the bottom indent for the apple bottom
- Attach the stalk and the leaf in the indent at the top of the apple
That's it.
