CrochetMenScarvesHatsGlovesSweatersCardigansSocksOther clothingWomenScarvesHatsGlovesShawls and cover upSweatersCardigansSocksSlippersBagsOther clothingChildrenScarvesHatsGlovesSweatersCardigansSocksSlippersOther clothingHomeBlankets and plaidsRugsHome decorationsPetsSchemesKnittingOther hand-madeChat
Crochet Amigurumi Bunny

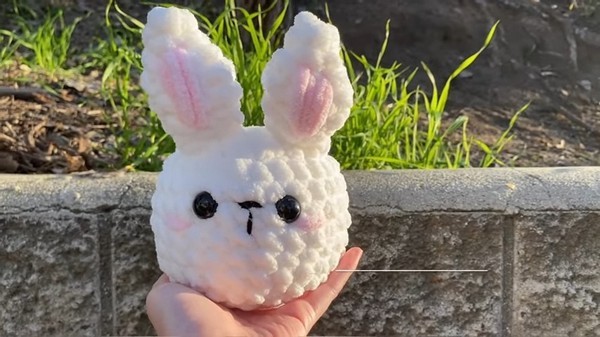
Crochet Amigurumi Bunnies are the cutest and most delightful little creatures to create with your crocheting skills! These charming bunnies come to life with their fluffy yarn and adorable details, making them perfect for cuddling or as a charming decoration in any room. Whether you're a crochet enthusiast looking for your next fun project or someone new to the craft wanting to try something cute and whimsical, making an Amigurumi Bunny is a wonderful choice.
With just a few simple stitches and some creativity, you can bring a smile to your face and others with these lovable little bunnies. So grab your yarn, crochet hook, and let the magic of creating these irresistible Amigurumi Bunnies begin!Materials:
- 7mm crochet hook
- #6 Super Bulky blanket yarn in white (main colour) and pink (for the blush and accents on the ears)
- #4 worsted weight yarn in black (for detailing the nose)
- Stuffing
- Yarn needle
- Scissors
- Stitch marker
- 60mm safety eyes (or substitute as desired)
Step by step Pattern
Body:
- Magic Circle: Start with a magic circle using your white yarn. Make 7 single crochets (sc) inside the circle for Round 1. Tighten the circle by pulling the tail end.
- Round 2: Perform 7 increases (2 sc in each stitch around) for a total of 14 stitches.
- Round 3: 1 sc in the first stitch, 1 increase in the next stitch; repeat 7 times for a total of 21 stitches.
- Round 4: 1 sc in the next 2 stitches, 1 increase in the next stitch; repeat 7 times for a total of 28 stitches.
- Round 5-9: 1 sc in each stitch around, for a total of 28 stitches in each round.
- Round 10: Start with a bobble stitch for the tail in the first stitch, then 1 sc in each of the remaining stitches around for a total of 27 sc and 1 bobble stitch.
- Round 11: 1 sc in each stitch around for a total of 28 stitches.
- Round 12: 2 sc, then 1 decrease; repeat 7 times for a total of 21 stitches.
- Round 13: 1 sc, then 1 decrease; repeat 7 times for a total of 14 stitches.
- Stuff the bunny body firmly and place the safety eyes between Rounds 6 and 7, approximately 4 stitches apart.
- Round 14 (Closing Round): Perform 7 decreases (invisible decrease recommended) for a total of 7 stitches. Fasten off, leaving a long tail for sewing. Use the yarn needle to weave through the remaining stitches, pull tight to close the hole, and weave in the end.
Ears (Make 2):
- Start with a magic circle using the white yarn, and make 4 sc inside the circle for Round 1.
- Round 2: 1 sc, 1 increase; repeat 2 times for a total of 6 stitches.
- Round 3: 1 sc, 1 increase; repeat 3 times for a total of 9 stitches.
- Round 4-5: 1 sc in each stitch around for a total of 9 stitches in each round.
- Round 6: 1 sc, 1 decrease; repeat 3 times for a total of 6 stitches.
- Round 7: 1 sc, 1 decrease; repeat 2 times for a total of 4 stitches. Fasten off, leaving a long tail for sewing.
Adding Details:
- Nose: Using the black yarn, sew the nose between the eyes by stitching a small triangle or oval.
- Blush: Sew a bit of pink yarn below each eye for the blush.
- Ear Accents: Add pink yarn inside each ear for the inner ear accent.
Assembly:
- Sew the ears to the top of the bunny's head, aligning them with the eyes.
- If you haven’t already, sew the nose and add any additional details like the blush.
- Adjust the stuffing as necessary before completely sewing up any openings.
Notes:
- This pattern is designed with beginners in mind. Adjust yarn and hook size as necessary to achieve different sizes.
- Always mark the beginning of each round with a stitch marker to keep track of your progress.
- Feel free to add your personal touch by customizing colors and details like the facial expression or additional accessories.
Congratulations!
You've completed your Crochet Amigurumi Bunny. Enjoy your new fluffy friend!
No comments
Write a comment
