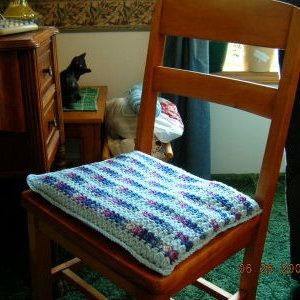
Crochet Stacked Clusters Seat Cushion

Looking to add a touch of coziness to your dining area or a splash of color to your living room? Why not try your hand at creating a Crochet Stacked Clusters Seat Cushion! This fun and creative project not only allows you to customize the colors and size to fit your style but also adds a personal touch to your home decor. With its unique stacked clusters design, this seat cushion is both practical and visually appealing. Whether you're a seasoned crocheter or just starting out, crafting your own Crochet Stacked Clusters Seat Cushion can be a rewarding and enjoyable experience that will surely brighten up any space in your home.
Materials Needed
6 oz worsted weight acrylic yarn in 2 colors.
Size H/8 or 5mm aluminum crochet hook
Yarn needle for weaving in ends
2 pieces cotton/polyester fabric in white size 16" x 13"
1 piece of white felt, 16" x 13"
3 pieces of polyester batting, 16" x 13"
Several Quilting pins
White Sewing thread and needle or sewing machine.
Yarn Thickness: 4mm
Gauge: 4dc=1"
Finished Size: 12" x 15"
Skill Level: Intermediate
Instructions
Special Stitch Used: Cl (cluster): *yo, insert hook in stitch indicated draw up a loop, yo draw through 2 lps on hook then rep from * two more times, then yo and draw yarn through all 4 lps on hook.
ROW 1: With blue, ch60. Sc in 2nd ch from hook. *Ch1. Sk next ch. Sc in next ch. Rep from * across. Ch3, turn.
ROW 2: *Cl in next ch1 sp. Ch1. Rep from * across. End with a dc in the last sc. Drop blue but do not fasten off. Join multi, ch1, turn.
ROW 3: Sc in top of first dc. Ch1. *Sc in next ch1 sp. Ch1. Rep from * across. End with a sc in top of ch3. Ch3, turn.
ROW 4: *Cl in next ch1 sp. Ch1. Rep from * across. End with a dc in the last sc. Drop multi but do not fasten off. Join blue, ch1, turn.
ROW 5: Sc in top of first dc. Ch1. *Sc in next ch1 sp. Ch1. Rep from * across. End with a sc in top of ch3. Ch3, turn.
ROW 6-60: Repeat Rows 2-5 14 times.
ROW 61: Repeat Row 2.
ROW 62: Repeat Row 3. Fasten off and weave all ends into back of work.
Assembly
Step 1: Layer the 2 pieces of fabric (wrong sides facing each other), 3 layers of batting and felt in that order on your working surface.
Step 2: With your quilting pins, pin all layers together so all edges are lined up evenly and so they will not shif when you are basting them together.
Step 3: With either your sewing machine or needle and thread, work a back stitch on 3 sides starting on a short side. Use a .25" seam allowance. Leave an opening on the 4th side to turn the insert inside out. Trim material close to stitching and clip corners close to stitching. Turn it inside out after stitching and stitch it closed. Set aside cushion insert.
Step 4: Pick up crochet work. Fold in half so Row One and Row 62 are lined up even, make sure the back sides are facing each other.
Step 5: Lay it down in front of you so the long side is away from you.
Step 6: Pick up work and join blue yarn to bottom right corner and work 2 sc in each dc row up the first side through both layers, work one sc in each sc and each ch1 sp across first and last row, working through both layers.
Step 7: Slip cushion in and finish stitching this last side closed as you did the first side. Fasten off and weave all ends into back of work.
