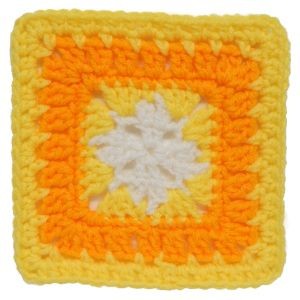
Crochet Kittery Square

The Crochet Kittery Square is a delightful pattern that brings a touch of charm and creativity to your crafting projects. With its intricate design and versatility, this square offers endless possibilities for creating beautiful blankets, pillows, and more. Whether you're a seasoned crocheter or just starting out, this pattern is a fantastic choice to hone your skills and add a handmade touch to your home decor.
Get ready to immerse yourself in the world of crochet with the Crochet Kittery Square and let your creativity soar as you stitch your way to a one-of-a-kind masterpiece!Materials Needed
Small amounts of 3 different colors of acrylic worsted weight yarn. I used yellow, white and orange.
Size H/8 5mm aluminum crochet hook
Yarn Needle
Yarn Thickness 4mm
Gauge: 4dc=1"
Finished Size: 6" x 6"
Skill Level: Beginner
Instructions
RND 1: With color1. Ch4, join w/slst to first ch to form ring. Ch3, dc in ring. Ch3. *2dc in ring. Ch3. Rep from * 2 times more. Join w/slst to top of ch3.
RND 2: Ch3, dc in same st as slst. Ch2. 2dc in next dc. Ch1. Sc in next ch3 sp. Ch1. *2dc in next dc. Ch2. 2dc in next dc. Ch1. Sc in next ch3 sp. Ch1. Rep from * around. Join w/slst to top of ch3. Fasten off color1.
RND 3: Join color 2 in any ch2 sp. Sc in same sp. 3dc in next ch1 sp. Ch3. 3dc in next ch1 sp. *Sc in next ch2 sp. 3dc in next ch1 sp. Ch3. 3dc in next ch1 sp. Rep from * around. Join w/slst to first sc. Fasten off color 2.
RND 4: Join color 3 to same st as slst. Ch1. Sc in each of the next 3 dc. 2sc, ch2, 2sc in next ch3 corner sp. Sc in each of the next 3 dc. *Sc in next sc. Sc in each of the next 3 dc. 2sc, ch2, 2sc in next ch3 corner sp. Sc in each of the next 3 dc. Rep from * around. Join w/slst to ch1.
RND 5: Ch3, dc in same st as slst. Ch1. Sk next sc. (2dc in next sc. Ch1. Sk next sc. 2dc in next sc. Ch1. Sk next sc. 2dc, ch2, 2dc in next ch2 corner sp. Ch1. Sk next sc. 2dc in next sc. Ch1. Sk next sc. 2dc in next sc. Ch1. Sk next sc.) *2dc in next sc. Rep bet () once. Rep from * around. Join w/slst to top of ch3. Fasten off, color 3.
RND 6: Join color 2 to first ch1 sp to the left of where you joined with a slst. Ch3. (Sc in next ch1 sp. Ch2. Sc in next ch1 sp. Ch2. Sc, ch2, sc in next ch2 corner sp. Ch2. Sc in next ch1 sp. Ch2. Sc in next ch1 sp. Ch2. Sc in next ch1 sp. Ch2.) *Sc in next ch1 sp. Rep bet () once. Rep from* around. Join w/slst to first ch of ch3.
RND 7: Slst into the first ch2 sp. Ch2. Hdc in same sp. 2hdc in each of the next 2 ch2 sp. 2hdc, ch2, 2hdc in next ch2 corner sp. 2hdc in each of the next 3 ch2 sps. *2hdc in each of the next 3 ch2 sps. 2hdc, ch2, 2hdc in next ch2 corner sp. 2hdc in each of the next 3 ch2 sps. Rep from * around. Join w/slst to top of ch2. Fasten off, weave ends into back of work.
