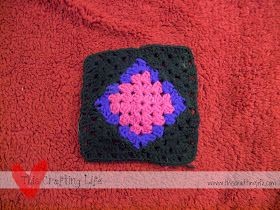
Crochet Diamonds in the Square Granny Afghan block

Have you ever tried creating a Crochet Diamonds in the Square Granny Afghan block? It's such a delightful project to work on! This classic crochet pattern combines the charm of traditional granny squares with the elegance of diamond shapes, resulting in a visually stunning and intricate design. Each square allows you to showcase different color combinations and experiment with various yarn textures, making it both enjoyable and customizable.
Whether you're a seasoned crochet enthusiast or a novice looking for a fun challenge, this pattern is sure to bring you hours of creative joy and satisfaction. So, grab your favorite crochet hook, pick out some vibrant yarns, and get ready to dive into the wonderful world of crochet diamonds!Materials:
Several colors of worsted weight yarn. I used Red Heart because that's what I had available and I have lots of it. You can use more or less colors than I did and achieve a different effect.
Size H hook or to achieve your desired gauge
Center Square Section:
Ch 3
R1: 2 dc in first ch, ch2, 3 dc in same ch again, ch2, 3 dc in same ch again, ch 2, 3 dc in same ch again, ch 2 and join with top of ch 3.
R2: sl st over to the first ch2 space. ch 3, 2dc, ch2, 3dc, ch 1, *in next ch 2 space, 3dc, ch2, 3dc, ch1* repeat around, join to top of ch 3
*Join next color in any ch 2 space (these will be the corners for now)*
R3: ch3, 2dc, ch2, 3dc, ch1, *in next ch1 space, 3dc, ch1, in "corner" ch 2 space, 3dc, ch2, 3dc, ch1* repeat around, join to top of ch 3
R4: sl st over to corner ch2 space, ch 3, 2dc, ch2, 3dc, ch1, *in next ch1 space, 3dc, ch1, next ch1 space, 3dc, ch1, next "corner" ch2 space, 3dc, ch2, 3dc, ch1* repeat around, join to top of ch3.
*Join next color in ch1 space that is in the middle of one of the square sides- this will make one of the triangle sections to form the new square*
Triangle attachment (work on each of four sides of the Center Square Section)
R1: in same space as joining, ch3, 2dc, ch2, 3dc. sl st into a space on the wall of the square (be careful not to stretch it too far, you want the triangle to match up on the side as far as length goes.
R2: ch3, turn, in same space, 2dc, ch1, in ch2 space, 3dc, ch2, 3dc, ch1, in top of ch3 from previous row dc in this manner: YO, insert hook through top of ch3 from beginning of prior row and through a point in the wall of the square equivalent to where you attached the top of the row on the other side, YO, pull through both square and top of ch3, progress with dc as normal. 2dc more in same space, then join top of the row to a suitable place on the "wall" of the square to attach.
R3: ch3, turn, in same space, 2dc, ch1, 3dc in ch 1 space, ch1, (3dc, ch2, 3dc)in ch2 space, ch1, 3 dc in ch 1 space, ch 1, in top of ch3 from previous row dc in this manner: YO, insert hook through top of ch3 from beginning of prior row and through a point in the wall of the square equivalent to where you attached the top of the row on the other side, YO, pull through both square and top of ch3, progress with dc as normal. 2dc more in same space, then join top of the row to a suitable place on the "wall" of the square to attach. FO.
Repeat Triangle Attachment on each side of the square. On last side, do not break off yarn. Your yarn should be in the point of what was the square after the first section. Continue on with this next round:
Final Round: ch3, 2dc in same sp, ch1, (3dc in next ch 1 space, ch 1) twice, *in ch2 space, 3dc, ch2, 3dc, ch 1, (in next ch 1 space, 3dc, ch 1) 5 times*, repeat from * two more times, (3dc, ch 1) in remaining two ch 1 spaces. Join to top of ch 3 from beginning of round. FO.
