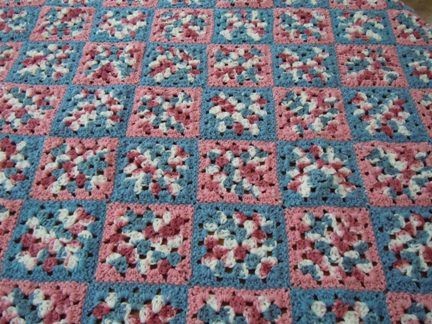
Crochet Granny Square Afghan

Crocheting a Granny Square Afghan is a fantastic way to showcase your creativity while keeping cozy. The timeless charm of the granny square pattern adds a touch of nostalgia to your home decor, making it a lovely addition to any couch or bed. With its repetitive yet soothing stitching, creating each individual square becomes a mindful and rewarding experience.
Whether you choose vibrant colors for a bold look or soft pastels for a more soothing feel, the versatility of this crochet project allows you to customize it to match your style perfectly. Once all the squares are completed, joining them together is like piecing together a beautiful mosaic, culminating in a warm and inviting blanket that you can treasure for years to come. So grab your yarn, hook, and a cup of tea, and enjoy the therapeutic and heartwarming process of crafting your very own Granny Square Afghan.Craft Supplies:
- Crochet hook size H
- Yarn needle
- 14 oz (36 oz) MC Red Heart 'wedge wood' worsted weight yarn
- 8 oz (20oz) CC#1 Red heart 'country blue' worsted weight yarn
- 8 oz (20oz) CC #2 Red heart 'rose pink' worsted weight yarn
Amounts given for lap size with changes in ( ) for full size afghan.
The amount of yarn is an estimate. It varies depending on your tension. It is always better to buy too much than not enough. If buying yarn that uses a dye lot, be sure to get enough yarn from the same dye lot.
To make a granny square:
Ch 5; join with a slst to form a ring.
Round 1: Ch 3, 2 dc in ring* ch1, 3dc in ring. Repeat from * 2 more times. Ch 1 join with slst to 3rd ch
Round 2: Ch 3, 2 dc in corner space ch1 * 3dc in next space, ch 1, 3 dc in same space, ch 1. Repeat from * 2 more times, 3 dc in beginning space, ch 1, join with slst to 3rd ch (of beginning ch 3)
Round 3: Ch 3, 2 dc in corner space, ch 1, *3 dc in next space, ch 1, 3 dc in next sp, ch1, 3 dc in same sp, ch 1. Repeat from * 2 more times. 3 dc in next sp, ch1, 3 dc in beginning sp, ch 1, join with a slst to 3rd ch (of beginning ch 3) Change to CC for next round.
Round 4: Ch 3, 2 dc in corner sp, ch 1 *3 dc in next sp, ch 1 3 dc in next sp, ch1 3 dc in next sp, ch 1 3 dc in same corner space ch 1 repeat from * 2 times. 3 dc in next sp ch 1, 3 dc in next sp, ch 1 3dc in beg sp, ch 1 join with slst to 3rd ch (of beg ch 3) Fasten off, weave loose ends back into square and trim off any extra yarn.
For a lap size afghan (lapgan) you need 80 squares. For a full size afghan you need to make 192 squares. The lapgan will be made by joining 10 rows of 8 squares and the full size will be made up of 16 rows of 12 squares each. If using two different border colors as shown in our sample, make half your squares with cc #1 and the other half with cc #2.
To assemble the afghan:
First you need to attach the squares into rows then join the rows together. To attach two squares, place one square with cc #1 on top of a square with cc #2. Thread a piece of yarn through a yarn needle and attach it to one corner of the two squares by passing the needle through both loops on both squares. (You can use either cc #1 or cc #2 to join the squares just be sure to use the same color throughout) Tie the yarn in a knot leaving a 2" tail. Lay the tail along the edge of the granny square and whip stitch across one end of the squares to join them. Knot the yarn off and weave the loose end back in.
Open up the two squares and lay another square on top of the first square. This time join in the same way but join on the opposite side that you joined the first square. Continue adding squares in this manner alternating the squares with cc #1 with the cc #2 squares. Once you have joined 8 (12) squares you have completed one row. Put this aside and go onto the next row. Continue until all 10 (16) rows are completed.
Now it is time to join the rows together. Lay one row on top of another row with right sides facing. If using the two different border colors, line them up so that cc #1 is lines up with a cc #2. Whip stitch the rows together in the same way that you joined the squares. Continue adding rows in this manner until all the rows are attached. Once complete, check to make sure you have woven all loose ends back into the afghan.
