
Crochet Honey Bee Amigurumi Project

The Crochet honey bee amigurumi is a delightful and fun project for all crochet enthusiasts. These adorable little creations bring a touch of sweetness and playfulness to any space with their cute designs. You can experiment with different yarn colors and textures to give each honey bee its unique personality.
Whether you are a beginner or an experienced crocheter, crafting these tiny creatures is a rewarding and joyful experience that will brighten your day. With just a few simple stitches and some creativity, you can create a buzzing hive of these charming amigurumi honey bees that are bound to put a smile on your face and make a lovely addition to any crochet collection.
Required Materials
- 5mm crochet hook
- worsted weight yarn in black and yellow
- 9mm safety eyes
- white felt
- hot glue gun
- tapestry needle
- scissors
- black pipe cleaner
Stitches & Abbreviations
| ch | chain stitch |
| sc | single crochet |
| inc | increase |
| dec | decrease |
| ** | repeat what’s in between “**” as directed |
| sl st | slip stitch |
Body
In yellow, ch 2
Round 1: 6sc in first ch
Round 2: inc in each stitch (12)
Round 3: *sc, inc* around (18)
Round 4: *2sc, inc* around (24)
Round 5-6: sc around
Round 7: switch to black, sc around
Round 8-9: switch to yellow, sc around
Round 10: switch to black, sc around
Round 11-12: switch to yellow, sc around
Round 13: switch to black, sc around
Round 14: switch to yellow, *2sc, dec* around (18)
Round 15: *sc, dec* around (12)
Round 16: switch to black, dec in all stitches (6)
Sl st to next stitch, then cut yarn and pull through to fasten off. Leave a long tail for sewing.
Assembly
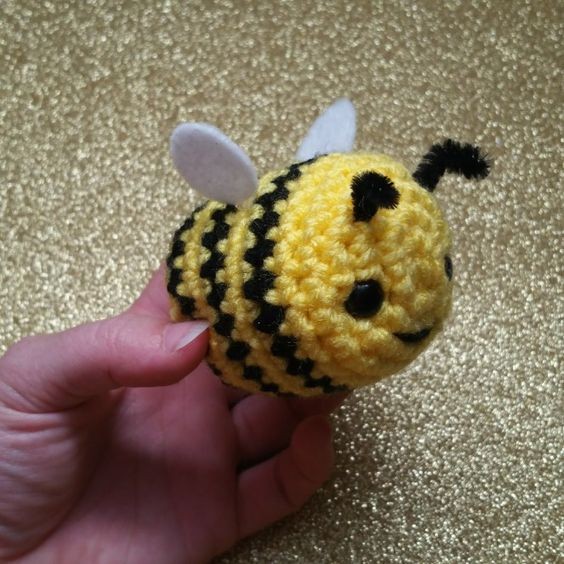
- Attach safety eyes to the front of the bee’s face, in between rounds 3 & 4 and an inch apart.
- Next, stuff the bee and use the tail to cinch the opening closed by sewing through each stitch and pulling tight. Tie a knot and weave the tail in.
- Cut the pipe cleaner so it measures 3”. Poke it through the bee’s face, and out through another stitch on the face. Roll the tips down and bend them so they look like antennae.
- Cut two tiny circles out of the felt (about ¾” in diameter) and hot glue them to the body, so they stand upright. I attach mine on the center black stripe and even with the antennae.
- Last, embroider a small smile on the front of the bee’s face with a bit of black yarn.
