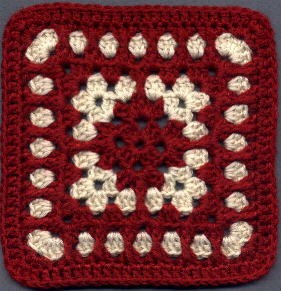
Crochet Spanish Tile Square

The Crochet Spanish Tile Square is a delightful project that combines intricate patterns with beautiful colors to create a stunning square motif. This crochet design allows you to showcase your skills while adding a touch of elegance to any project you incorporate it into. The rhythmic repetition of stitches in this pattern is not only soothing but also rewarding once you see the intricate Spanish tile design come to life.
Whether you're a beginner looking to challenge yourself or an experienced crocheter wanting to expand your repertoire, the Crochet Spanish Tile Square is a fantastic choice that is sure to bring a smile to your face with its charming and stylish appearance.Materials:
- Caron Wintuk worsted weight yarn in 2 colors
- Crochet hook size G
Gauge: Rounds 1-3 = 3", Completed square = 7"
To Work Front Post Treble (fptrc): yo twice, insert hook around post of specified dc, complete trc
With color A, ch4; join with a sl st to form ring
Round 1: Ch3 to count as first dc; 2dc in ring (ch3, 3dc in ring) 3 times; join with
a dc in the top of beginning ch3 to form last corner loop
Round 2: Ch3 to count as first dc; (dc, ch2, 3dc, ch2, 2dc, ch1) all in same
corner loop; *(2dc, ch2, 3dc, ch2, 2dc, ch1) in next ch3 corner loop* Repeat from
* to* 2 times; join with a sl st to top of beginning ch 3. Fasten off color A
Round 3: Skip first ch2 space; attach color B with a sl st to next ch2 space; (2dc,
ch3, 2dc) in next ch1 sp; sl st in next ch2 sp, ch3, *sl st in next ch2 sp (2dc, ch3,
2dc) in next ch 1 sp; sl st in next ch2 sp, ch3* Repeat from * to * 2 times; sl st in
the same loop as beginning sl st
Round 4: Ch3 to count as first dc; 2dc in same loop as sl st; *(3dc, ch3, 3dc) in
next ch3 sp; (3dc in next ch2 sp of round 2) twice* Repeat from * to * 2 times;
(3dc, ch3, 3dc) in next ch3 sp; 3dc in next ch2 sp of round 2; join with a sl st to
the top of beginning ch 3. Fasten off color B.
[Note: the "(3dc in next ch2 sp of round 2)" groups in this round are worked in the
same loops as, and over top of, the sl sts of Round 3.]
Round 5: Attach color A with a sl st to any ch3 sp; ch 3 to count as first dc, 2dc
in same ch3 sp; *[3dc in sp between next 3dc group; (dc in next sp between 3dc
group, fptrc around center dc of round 2 directly below sp, dc in same sp as last
dc); 3dc in sp between next 3dc group]; (3dc, ch3, 3dc) in next ch3 sp* Repeat
from * to * 2 times; then from [ to ] once; 3dc in the next ch3 sp; ch 1, join with a
hdc to top of beginning ch3.
Round 6: Ch 3 to count as first dc, 2 dc in same loop formed by hdc joining of
last round; *(3dc in sp between next 3dc groups) 4 times; (3dc, ch3, 3dc) in next
ch3 space*. Repeat from * to * 2 times; (3dc in sp between next 3 st group) 4
times; 3dc in same ch3 sp as beginning, ch3, join with a sl st to top of beginning
ch3. Fasten off color A.
Round 7: Attach color B with a sl st to any ch3 sp, ch3 to count as first dc; 3dc in
same sp; *(3dc in sp between next 3 st group) 5 times; 7 dc in next ch3 sp*
Repeat from * to * 2 times; (3dc in sp between next 3 st group) 4 times; 3dc in
same ch3 sp as beginning, join with a sl st to top of beginning ch3. Fasten off
color B.
Round 8: Attach color A with a sl st to the 4th dc of any corner, ch2 to count as
first hdc, work 2 hdc in same st; skip next 3dc, *(dc in next sp between 3dc
groups, fptrc around center dc of round 6 directly below sp, dc in same sp as last
dc) 6 times; skip next 3dc; 5 hdc in next dc; skip next 3dc* Repeat from * to * 2
times; (dc in next sp between 3dc group, fptrc around center dc of round 6
directly below sp, dc in same sp as last dc) 6 times; skip 3dc; 2 hdc in the same st
as beginning; join with a sl st to top of beginning ch2.
Round 9: (Fudging round!) Check size of square. If it is 7", eliminate round 9 - 92
sts around. If you need another 1/2", work round in sc; if you need another inch,
work in dc. Working 3 sts (either sc or dc) in the center hdc of each corner, sc or
dc in every st around - 100 sts around.
