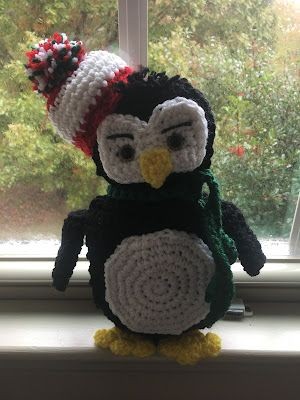
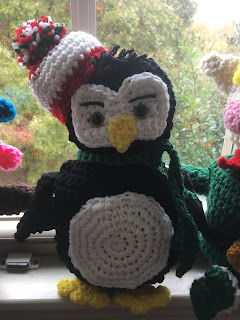
Crochet Christmas Cheer Cuddlers Penguin

The Crochet Christmas Cheer Cuddlers Penguin is a delightful addition to any holiday décor. With its charming design and cuddly softness, this little penguin is sure to bring a smile to your face and warm your heart. Whether displayed on a mantel, nestled among other festive decorations, or gifted to a loved one, this crochet creation is bound to spread joy and cheer. The intricate details and cozy feel make it a perfect companion during the winter season. Embrace the holiday spirit with the Crochet Christmas Cheer Cuddlers Penguin and let its friendly presence make your festive celebrations even more special.
Size: approx. 12" tall
Gauge: Not important for this project
Materials:
--4.0mm & 5.0mm hooks
--#4 worsted weight yarn in Black, Green, Red, White and Yellow
--(2) 15mm black safety eyes - eyes
--Polyfil
--tapestry needle for weaving
U.S. Stitch Abbreviations:
Ch: chain
Sl st: slip stitch
St: stitch(es)
SC: single crochet
SC2tog: single crochet 2 stitches together
SC3tog: single crochet 3 stitches together
HDC: half double crochet
DC: double crochet
Sk: skip
Rep: repeat
MR: magic ring
FO: fasten off
Penguin:

Directions:
Head/Body Panel (make 2):
1. With Black yarn and 5.0mm hook, Ch15. SC in 2nd ch from hook and across. Ch1 and turn. (14)
2. 1 SC in each st across. Ch1 and turn. (14)
3. 2 SC in first st, 1 SC in next 12 st, 2 SC in last st. Ch1 and turn. (16)
4. 2 SC in first st, 1 SC in next 14 st, 2 SC in last st. Ch1 and turn. (18)
5. 2 SC in first st, 1 SC in next 16 st, 2 SC in last st. Ch1 and turn. (20)
6-20. 1 SC in each st across. Ch1 and turn. (20)
21. SC2tog, 1 SC in next 16 st, SC2tog. Ch1 and turn. (18)
22. SC2tog, 1 SC in next 14 st, SC2tog. Ch1 and turn. (16)
23. SC2tog, 1 SC in next 12 st, SC2tog. Ch1 and turn. (14)
24. SC2tog, 1 SC in next 10 st, SC2tog. Ch1 and turn. (12)
25. 1 SC in each st across. Ch1 and turn. (12)
26. 2 SC in first st, 1 SC in next 10 st, 2 SC in last st. Ch1 and turn. (14)
27. 2 SC in first st, 1 SC in next 12 st, 2 SC in last st. Ch1 and turn. (16)
28-35. 1 SC in each st across. Ch1 and turn. (16)
36. SC2tog, 1 SC in next 12 st, SC2tog. Ch1 and turn. (14)
37. SC2tog, 1 SC in next 10 st, SC2tog. Ch1 and turn. (12)
38. SC2tog, 1 SC in next 8 st, SC2tog. Ch1 and turn. (10)
39. 1 SC in each st across. FO and weave ends. (10)
Make a second panel. One panel is your front piece and the second panel is your back piece. Before joining the two panels together, you will need to make the features for the front side.
Belly:
1. With White yarn and 5.0mm hook, 8 SC into MR. Sl st join to first st and Ch1. (8)
2. 2 SC in each st around. Sl st join to first st and Ch1. (16)
3. 2 SC in first st, 1 SC in next st. Rep around. Sl st join to first st and Ch1. (24)
4. 2 SC in first st, 1 SC in next 2 st. Rep around. Sl st join to first st and Ch1. (32)
5. 2 SC in first st, 1 SC in next 3 st. Rep around. Sl st join to first st and Ch1. (40)
6. 2 SC in first st, 1 SC in next 4 st. Rep around. Sl st join to first st and FO. Leave a long tail for attaching. (48)
Face:
1. With White yarn and 5.0mm hook, Ch12. SC in 2nd ch from hook and next 3 ch. Sl st into each of the next 3 ch. SC in each of the remaining 4 ch. Ch1 and turn. (8 SC and 3 Sl st)
2. SC in the first 4 st. Sl st in the next 3 st. SC in the last 4 st. Ch1 and turn. (8 SC and 3 Sl st)
3-6. Rep #2.
7. SC around. FO and leave a long enough tail for attaching.
Eyes:
1. Attach safety eyes at Rows 4-5 of the Face section.
2. Use black yarn and embroider eyebrows.
Nose:
Wings (make 2):
Scarf:
1. With Green yarn and 5.0mm hook, Ch 71. SC in 2nd ch from hook and across. FO and weave ends.
Feet (make 4):
You will make 4 feet. Whipstitch 2 together to make 1 foot.
1. With Yellow yarn and 4.0mm hook, Ch4. SC in 2nd ch from hook and next 2 ch. Ch1 and turn. (3)
2. 1 SC in each st across. Ch1 and turn. (3)
3. 2 SC in first st, 1 SC in next st, 2 SC in last st. Ch1 and turn. (5)
4. 1 SC in each st across. Ch1 and turn. (5)
5. *3 DC in first st, sl st in next st,* rep from * to * one more time. 3 DC in last st. FO and leave a long enough tail to whipstitch together.
Hat:
1. With Red yarn and 5.0mm hook, 6 SC into MR. Sl st join to first st and Ch1. (6)
2. 2 SC in each st around. Sl st join to first st and Ch1. (12)
3. 2 SC in first st, 1 SC in next st. Rep around. Sl st join to first st and Ch1. (18)
4. 2 SC in first st, 1 SC in next 2 st. Rep around. Sl st join to first st and FO Red yarn. Join White yarn and Ch1. (24)
5. With White yarn, 2 SC in first st, 1 SC in next 5 st. Rep around. Sl st join to first st and Ch1. (28)
6-8. 1 SC in each st around. Sl st join to first st and Ch1. At the end of Round 8, FO White yarn and join Red yarn. (28)
9. With Red yarn, 1 SC in each st around. Sl st join to first st and Ch1. (28)
10. 1 SC in each st around. Sl st join to first st and FO. Leave a long enough tail for attaching the hat to the top of the Penguin's head. Weave any ends. (28)
Pompom:
1. With Red, White and Green yarn held together, I wrapped it 15-20 times around 3 fingers. Tied double knot in the center and then trimmed with scissors.
Assembly:
1. Attach the belly to the center body section.
2. Attach eyes, nose and eyebrows to face section; then attach face to the head portion.
3. Whipstitch or SC your front and back panels together. As you close the bottom, insert feet to close up feet between the 2 panels. Before finishing off, add Poly-fil. Lightly stuff.
4. Attach wings on each side of the body.
5. Wrap scarf around neck and tie off.
6. At the top, I used a tapestry needle and Black yarn to add hair. Just insert in stitch and tie in a double knot. Make as much or as few hair strands you want. I made mine about 1/2" long.
7. Attach hat. I attached mine on the right side of the head.
Super cute and easy project to complete in one evening.
