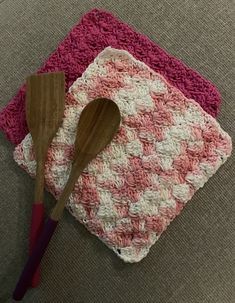
Crochet Bean Stitch Dishcloth

If you're looking to add a touch of handmade charm to your kitchen, trying out a Crochet Bean Stitch Dishcloth could be a fun and creative project for you! This versatile stitch creates a lovely texture that is not only great for scrubbing but also adds a cozy feel to your space. The dishcloth can be customized in various colors to match your kitchen decor or make a thoughtful gift for a friend.
With some yarn, a crochet hook, and a bit of patience, you'll be weaving your way to a beautifully textured dishcloth in no time. So grab your supplies, put on some music, and enjoy the therapeutic rhythm of crochet as you create a practical and beautiful addition to your home. Happy crocheting!Abbreviations (US)
- ch(s): chain(s)
- pm: place marker in the last st worked
- rep: repeat
- rnd(s): round(s)
- sl st(s): slip stitch(es)
- sp(s): space(s)
- st(s): stitch(es)
- yo: yarn over
Special Stitch
Bean: Insert your hook into a st. Yo and pull up a loop (2 loops on hook). Yo, insert your hook in the same st, pull up a loop (4 loops on hook). Yo, insert your hook in the same st, pull up a loop (6 loops on hook). Yo and pull through all 6 loops. Ch 1 to close.
For step out photos of the bean stitch, you can check out the bean stitch tutorial over at Stitching Together.
Materials
- Crafter’s Secret Cotton Weight 4 Medium (100% Cotton, 120yds/110m, 2.5oz/71g) Mango Stonewashed 1 skein
- Size H/8 5mm crochet hook
- Scissors
- Tapestry needle for weaving in ends
- Optional: Stitch Markers
Finished Size
6.5″ x 6.5″
Gauge
6 rnds in pattern = 4″ x 4″
Remember that each bean st is finished with a ch 1, then in each corner you work another ch 1. Essentially you are working 2 chs in a row. So, it may be easier to think to yourself with each corner, pull the hook through all 6 loops, then ch 2.I found that mentally adding the chs together helped me not to miss any as I worked up the pattern.
Pattern
Magic circle, ch 1 to secure.
Rnd 1: Working into the magic circle, (bean, ch 1, pm) 4 times. You should have 4 bean sts. Sl st to the top of the first bean. Ch 1 and turn.
Rnd 2: In each ch-1 sp, (bean, ch 1, pm, bean). You should have 8 bean sts. Sl st to the top of the first bean st. Ch 1 and turn.
Rnd 3: *Work 1 bean st in between the 2 bean sts below. In the ch-1 sp, (bean, ch 1, pm, bean). Rep from * around. You should have 12 bean sts. Sl st to the top of the first bean st. Ch 1 and turn.
Rnd 4-10: *Work 1 bean st in between bean sts across. In the ch-1 corner sps, (bean, ch 1, pm, bean). Rep from * around. Each rnd you will add 4 bean sts and end up with the following counts: 16, 20, 24, 28, 32, 36, 40 beans. Sl st to the top of the first bean st. Ch 1 and turn.
Cut yarn, fasten off, and weave in ends.
Note: If your project slightly puckers as you work the final rounds, that’s okay! Cotton yarn stretches, and this project will be well used, flattening out quickly.
