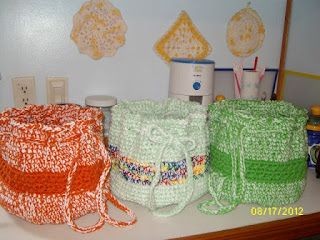
Crochet Drawstring Bags and Backpacks

Crochet drawstring bags and backpacks are not only practical but also a fun and creative way to express your personal style. With endless possibilities for colors, patterns, and designs, you can easily customize these accessories to match your unique taste. Whether you're looking to create a cute mini drawstring bag for your essentials or a spacious backpack for your adventures, crochet offers a versatile and charming option.
The beauty of these handmade pieces lies in the love and effort put into each stitch, making them not just accessories, but also meaningful items that you can cherish for a long time. So, grab your hooks, pick your favorite yarn, and let your imagination run wild as you craft your own crochet drawstring bags and backpacks that reflect your personality and creativity!K Hook
Sts Used: sc, hdc, X st, sl st
WW yarn - 2 strings held together throughout pattern
NOTE 1: ch 1 does NOT count as st. ***ALWAYS work 1 sc
in ch 1 space as 1st st
NOTE 2: you can do this pattern without changing colors, I just listed the changes I did in order to show you where to make the changes if desired
Color A:
Row 1: ch 4, join to form ring, ch 1, 8 sc in ring, join (8 sts)
Row 2: ch 1, 2 sc in each st around, join (16 sts)
Row 3: ch 1, *1 sc in next st, *2 sc in next st, *Repeat around (24 sts)
Row 4: ch 1, *1 sc in next 2 sts, *2 sc in next st, *Repeat around (32 sts)
Row 5: ch 1, *1 sc in next 3 sts, *2 sc in next st, *Repeat around (40 sts)
Row 6: ch 1, *1 sc in next 4 sts, *2 sc in next st, *Repeat around (48 sts)
Row 7: ch 1, *1 sc in next 5 sts, *2 sc in next st, *Repeat around (56 sts)
Row 8: ch 1, *1 sc in next 6 sts, *2 sc in next st, *Repeat around (64 sts)
Row 9: ch 1, *1 sc in next 7 sts, *2 sc in next st, *Repeat around (72 sts)
Row 10: ch 1, *1 sc in next 8 sts, 2 sc in next st *Repeat around (80 sts)
Row 11-17: ch 1, 1 sc in each st around, join (80 sts)
Color B:
Row 18: ch 1, 1 sc in each st around, join
Row 19: ch 2, skip first st, 1 hdc in next st, 1 hdc in st just
skipped (X st completed) *Repeat around, join
Row 20: Repeat row 18
Row 21: Repeat row 19
Row 22: Repeat row 18
Color A:
Row 23-28: Repeat row 17
Row 29, ch 1, *1 sc in next 2 sts, ch 2, skip 2 sts, 1 sc in next 2 sts, *Repeat around, join
Row 30: ch 1, *1 sc in each st, 2 sc in ch 2 space, *Repeat around
Row's 31-32: ch 1, 1 sc in each st around, Join
Row 33: ch 1, [sl st, ch 1] in each st around, join & fasten off
**NOTE: 2 Options for finishing cords. As you can see from photo I made
backpacks, however my next one I'm using the purse cords instead
BackPack Cord: {LOOK AT PHOTO FOR CORD PLACEMENT}
ch 170, sl st in each st, finish off with long tail
with FRONT facing you, Weave through opening on
row 30 to center back on both sides, Now take boths
ends down "back" to beginning of row 18, slip one
end through to wrong side, now do the same with
the other end making sure to have maybe 2 or 3 sts
in-between the 2 cords, secure firmly together
inside the bakpack, turk in tails
Purse Tie Cords: Make 2
ch 130 leaving long cords
Weave 1 cord through opening on row 18 attach ends together,
weave 2nd cord opposite of first cord, attach ends together
gentle pull both cords opposite of eachother and tie into a
lovely bow at top of bag, OR slips both cords over your shoulder
and use as a "BIG" purse
