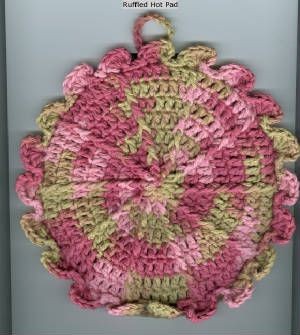
Crochet Ruffled Hot Mat

If you enjoy adding a touch of whimsy to your kitchen decor, a Crochet Ruffled Hot Mat is a delightful choice! Not only does it protect your countertops from hot pots and pans, but it also adds a charming and cozy vibe to your kitchen space. The ruffled edges give it a playful and elegant look that will surely catch the eye of anyone setting foot in your kitchen.
Whether you crochet it in bright, cheerful colors or opt for more subdued hues, this hot mat is a fun and practical addition to your culinary arsenal. So, grab your crochet hook, pick out your favorite yarn, and get ready to stitch up a lovely and functional accessory for your kitchen that will make you smile every time you use it!Materials: Worsted Weight Cotton Yarn. Peaches & Crème, about 2 ounces. I used variegated for both sides of this mat; and a G hook.
Finished Size: The surface inside the ruffles of the Mat holds a six inch dish.
The double thickness is joined so that the outside ruffles stand-up and make a rim around the dish.
FRONT: Chain 3, join with a sl st to form a ring.
Rnd 1: Ch 3, work 9 dc in the ring. Join with a sl st to the top of the first ch-3. (10 dc total).
(FPDC = Front Post Dc)
Rnd 2: Ch 3, FPDC around the post of the dc directly below, (dc in the next dc, FPDC around the post of the same dc) around. Join with a sl st in the top of the 1st ch-3. (20 sts).
Rnd 3: Ch 3, dc in the next FPDC, work a FPDC around the same FPDC, (dc in the next dc, dc in the next FPDC, work a FPDC around the same FPDC) repeat 9 times. Join with a sl st in the top of the 1st ch-3 (30)
Rnd 4: Ch 3, dc in the next dc, dc in the next FPDC, work a FPDC around the same FPDC, (dc in the next 2 dc, dc in the next FPDC, work a FPDC around the same FPDC) repeat 9 times. Join with a sl st in the top of the 1st ch-3. (40)
Rnd 5: Ch 3, dc in the next 2 dc, dc in the next FPDC, work a FPDC around the same FPDC, (dc in the next 3 dc, dc in the next FPDC, work a FPDC around the same FPDC) repeat 9 times. Join with a sl st in the top of the 1st ch-3. (50)
Rnd 6: Ch 3, dc in the next 3 dc, dc in the next FPDC, work a FPDC around the same FPDC, (dc in the next 4 dc, dc in the next FPDC, work a FPDC around the same FPDC) repeat 9 times. Join with a sl st in the top of the 1st ch-3. (60)
Rnd 7: Ch 3, dc in the next 4 dc, dc in the next FPDC, work a FPDC around the same FPDC, (dc in the next 5 dc, dc in the next FPDC, work a FPDC around the same FPDC) 9 times. Join with a sl st in the top of the 1st ch-3. (70)
Rnd 8: Ch 3, dc in the next 5 dc, dc in the next FPDC, work a FPDC around the same FPDC, (dc in the next 6 dc, dc in the next FPDC, work a FPDC around the same FPDC) 9 times. Join with a sl st in the top of the 1st ch-3. (80)
(FLO = Front Loops Only)
Rnd 9: Ch 1, sc in the same dc, sl st in FLO in the next 4 dc, ch 3, work 5 more dc in the FLO of the same dc (5 total dc). (Sl st in the next 4 dc, ch 3, work 4 more dc in the same dc) around. Join with a sl st to the 1st sc. Finish off and weave in ends.
BACK: Use the same color as for the Front or a contrasting color.
Working in Rounds - -
Rnd 1: Ch 3, join to form a ring. Work 11 dc in the ring. Join with a sl st in the 1st ch-3 made. (12 dc total).
Rnd 2: Ch 3, work 2 dc in each dc around. Join as before.
Rnd 3: Ch 3, dc in the same dc, (dc in the next dc, 2 dc in the next dc) around. Join as before.
Rnd 4: Ch 3, dc in the same dc, (dc in the next 2 dc, 2 dc in the next dc) around. Join as before.
Rnd 5: Ch 3, dc in the same dc, (dc in the next 3 dc, 2 dc in the next dc) around. Join as before.
Rnd 6: Ch 3, dc in the same dc, (dc in the next 4 dc, 2 dc in the next dc) around. Join as before.
Rnd 7: Ch 3, dc in the same dc, (dc in the next 5 dc, 2 dc in the next dc) around. Join as before.
Rnd 8: Ch 3, dc in the same dc, (dc in the next 6 dc, 2 dc in the next dc) around. Join as before. Finish off and weave in ends.
JOINING:
Rnd 9: With Wrong sides together, and holding with the front facing you, join with a sl st in any st. Working through both thicknesses, ch 1, sc in the same st, (sc in the back loops only of each front and into the corresponding loop of the back piece) around. Join with sl st in the first sc. Finish off and weave in all ends.
If you would like a Hanging Loop: In any stitch on round 9, chain 14, sl st in the same st and continue with pattern.
