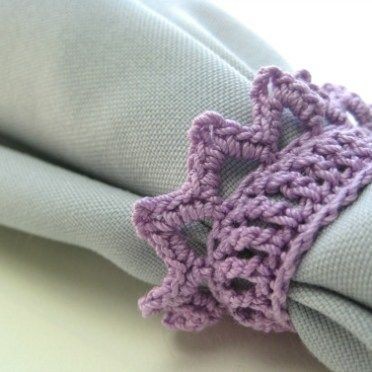
Crochet Lacy Cord Holders

If you're looking for a unique way to keep your cords organized and stylish, crochet lacy cord holders might just be the perfect solution! These charming accessories not only prevent your cords from getting tangled but also add a touch of handmade elegance to your space. With a few basic crochet stitches and some colorful yarn, you can create customized cord holders that reflect your personal style.
Whether you're a seasoned crocheter or a beginner looking for a fun project, crafting lacy cord holders is a great way to add a personal touch to your home or office. So grab your crochet hook and get ready to bring a little extra flair to your everyday tech accessories!What you need
US 1 / 2.35 mm crochet hook
Small amount of size 10 crochet thread
Instructions
Variation 1
Row 1: ch24, join w/sl-st to first ch being careful not to twist.
Row 2: ch2, sc in same ch, sc in each ch around, join w/sl-st to first sc [24 scs]
Row 3: ch3, trc in same sc, trc in each sc around, join w/sl-st to first trc [24 trcs]
Row 4: ch2, sc in same trc, sc in each trc around, join w/sl-st to first sc [24 scs]
Row 5: (ch5, skip next 2scs, sl-st in next sc) around, ch5, join w/sl-st to base of first ch5 [8 ch5 loops]
Row 6: sl-st into ch5 space, ch2, (sc, hdc, dc, ch2, dc, ch3, dc, ch2, dc, hdc, sc) in same sp and in each ch5 space around, join w/sl-st to first sc.
Finishing: Break off and weave in ends. For best results, block by wetting thoroughly and pinning points in place and shaping ring by hand, then leave pinned to dry completely.
Variation 2
Rows 1-4: Follow Variation 1 pattern.
Row 5: (ch5, skip next sc, sl-st in next sc) around, ch5, join w/sl-st to base of first ch5 [12 ch5 loops]
Row 6: sl-st into ch5 space, ch2, (3sc, ch3, 3sc) in same ch5 sp and in each ch5 space around, join w/sl-st to first sc.
Finishing: Break off and weave in ends. For best results, block by wetting thoroughly and pinning points in place and shaping ring by hand, then leave pinned to dry completely.
