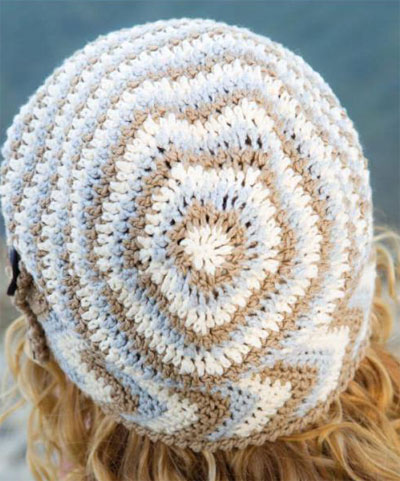
How to Crochet Unique Women's Hats for Winter

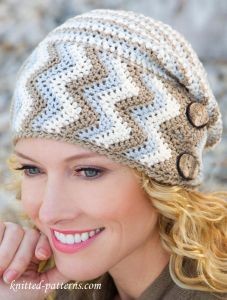
Crocheting women's hats is not just a creative endeavor but a way to add a personal touch to your winter wardrobe! The beauty of crocheting a hat is the ability to make it unique to your style, whether you prefer a classic beanie or a slouchy design. The soft yarn gliding through your fingers can be a soothing and satisfying experience, leading to a cozy and fashionable accessory at the end of your crafting journey. From choosing the perfect colors to adding embellishments like pom-poms or buttons, there's endless room for creativity in crocheting women's hats. So grab your crochet hook, pick out your favorite yarn, and get ready to make a hat that not only keeps you warm but also showcases your individual flair!
Finished Sizes
Instructions given are for woman's small; changes for large are in [ ].
Finished Measurements
Circumference: 20 [22] inches
Height: 10 [11] inches
Materials
- Universal Yarn Bamboo Pop light (DK) weight bamboo/cotton yarn (3 1/2oz/292 yds/100g per ball); (3):
- 1 ball each #102 cream, #110 sand and #115 silken
- Size H/8/5mm crochet hook or size needed to obtain gauge
- Tapestry needle
- 1-inch wood buttons: 2
- Locking stitch markers
Gauge
In pattern stitch: 16 sts = 4 inches; 14 rows = 4 inches
Pattern Notes
Weave in loose ends as work progresses.
Join with slip stitch as indicated unless otherwise stated.
Use stitch marker to mark beginning of rounds and move up as each round is completed.
Chain-3 at beginning of round counts as first double crochet unless otherwise stated.
Chain-1 at beginning of round counts as first single crochet unless otherwise stated.
Pattern Stitch
Rnd 1: Ch 3 (see Pattern Notes), sc in next st, [dc in next st, sc in next st] around.
Rnd 2: Ch 1 (see Pattern Notes), dc in next st, [sc in next st, dc in next st] around.
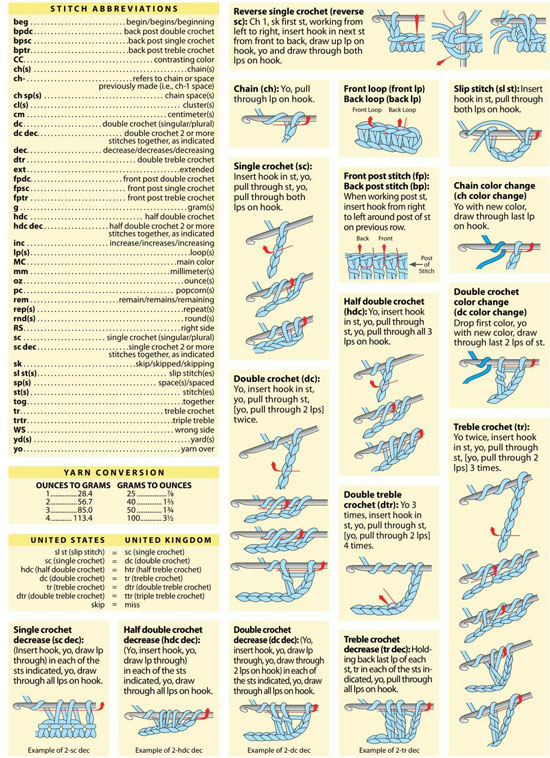
Special Stitch
Single Crochet Join (sc join): Place slip knot on hook, insert hook in indicated stitch, yo and pull up a loop, yo and draw through both loops on hook.
Hat
Band
Row 1 (RS): With sand, ch 24, 2 sc in 2nd ch from hook, sc in each of next 4 chs, sk next 2 chs, sc in each of next 4 chs, 3 sc in next ch, sc in each of next 4 chs, sk next 2 chs, sc in each of next 4 chs, 2 sc in last ch, turn. (23 sc)
Rows 2 & 3: Ch 1, 2 sc in first sc, sc in each of next 4 sc, sk next 2 sc, sc in each of next 4 sc, 3 sc in next sc, sc in each of next 4 sc, sk next 2 sc, sc in each of next 4 sc, 2 sc in last sc, change color (see Stitch Guide) to cream in last sc, turn.
Rows 4 & 5: Rep rows 2 and 3, at end of row 5, change color to silken.
Rows 6 & 7: Rep rows 2 and 3, at end of row 7, change color to sand.
[Rep rows 2-7] until piece measures 21 [23] inches, ending with row 2, 4 or 6.
Note: If piece ends with row 4 or 6, change color to sand at end of next row.
Next row (RS): Ch 1, sc in first sc, sk next sc, hdc in each of next 2 sc, dc dec (see Stitch Guide) in next 4 sc, hdc in each of next 2 sc, sc in next sc, sk next sc, sc in next sc, hdc in each of next 2 sc, dc dec in next 4 sc, hdc in each of next 2 sc, sk next sc, sc in last sc, change color to sand as needed, turn. (4 sc, 8 hdc, 2 dc)
Edge
Row 1 (RS): Working in ends of rows of bottom edge, work sc evenly across to row 1, working on opposite side of foundation ch, sc in each ch across, do not turn.
Row 2 (RS): Reverse sc (see Stitch Guide) across short and bottom edges. Fasten off.
Body
Getting started: Overlap short ends approximately 1 inch to form a circle. Hold Band with unworked ends of rows facing.
Set-up row: Working in ends of rows and in both thicknesses where ends overlap, sc join (see Special Stitch) sand in any row in unworked edge, work 79 [89] sc evenly around, change color to cream, join (see Pattern Notes) in beg sc, place marker (see Pattern Notes). (80 [90] sc)
Rnd 1: Work rnd 1 of Pattern St (see Pattern Stitch), change color to silken, join in top of beg ch-3. (40 [45] dc, 40 [45] sc)
Rnd 2: Work rnd 2 of Pattern St, change color to sand, join in beg ch-1. (40 [45] sc, 40 [45] dc)
Rep rnds 1 and 2 of Pattern St, changing colors as established in Band, until piece measures 8 [8 3/4] inches from bottom edge of Band.
Crown
Getting started: Place marker on first st, [sk next 15 [17] sts, place marker on next st] 4 times.
Continue working in Pattern St, moving markers up as each rnd is completed, and changing colors as established. (5 markers)
Rnd 1: Work first st of next row of Pattern St, sc dec (see Stitch Guide) in next 2 sts, *work in Pattern St to last 2 sts before next marked st, sc dec in last 2 sts, work next st in Pattern St in marked st, sc dec in next 2 sts, rep from * around, ending last rep at **, sc dec in last 2 sts, join in beg st. (70 [80] sts)
Rnds 2-7 [8]: Rep rnd 1. At end of last rnd, leaving a long tail, fasten off. (10 [10] sts)
Finishing
Weave tail through last rnd, pulling tightly to close. Secure end. Working through both layers, sew buttons close to overlapping edge.